

You are using an out of date browser. It may not display this or other websites correctly.
You should upgrade or use an alternative browser.
You should upgrade or use an alternative browser.
My ProjecTee
- Thread starter DonnyRay
- Start date
DonnyRay
Well-Known Member


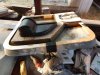
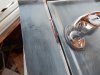
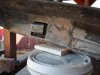
 The top photos shows where i plan to place the cupholder/ storage pocket on the door. The middle photo shows the encapsulation of the cup holder/storage pocket. The bottom photo show the door latch assembly ( the top piece is going to be removable to access the door handle ). The cupholder/storage pocket is captured in fiberglass. I had doubts about the resin adhering to the plastic cupholder/storage pocket. I DO KNOW fiberglass will adhere to fiberglass.
Last edited:


DonnyRay
Well-Known Member
Thanks Spanky , Dwsatt & Rbswelder. I'm very pleased with the results. I use angle iron & 3" wide fiberglass tape to make my angleglass. Think "V " shaped fiberglass. I use 3 layers of the 3" fiberglass tape. I also use an aerosol can containing a non-stick chemical which i purchase from Tap Plastics.
Last edited:


I've always considered fiberglass an art... one I have never mastered, mainly because of the variables (temp, time, volumes, hardeners, etc...)
Even after having watched a plethora of YouTube videos, the process was touchy when I redid my floor.
I ended up grinding off the bad parts and redoing a few spots.
Even after having watched a plethora of YouTube videos, the process was touchy when I redid my floor.
I ended up grinding off the bad parts and redoing a few spots.
DonnyRay
Well-Known Member
I use about 55 percent of the required hardener. The resin i use requires 10 drops of hardener per 1 ounce of resin. 5 drops of hardener would be half of the required amount' I would use 7 drops. 5 drops ( half the required amount ) & 2 more. In 2 ounces of resin i would use 10 drops + 2 or 3 more drops. With the local temperatures being close to 100 degrees , this method gives me about 20 minutes to lay my glass. The resin mixture will set up in about 1 1/2 hours. It's thoroughly cured in 24 hrs ( from the time you originally laid the glass ). TAP plastics has some resin that's called SLOW RESIN . It will work when the ambient temperature is as low as 40 degrees. PS: By using less hardener , i am increasing my time to lay up the fiberglass. If you get in a hurry ; you make mistakes & end up with a sloppy job. The drawback to increasing your working time is , you also increase your curing time. Hope this helps.


DonnyRay
Well-Known Member
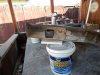
Thanks Spanky & James Louis. Here's some more photos : The striker plate has been located in the door well. I used black silicone glue to hold the striker plate ( temporarily ) in place. When the black silicone glue sets up , i'll open the door & mark around the striker plate. Then i'll remove the striker plate & cut out where i previously marked. I plan to countersink the striker plate.
Attachments
choppedtop
Well-Known Member
I some times use modeling clay to hold things in place for marking and fit.
DonnyRay
Well-Known Member
I removed the door from the door well. I removed the black silicone excess from around the striker plate. I marked around the striker with a fresh ( new ) black sharpie. I removed the striker plate from the door well. Tomorrow i'll drill 6 holes in the striker plate ( with my drill press ). I'll spray pol - ease 2300 on the striker plate. Then countersinking the striker plate will begin. PS: The recessed pocket in the striker plate was made by using C CHANNEL. The dimensions of the c channel are : 1 in. Wide x 1/2 in. Tall X 2 in. Long x 1/8 in. Thick .


DonnyRay
Well-Known Member
More chainsaw progress photos: I added a pull start handle. So far , i have 2 colors on it.
 The 2 grab handles are going to be black. The gas filler cap is blue ( came from an "agua fina" water bottle ). I have light orange colored ( stick on letters ) they will spell out , " KILS ALL ". They will be attached to the cover.
I added a pull start handle. So far , i have 2 colors on it. The 2 grab handles are going to be black. The gas filler cap is blue ( came from an "agua fina" water bottle ). I have light orange colored ( stick on letters ) they will spell out , " KILS ALL ". They will be attached to the cover.Similar threads
