Ron Pope Motorsports                California Custom Roadsters               

A bit of progress

choppinczech

Well-Known Member
I finally finished mounting my radiator and making my fan shroud. Which allowed me to set the engine and trans back 1 1/8" to 7-18-14.JPG 7-19-14 5.JPG 7-19-14 8.JPGwhere it should be. I've been having to look at my mock up engine set too far forward for weeks and it was driving me nuts. I should have a 1 1/4" gap between a short water pump and the fan.

I'm also changing my trans crossmember. I'm running oval exhaust tubing under the body and it'll pass through the crossmember. I'll finish welding it up tomorrow.
 
Got the crossmember tacked in.
frame.JPG

Gonna start working on an under dash 90° brake setup next. I've got lots of room under there.
inside.JPG

side view.JPG
 
You should enter this in the LA Roadster Show when it's done. Your level of expertise is far beyond average and this is definitely a world class rod in the making. Nice work.
 
A real 21st Century version of Henry's T. Keep up the good work.

Jim
 
That looks very nice. Did you make that fan shroud?

Yes. It's made like the car audio guys do their speaker boxes.


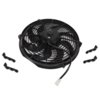
I started with whittling the mounts and flared flange off of one of these Zirgo 14" 2785 CFM fans.

14 fan.jpg
The MDF mold was made up of the rectangular base the size of the radiator's core (minus the thickness of the finished fiberglass). The inner circular ring just under 14". Then I stretched masking tape from the ring to the base.


Covered with 8 layers of 8.8 oz. Modified Twill E-glass gave it a super strong thickness of 1/8".


This is a small radiator. So I want to pull 100% of air through the core.


7-19-14.JPG
 
That windshield frame is what peaks my interest

This is a pic of the windshield frame I found on TheSamba.com. It's from a '67 Bug Convertible. I chopped it 4 1/2". My body was already widened 8 1/2" way back in the beginning so the width of the windshield frame was perfect.

This steel frame was just for the mold plug though.

Cowl extension.jpg


The final frame is glass. Filled with epoxied steel rod and glass.

5-16-13 4.jpg

6-23-13.JPG

6-23-13 3.JPG
 
Been working on my under dash brakes.

As usual, I'm not satisfied with what's out there that fits within my budget. And I'm also not willing to fork out $500+ for one that may not even fit under my cowl.

So I made one that fits the dimensions of my car.

8-17-14.JPG

Works real smooth. 4:1 ratio for power brakes.

8-17-14 2.JPG
 
Thanks guys.
 

     Ron Pope Motorsports                Advertise with Us!     
Back
Top