Ron Pope Motorsports                California Custom Roadsters               

Extending the height of the side of the body?

AltBantam

Active Member
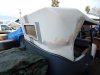
So I bought sheet of Advantech OSB for the floor and cut out the floor using the method shown in the "Installing Floorboard in a Fiberglass Body" video. I then placed the floor on the frame to precut for the bellhousing and transmission. I set up the body as the video showed. A t bucket and Bantam are cousin right? It should work, right? Maybe in a perfect world. From what I have learned working on this project, there is no such thing... That said, first, I found the bottom of the body was trimmed poorly when removed from the molds. Not sure when the body was made, but it must have been the first time the guy did it. There is a quarter inch difference between the two sides. Also, the trimming is not straight, or near straight. Both sides have high and low spots, not at the same locations as the other side. No problem, I just raised the floor to compensate. Now, while the firewall on the is about 25" at the center, the sides are closer to 21". With the floor lifted several inches, the sides are now shy of 18". This is less than I wanted. So question. How can I lengthen the bottom of the fiberglass body keeping the added on part strong enough to mount the floor. Will simply adding a few layers of fiberglass be enough? I was thinking about gluing or bondoing something like nail plates to the existing body. Once hardened, I will add 2 or 3 lays of mat. Retrim correctly. Bondo the outside flush with the existing body. Attach floor to extended body. But will the metal plates hold? I would like to add 2 to 3 inches to the existing body if possible. Any thought? Has this been done? Thanks.
 
Instead of nail plates, use expanded metal. You can get it in lengths that would go the whole side of the body. Definitely fair the existing glass on BOTH sides, put a couple of layers on the inside. Use an epoxy resin or 'Bondo' to glue the metal to the body above the mating area. then a few more layers over the metal.
 
Also, though I'm not sure of the Bantam body, but Model T bodies taper in at the bottom 'frame rail' area, so this means your floor will snug-in toward the taper of the body. I actually chamfered the edges of my floor after it was cut out to take advantage of this feature.
 
HenrysT, I have some expanded metal, not enough to glass into the full side if the body. I plan to cut out the doors. Climbing into the car would be tough for me, impossible for my wife. But due to the passenger section of the Bantam body being shorter than a bucket body, I could extend the metal up on either side of the door. When you say “fairing” are you talking about sanding down the glass to overlap the new glass over? Or adding filler to the expanded metal before glassing over it?

Spanky. The sides of the Bantam body taper inwards like a t bucket, though maybe not as much. I planned to use a filler between the wood and the side of the body after glassing in the top before glassing the bottom. I am open to other methods…
 
Yes, sand the body down, try to have it as rough as possible. Try to have the fiberglass 'hairs' so the new glass will have some thing to bond to. If you have the floor right there, you might not need the expanded metal or add it to the bottom edge of the body and bend it to the floor like a piece of angle.
 
DSCN0548.JPG Start by purchasing some polypropylene sheets ( non- stick material ). Make sure the sheets are 1/8" thick. The polypropylene material will be placed on the inside of the body. You will also need some 1/4" x 1 1/2" wood ( can be found at your local lumber supply store) ( used for trim in a house). A roll of aluminum tape used for HVAC installation. Make a long horizontal cut along the length of the body ( do both sides) Determine how wide you want the body's gap to be in order to correct the problem with your bodies uneven situation. Also make a horizontal cut across the front of your firewall. Now , cut out several pieces of the 1/4" x 1 1/2" trim board. Each trin board piece need to be 2" longer than your desired gap. Mark each trim piece ( starting at the firewall & moving toward the back of the body) 1d , 2d , 3d, 4d etc. The "d" represents the driver's side of the body. On the passenger's side number the trim pieces 1p , 2p , 3p4p etc. The "p" represents passenger's side. There's a reason i want you to do the numbering. Attach the trim pieces along the outside of the body to maintain your gap space. . Starting from the passenger's side of your firewall , number the trim pieces 1f , 2f , 3f , 4f etc. After you have installed all of the trim pieces , cut out sections of your polypropylene sheets. Make then 1 1/2" wider than your gap . You can tape the sheets of polypropylene the whole length of each of your 3 gaps. Now remove all of your 1/4" x 1 1/2" trim pieces ( one at a time) & cover the front of them with aluminum hvac tape & re-mark the outside of the tape with the number of the trim piece it is attached to. Place the trim pieces on the backside of the polypropylene sheets, Using the same screw holes ; reattach the trim pieces to the backside of the polypropylene sheets ( do these trim pieces one at a time). You can leave the masking tape attached to the polypropylens sheets. When you finished doing this to all 3 gaps , cut out some strips of 2 oz fiberglass to fit exactly inside your gaps. From the outside of the body , Apply 2 layers of the 2oz mat inside your gaps. When the resin sets up ( in all 3 of your gaps), remove the 1/4" x 1 1/2" trim pieces & the polypropylene sheets. On the inside of your body (on the backside or your very long patch). Cut out some 2oz fiberglass strips 3" wider than your gap ( remove any high spots that might have been caused by your patch work). You can use a hand held grinder with a flappy disc to make quick work of this task. Once you have precut your fiberglass strips ( make sure you have enough to glass in 2 layers of the 2oz for each of your 3 gaps) You can do one gap at a time if it's easier for you. When the fiberglass patch work sets up , you are FINISHED !!
 
Last edited:
PS: This is the way I would do this task. Remember , there is more than one way to skin a cat. This is MY way. My photos above are to show you MY finished product. I hope my instructions will help you reach your goal.
 
DSCN1546.JPG More information for AltBantam. This diagram is how the finished job should look.
 
Last edited:
PS: Before you glass in your inside patch , cover all of your outside screw hole with a piece of Aluminum hvac tape. This will prevent resin from running down the outside of your body.
 
AltBantam, can't go wrong with Donny Rays or Old Round Farts advice. I used the same method that Donny Ray talks about to widen and stretch my body. Widened 3" and lengthened 5". T-Bucketplans.com is an e book written by Chester Greenhalgh. (RIP) I used some of his plans early on. I also followed Bob Hamiltons Streetrod 101 videos before I joined the group. There are 2 that I used early on. "Fiberglass body modifications" & "fiberglass body work and paint" available at StreetRodPlans.com – The Smart, Easy Way to "Build it Yourself" on a Budget!
 
WOW !! Thanks for the huge compliment CheapT. I do my best to help out whenever i can. That's what we are all about.
 
DonnyRay, I did not think about cutting the body near the bottom then adding an extra two or three inches. But, I'm not sure that will work with the Bantam's side. If you look at the image below, there is a large scalloped area which runs along most of the side of the body. It's sort of like the early 1950's Corvettes, though larger. I would have to recontour the curved area behind the door cutout if I added several inches there, which might note be easy. The area below is only about an inch or so... not sure if that would be enough to cut. HenrysT's idea, if I understood it, might work better. With the wood floor laying flat and the body sitting so the front is sitting on the floor but the rear beginning at the rear fender is raised nearly two inches, I get about 21" at the rear of the door. About half of the side is in contact with the current body. That area will be bonded then glassed to the floor. The rear section which doesn't touch the body, I will add four layers of glass inside and three layers outside wrapping under floor. I may add another two layers outside and extend them below the floor to be cut and shape later to give the body a channeled look. Of course, both the top and bottom of the floor will be glassed to seal the floor completely. Does this sound strong enough?

Side profile.png
 
I think if I was doing it I would make a cut just above the bead detail on the bottom of the body and add the desired amount to the bottom. You could also make a mold of the bottom of the body and just have one seam to work.
 
I think John has a point: just make a skirt around the bottom of the body to make it lower and improve the stance. And . . . since channeling the body will cause the frame rails to intrude into the interior space, I recommend adding some footwells to improve pedal access and give more driving comfort. (a feature which I wish I had added to my T-bucket:thumbsdown:)
 
If you cut the body you are going to have to fix the fenders and probably the "C" shaped belt line as well depending on where you cut. All that is possible, but might be more than you want to tackle. I think your first idea of just adding to the bottom is the easiest.
 
I’ve only tinkered a bit with cutting body lines but I’d have to agree with the ORF, Spanky and 409T. If you cut the bottom that’d be easiest. You’ll have to match the arc by moving it forward and then fix from the wheel opening to the arc. Be pretty cool though. Add 3” to the body to cover the frame and cut a footwell into the floor.
 
DSCN1547.JPG Make sure the 2" x 2" x 6" trim pieces that are protruding below your body's cut line are exactly the same length as your desired gap. Then screw the bottom lip to the bottom of your trim pieces.
 
Austin Bantam Body 005.jpg Make your cut exactly in the corner which is created where the body joins the bottom lip. Save the 2 bottom lips to be re-attached later.
 

     Ron Pope Motorsports                Advertise with Us!     
Back
Top