

You are using an out of date browser. It may not display this or other websites correctly.
You should upgrade or use an alternative browser.
You should upgrade or use an alternative browser.
Four Link Adjustments
- Thread starter Mr. Fixit
- Start date


fluidfloyd
Active Member
Mr. Fixit;George,
I hate to say that I am a bit confused with one thing that you mentioned.
You state to "remove the one upper and set your pinion angle". You also said "DO NOT preload either of the uppers". Ok, my confusion is how then do you set the pinion angle without and load on either of the uppers?
When I try to set the pinion angle with the left upper, I am putting quite a bit of load on it and only seem to shift the chassis off center.
Please let me know when you are tired of me. :lol:
Thanks,
Mr. Fixit
I might have misled you so let me restate my thinking. We'll start at the point where you are ready to set the pinion angle. Now with one upper link disconnected you adjust the other upper until you get the pinion angle to where you want it. Now put the other link back in place at one end only. Now adjust it in or out until the other end lines up with your bracket hole and you can slip the bolt end by hand. The rear end should still be centered and you should be able to remove any of the 4 top bolts with just your hand. If all these things are good then you are there. You only put preload into the system when you start adjusting one link without equally adjusting the other link. Preload is just away of making the car torque steer due to high axle torque that causes the chassis to try and roll around the driveshaft. This is very common in drag racing cars and really shouldn't be an issue for most buckets. Now if you put a lot of torque to the ground and have a frame or chassis that lacks torsional rigidity then that's another ball game. As long as you get it to where you can slip the bolt with minimun effort then you'll be fine. If you're still having problems then please let me know. I'll check in tonight when I get to the house and a DSL line. Don't feel bad about asking and don't ever think you're bothering anyone here. Everybody has to learn from somebody and I just hope I can help you. 4 links for street and for racing can sometimes get confusing and in racing can drive you up the wall. I have seen the best of the best in the pro ranks become completely lost after doing it for years. So just ask away. And if anyone here has a different approach or something to add then please do. I still study this stuff because I'm an addict. Now both of our heads should be hurting. I'll keep in touch. Good luck.
George
prodesigns1@yahoo.com
fluidfloyd
Active Member
Mr. Fixit ,
After getting to the housing and re-reading your last post I realized exactly what you were saying and I now neeed to recorrect part of my statement. Once you get the lower links adjusted and the housing centered you need place a small adjustable jack under the pinion snout. Leave both upper bars disconnected and adjust the pinion angle with the adjustable jack. Once you get it where you want it then put either one of the upper links back in place by adjusting it to the new and correct length and float the bolts in. Now do the same with the other side. Now you should be adjusted and centered with zero preload. You cannot put any preload with a triangulated 4 link without moving the housing off center. Sorry about the misguided instructions. Now my brain doesn't hurt. I feel better too.
George
fluidfloyd
Active Member
Mr. Fixit; George,
Thank you so much for the comprehensive clarification. I will try again tomorrow to make some headway so that I can get back to the body build.
Mr. Fixit
My pleasure. Sorry about the confusion. Guess I really am getting hold and forgetful. If you run into any problems, you can call me at the shop. I am the head floor sweeper (Non Union position) so I can't be fired. Good luck.
George
870/269-3802
Ted Brown
Member
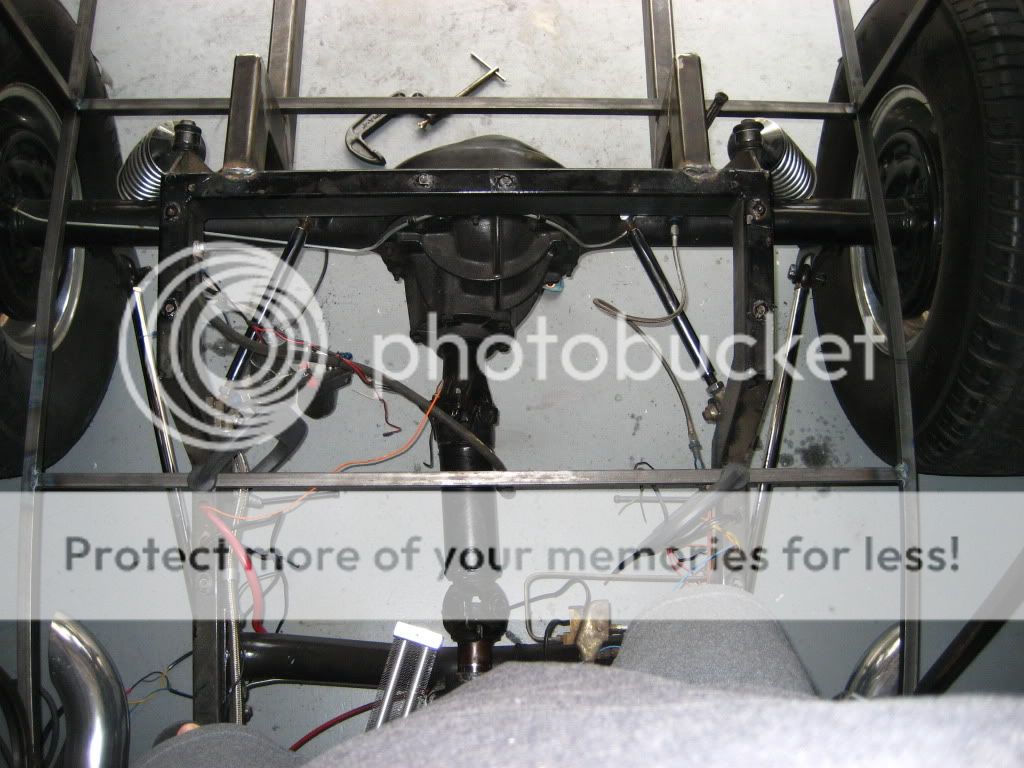
Mr. Fix, I see that your rear coils are mounted way wrong, bad angle, I would cut off all the mounts, and remount them ahead of the rear end, and inboard of the frame, not so wide, this will give the chassis a bit more leverage againest the coils and give a better ride.. I also noticed that with those short brackets for the top 4 bar links, that gives a bit too much leverage to the rear end, too easy to pull the rod mounts out of their welded positions, they should be up higher on the top of the third member, to get them farther away from the pinion turning point... Do you understand where I am coming from with this?? George is explaining the adjustment pretty well, just keep 2 stands under the frame also... 
Mr. Fixit
Member
George,
Now that makes a tremendous amount of sense to me. It's so simple, I overlooked the concept and made things harder then the had to be.
Ted,
Thanks for the added insight, I appreciate it. I will be looking at the shock mounting options too. Are you suggesting that they be mounted more vertical? By any chance, do you have any photos for visual aide purposes.
On the pinion angle issue, everything that I have read indicates a setting of 1 - 3 degrees. Do you guys agree with this? The engine and trans output shaft are level according to my digital protractor. Does this mean that I should take off the drive shaft and set the angle off of the universal joint mount of the rear at say 2 degrees?
Most all of my experience in the shop is as a machinist and fabricator, not general automotive, so these practices are giving me brain cookies.
Mr. Fixit
Now that makes a tremendous amount of sense to me. It's so simple, I overlooked the concept and made things harder then the had to be
.Ted,
Thanks for the added insight, I appreciate it. I will be looking at the shock mounting options too. Are you suggesting that they be mounted more vertical? By any chance, do you have any photos for visual aide purposes.
On the pinion angle issue, everything that I have read indicates a setting of 1 - 3 degrees. Do you guys agree with this? The engine and trans output shaft are level according to my digital protractor. Does this mean that I should take off the drive shaft and set the angle off of the universal joint mount of the rear at say 2 degrees?
Most all of my experience in the shop is as a machinist and fabricator, not general automotive, so these practices are giving me brain cookies.
Mr. Fixit
fluidfloyd
Active Member
[Mr. Fixit;
On the pinion angle issue, everything that I have read indicates a setting of 1 - 3 degrees. The engine and trans output shaft are level according to my digital protractor. Does this mean that I should take off the drive shaft and set the angle off of the universal joint mount of the rear at say 2 degrees?
All driveshaft shops will tell you to set the pinion angle equal to the transmission centerline. If the transmission is zero then the pinion should be zero. If the transmissinon is down 2 deg then the pinion should be up 2 deg. Do a google search for custom driveshafts and you will find a chart explaining it. Drag racing do it a little different but don't worry with their methods.
As to your 4 bar links and brackets. Don't change any brackets at this time. This is a street ride and not a racer. Your upper brackets will be fine. There are plenty of heavy pro-touring types of cars being built by 1st class pro shops and they put them on just like you. Check out Art Morrison or Chassisworks (Chris Alston). They have websites and I have known both of these guys for a number of years and they both do their homework.
As for your rear shocks. Yes, they do appear to be leaned in a little to much. This could be an optical illusion so you need to put your protractor against the coil spring and get an angle off the verticle. Again, I would not move anything until I had it at running weight. Then you can get a true corner weight and a required spring rate. This will vary based on spring angle and location. When you get to that point in your build then we can all discuss it. Just leaning them over or standing them up or moving them without knowing your weight requirements and the spring rates that you now have is a pure game of unknown chance. Take your time and do it right the first time.
Most all of my experience in the shop is as a machinist and fabricator, not general automotive, so these practices are giving me brain cookies.
As for your experience in the shop, well it looks to me that you have that well handled. I am looking forward to the body portion of this project. Good luck.
George
Mr. Fixit[/QUOTE]
Mr. Fixit
Member
Okay guys, with all of your help I finally got the 4 link set up, rear alignment and pinion angle resolved.
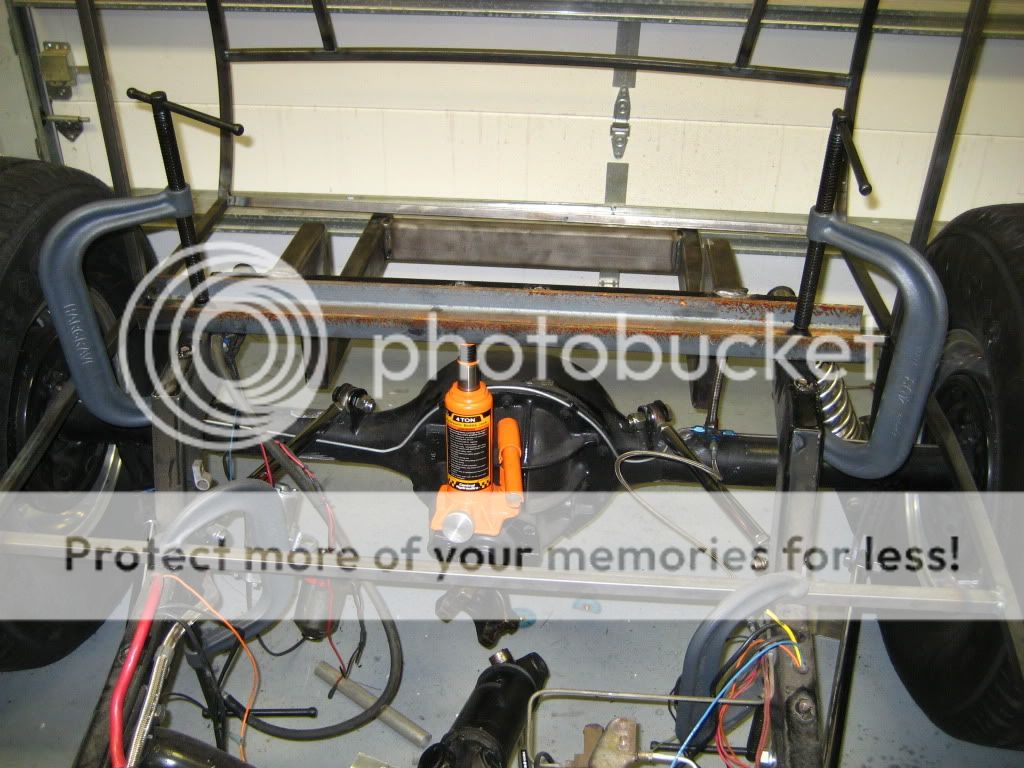
After I removed one bolt from each of the top links, the rear rolled back a bit creating a positive (up) angle on the pinion. In order to get the negative downward angle needed, I couldn't use a jack on the floor, but rather a bottle jack between the frame rails and the top of the rear as in the photo below.
I pushed the nose down to 2 degrees using a digital protractor to check the pinion when it was in the vertical position, adjusted the two top links until the previously removed bolts slid in easily and then I removed the jack and rechecked everything and it was perfect. The rear is now centered on the chassis, the pinion has -2 degrees and shocks rotated around so they move freely with no bind
I can now feel comfortable that the body will be in the correct place so I can continue with that aspect of things..
Thanks again all...
Mr. Fixit
Mr. Fixit
Member
George,
I had read a number of articles regarding the pinion angle and agree with your comments with the exception of the need to create a negative angle in order to compensate under load. Under load, when the rear end digs down a little, the negative angle becomes neutural and creates what you are referencing. From what I have learned, this angle varies quite a bit based upon suspension design. 4 links ususlly have -1 to -3 and leaf spring designs can have as much as -8 to to -9 because they rotate so much more under load. Well, I guess that we have beat she suspension horse to death by now, so enough about that.
Since the car was in complete order with the fibergalss body when I got it, and since I had already put about 1000 miles on it with no suspension issues, I will leave everything else alone for now as you have suggested.
Thanks again,
Mr. Fixit
P.S. I have had a couple of inquiries about the ring roller that I built with folks on the forum seeking plans. I know that you offered to put the design on CAD for the benefit of others a couple of weeks ago, so whenever you like we can come up with a plan to plan.
fluidfloyd
Active Member
Mr. Fixit;
P.S. I have had a couple of inquiries about the ring roller that I built with folks on the forum seeking plans. I know that you offered to put the design on CAD for the benefit of others a couple of weeks ago, so whenever you like we can come up with a plan to plan.
You'll be OK with -2 degrees. Lots of thoughts on that subject and yes, depending on the suspension design you will get angle changes. Just think of a 4 link as a front a-arm system turned 90 degrees. Spindle goes up and cambers in. That's why they use u-joints.
As for the ring roller, just let me know when you want to do it. Catch me at my email address and we'll get the details worked out as to what you have for drawing information. I'll be in touch.
George
prodesigns1@yahoo.com
Mr. Fixit
Member
fluidfloyd said:Mr. Fixit;
P.S. I have had a couple of inquiries about the ring roller that I built with folks on the forum seeking plans. I know that you offered to put the design on CAD for the benefit of others a couple of weeks ago, so whenever you like we can come up with a plan to plan.
You'll be OK with -2 degrees. Lots of thoughts on that subject and yes, depending on the suspension design you will get angle changes. Just think of a 4 link as a front a-arm system turned 90 degrees. Spindle goes up and cambers in. That's why they use u-joints.
As for the ring roller, just let me know when you want to do it. Catch me at my email address and we'll get the details worked out as to what you have for drawing information. I'll be in touch.
George
prodesigns1@yahoo.com
Will Do, George.
Thanks...
Screaming Metal
Active Member
RPM said:That is pretty much how we set up a 4 link.. Undo the top right bar. Andjust the 2 lower bars to get the toe correct and the track correct. The adjust the top left bar to set pinion angle then adjut the top right so that both bolts slide in easly. Then if the car wants to torque steer left or right at full throttle adjust the preload on the top right.
Ya'll got it pretty well ironed out.....I'm gonna just sit back and spectate.....Think I'll get some popcorn..........heehee.....
Screaming Metal
Active Member
Hey Ted, Pass me a cold one over here................Ha!
Similar threads
- Replies
- 22
- Views
- 4K
