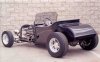
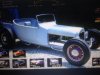
The partial channel started because, to me, the longer body needed more height to look right from the side. I started with 2x3 rail tubing and had our glass shop build the body with only a 1" channel on the floor. This started the look heading in the right direction and I proceeded to start over on the frame with 2x4 tubing tapering it from the cowl to the front similar to how we build our A' frames. This got the right proportion of height to length. The initial mock-up looked real good but a few more changes were needed.
I shortened the wheelbase down 4" to 99.5" and put the wheels on, took some photos and hung them on the wall for a few days...
Some bigger changes needed to be made. After some cutting and pasting (I didn't use Photoshop then) I decided that the back of the body was too high and the cowl needed raised to help with the hood line. The first car was body and frame was sold to a customer that kept after me. So I started again, changed a few small chassis designs, and had another body done real heavy so I could cut it up.
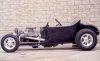
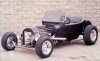
The back edge of the body was brought down 2.5", the cowl was raised 1" and a 32 dash was grafted in along with adding a lip for the hood. The trans. tunnel was also raised so the motor could be brought up for ground clearance.


.jpg")
.jpg")
.jpg")
.jpg")
.jpg")