Ron Pope Motorsports                California Custom Roadsters               

Installed my grill shell and Lokar shifter.

lanceks1 said:
Looks great Fred, the color combo is right on I think. The individual makeup of colors definately makes the difference. I noticed the red shade much more on the recent pics?? Really like that shade, and red isn't my favorite. I filled all of the open holes on the shell with chromed hole covers I got at my second home, "The Chrome Guy". The plating was much better than the HW store variety. I might not have posted the front of my shell since I put the Blue Oval on. I like it as a finish to the shell. I'll bet it's alot prettier than the one Henry put on.

Hey, those buttons look great! I only plugged the holes on the sides of the shell. I'm leaving the ones on the edge open. I'm playing with the thought of having a hood made and if that happens, I'd run a little strip of leather on the edge, but if that happens it would be in the way far future.

At first, I wasn't going to get the Ford emblem, but I'm glad I changed my mind. It does add a finishing touch. I still can't get over how well these grills look on a bucket. I'm surprised more people havn't done it.
 
fred do you think you can give me a step by step
on how you attached the grill and rad to the frame ???

i got my shell from speedway today

thanks bud :D
did you attach the rad to the shell??
i had it kinda proped up there
but didnt realy see how its done

any help at all is welcome
 
Sure, I'll do what I can.

First, the bottom tabs on my radiator were not out far enough to mount all the way on the TP radiator tabs.
 
tfeverfred said:
Sure, I'll do what I can.

First, the bottom tabs on my radiator were not out far enough to mount all the way on the TP radiator tabs.


:eek:Sorry, i hit the "submit" tab by mistake.:eek:

Okay, the mounting tabs on the radiator were not out far enough to use the TP tabs on the frame. So, I used a piece of metal stock and first mounted that across the tabs. The bottom of my radiator was flat, so all I did was drill a hole on each radiator tab. Then I set it on the piece of metal going across the frame, marked the holes and drilled. I then used bolts and mounted the radiator.

Next, my radiator is 21" tall. I set the shell against it, leaving a 1/4" gap between the top of the radiator and the inside of the shell. Because the TP radiator mounts are about an inch below the top of the frame, I had to cut 1" from the sides of the shell. This allowed the shell to set lower on the radiator and the sides of the shell rest on the radiator support.

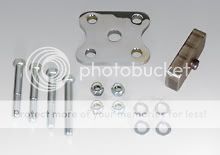
I did not mount my shell directly to the radiator. I used the side tabs. I bent each one out so that they were parralel to the sides of the radiator. Then, I measured the distance between the tabs and the sides of the radiator. It came out to about 1" on the lower tabs and about 3/4" at the upper tabs. Then I went to Lowes and found nylon tubing that was already 1" in length and I found 4 bolts to go through the nylon tubes. I also got 4 nyloc nuts to fit the bolts. On the lower part of the shell, there was a hole on each side that lined up perfectly with the radiator side tabs. All I had to do was drill those holes wider to match the bolts. I then marked the radiator tabs and drilled them out as well. Place the nylon tubes in place and run your bolts through and place the nuts on.

For the top radiator tabs, the shell starts to curve at the point where the radiator tabs are. So, I cut the top nylon tubes, on one side, the shape of the curve. There were no holes in tha part of the shell, so I drilled them. I then marked and drilled the radiator tabs and drilled them to. I placed the nylon tubes in place, ran my bolts and placed the nuts on. The nylon is strong and everything is nice and snug.

In this pic of the bottom of the shell, you may be able to see how I have it.

grill1.jpg


I can explain things better on the phone, if you like. PM me your phone number and I can call you. I have unlimited long distance, so don't worry about the charges.
 
i see what your talking about

i see my prob my rad is differant
i have the total rad
all there is for tabs are the ones
that mount it to the frame
 
datonamanmike said:
i see what your talking about

i see my prob my rad is differant
i have the total rad
all there is for tabs are the ones
that mount it to the frame

I had posted, in an earlier thread, that I was using a chopped '32 radiator. I forgot to mention that. The TP '23 radiator is both smaller in height and a little wider. The Model A shell may work, but you would have to cut it down some. Maybe more than you would like. However, I thought I would have to cut it down myself. If I had, I was going to make a plate to cover the area between the shell and the spring mount. That would hide the lower section of the shell that was removed.
 
i got it on the rad useing your way
with the spacers it looks great
i did have to cut it
i cut a little of the side at the bottom
i just left enuff so i could bent it under
the rad tabs
the lower part does look a little low
like 3 inchs off the ground i may have to rework
the lower part
but it does look great !!! ill post pics prob tomarow
night
thanks a bunch fred your a good friend
 
Datonmanmike,

I think you would find that Fred has gained a lot of friends on this site. I truly look forward to personally meeting him one day. There are alot of good men out there willing to help in anyway they can. Rick, Mike, etc.

thomas:)
 
datonamanmike said:
i got it on the rad useing your way
with the spacers it looks great
i did have to cut it
i cut a little of the side at the bottom
i just left enuff so i could bent it under
the rad tabs
the lower part does look a little low
like 3 inchs off the ground i may have to rework
the lower part
but it does look great !!! ill post pics prob tomarow
night
thanks a bunch fred your a good friend

Glad I could help. I ended up with 6" ground clearance. I'm not sure how, but I'm not going to question it.:D

As far as your clearance, before you cut that nice shell, have you considered a scrubline kit? Total sells them. It's a 3/4" thick block that mounts between the spring and the spring mount. One or two of those would get that frontend up and give you the clearance you need.

scrubline_kit.jpg


Total sells them for $35 and extra blocks are $10 each. It may work for you. I have one, but I don't have it installed. My front seems okay without it, but if I need to raise it, it's good to know I could.
 
I have been driving my full height, low grill mostly on pavement with no trouble in 2 months. Is it trouble asking?? Maybe..:neutral:
 
thanks fred i might consider that scrubline kit
but i like the fact that im nice and low in the front

as far as cuting the grill i already had to cut it
to make it fit my rad so cutting off some of the
bottom wont bither me
i got this black welting i can cover it with
i got it from JC whitney
im also going to cover the back side of the grill
with this where the hood is supposed to be

ill let you know and post pics thanks agian bud

thomas i didnt mean to single out fred
everyone here has helped me a lot
and i have made a bunch of goof friends here
 
datonamanmike said:
thanks fred i might consider that scrubline kit
but i like the fact that im nice and low in the front

as far as cuting the grill i already had to cut it
to make it fit my rad so cutting off some of the
bottom wont bither me
i got this black welting i can cover it with
i got it from JC whitney
im also going to cover the back side of the grill
with this where the hood is supposed to be

ill let you know and post pics thanks agian bud

thomas i didnt mean to single out fred
everyone here has helped me a lot
and i have made a bunch of goof friends here


Sounds like you cut yours where I thought I may have to cut mine. Looks like you got a good idea for finishing it up. We ALL look forward to pics.

Goof!? :lol:My girlfriend calls me that sometimes, but she inserts a reference to "sex with women who have children" in there.:)
 
i did end up cutting it down
but it looks great !!!!
the way its made i juse cut it
made the lower into sort of laps slid
one behind the other couple pop rivets
and it looks great pics coming promise
 
datonamanmike said:
i did end up cutting it down
but it looks great !!!!
the way its made i juse cut it
made the lower into sort of laps slid
one behind the other couple pop rivets
and it looks great pics coming promise

Cool! I'm glad you got it to work. That shell really is a beautiful piece of work.
 

     Ron Pope Motorsports                Advertise with Us!     
Back
Top