Ron Pope Motorsports                California Custom Roadsters               

Installing My Ss Brake Lines From Tp

datonamanmike

New Member
i got my ss brake line kit from TP yesterday. i laid it all out and it all looks like it will fit except for the lines from the master. i think they were bent wrong. does anyone have a diagram for this kit ??? it dosent come with very good instructions. maby im just a dummy.

also you would think for 285.00 $ total would include
the fittings that adapt the lines to the master.
im very disappointed with this.

i need help with this and any help is welcome

im writing this early friday but come 9:00 am i will be calling tp for help
 
I got mine from Total and it fit fine. I wasn't SS, but the bends should be the same. I have close up pics of the install, but I have not developed them yet. I'll try and get them up tomorrow.

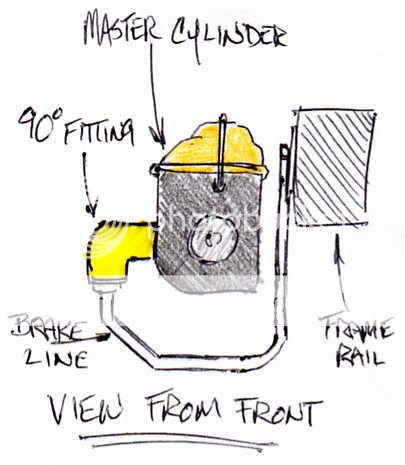
The lines from the master cylinder go down from the fittings, which are 90 degrees and under the master cylinder and then up to the frame rail. It will look like they are kind of cradleing the master cylinder.

You should probably call Total if the kit did not have the fittings. Also, make sure you tell them what size openings you have on your master cylinder. I got the old master cylinder and had to modify the fitting for the front disc until the correct one was sent to me. I was told that the new fittings are both 9/16", instead of 9/16" and 1/2".

I hope this helps and I'll try and have the close ups of my complete install up tomorrow afternoon.
 
In the meantime, here is a small doodle I made of how the master cylinder lines look from the FRONT. See how the lines go under the master cylinder and then go to the frame rail, where they run to their locations. The front half of the master cylinder works the rear brakes and the rear half works the front. If you use front disc and rear drums, MAKE SURE YOU REMOVE THE CHECK VALVE IN THE HALF THAT WORKS THE FRONT BRAKES! VERY IMPORTANT!

lines_route0001.jpg


This is not to scale and done in a hurry. I draw cartoons when I'm bored. I'll post some one day.;)
 
Hey Fred, you are a absalute genius. I really need to learn to spell.:eek:

thomas:)
 
well it turns out im missing sa few parts. i didnt relize that i needed 90 degree elbows at the master. when i spoke to rich at total he set me on the right path and the lines were right . so my elbows are on the way

then later i tryed working on the rear. i bent the short drivers side one went to connect ot to the caliber and relized id didnt fit right .
this is after i bent is of course. and after another call to total
( they are realy cool bout callin them ) pete told me i need fittings on my calibers witch i didnt recive either . story of my life. ha ha!!
pete explained if you dont tell them you have 4 wheel disks they assume you have drums in the rear and thats why im missing parts

also fred. just to be sure, if i have rear disks i need not remove anything from my master ?? thanks for your help guys

so bottom line my, brake lines are half installed but look good
so far. guess it will be some time next week when the fittings get here .
then it will be on to bleeding
 
Sorry to hear you didn't get the fittings, but it's good that Total is going to make it right. Brian, Pete and Rich are good guys and have helped me tons.
 
man i wish my brakes went as smooth as freds
i chased leaks all day the T fitting leaked
the fitting that has the brake light leaked
and my master cyl front brake ( rear of car )
90 0 fitting leaked i have disk rears
the lines you bend for your self looked bad to me
so i got ss briaded lines they look good
my prob was i couldnt get the double flar right
my cheap tool kept letting the tubbing slide
but the braded lines solved that and it looks good
the guy a the speed shop told me to put teflon tape
on the brake light thing and that solved that
now all im dealing with is the master fitting
very small leak something in the an fitting i think

now on to bleeding i bought a bleeder you hook to
air and it makes vacume but i cant get a firm pedel
i bench bled my master on the car thought it was ok
i see there are 4 bleeder screws on the front calibers
and 2 on the rears is htere an order to bleeding these
i hate brakes lol


wanna come do mine for me fred ????
 
Datona, if I could I would, but I can give you tips. I tried using a vac setup to bleed my brakes and it worked so good that it was sucking air through the threads of the bleeder valve! I spent 3 hours sucking air and fluid! I ended up using a little one man bleeder that I got at the auto parts store. Cost me $6.99 and worked like a charm. MAKE SURE THE BOTTLE IS ABOVE THE BLEEDER! Did the whole car in like 20-30 minutes. There is a pic in my members page. I also replaced my front bleeders with Speed Bleeders. The size I needed for my S-10 rear was out of stock. They worked very well, but with the one man bleeder, I probably could have used the Wilwood ones any way.

As for leaks, I had a leak in the brake switch connection that leads to the rear line and like you, a little teflon tape cured the problem. Make sure you use the BLUE kind for hydralic lines. I used the white and had to use more than I thought was needed. It didn't leak, but a friend recommended the blue and it just made since to try it. Still not leaking and I mash the brakes everyday just to see.

Leaks are going to happen. Mine leaked at a few other connections, but it was because I under estimated just how tight they needed to be. I wanted to be careful with the AN fittings, but I was being TOO careful. I got 'em tight, then cranked 'em a little more for good measure!

You said you calipers have 2 bleeders. In my reading I have found that you only need to use the upper most bleeder. The air will always go to the top most point of the caliper. It is not necessary to bleed both.

I scored a flare kit at the auto parts store too, but I had never used one and tried it on a small length first. Once again, it didn't come out right until I READ THE INSTRUCTIONS!:lol: I once again proved to myself that I don't know everything!

Your braided lines look good and will probably be okay for that short length.

Bleed from the furthest point to the shortest. RT front, LT front, RT rear, LT rear.

Good luck. Like most things I have found in my build so far, if you just sit and look at things for a few minutes, it tends to become as simple as it should be. Take your time and don't be affraid to walk away, get a breathe and start over if you need too.
 
thanks fred its 6 am here i just got in and there is one tiny drop
fliud under the rear (front ) line at the master its a AN fitting and
a 90 degree fitting looks like its where the flare meets this 90 degree fitting iv had it apart a couple times guess ill take it apart agian look at that high hat looking thing
then ill deal with the bleeding thing
not happy here
 
I THINK I GOT IT !!!!!! i took apart the AN fitting and took the line off ant took it to murrys speed shop here the guy there pointed out to me the flair was good but the cone where it meets the 90 degree fitting we kinda chewed up he didnt have one told me to get another one from total i was ok with thateven so i asked him if he thought i could fix up the one i have with some emory cloth he said give it a shot so i sanded it back into shape and low and behold it hasnt leaked in like 3 hours now i bled the system out and think im good now i happy agian
one question for yas how much pedel travel should i have???
i got a good solid pedel but my travel is like 3 inchs or more
is this ok or do i need more bleedin ???
 
Bleed on bro you should only have 1/2-3/4 in. travel and it should not be spongy
 
Hmmmm.... I had called Total because I got almost (3") the same amount of travel. I was told that this was about right, but I also have drums in the rear. There is also adjustments that can be done with the actuating rod. In my regular car with power brakes I get about 4" of travel and it has power disc brakes. Perhaps a call to Total is in order if you still feel this isn't right.

It was also mentioned that after the body is in place, they bolt a stop to the floor behind the peddle lever to keep the actuating rod from coming out of the master cylinder boot, if the lever is accidently moved in the opposite direction.
 
I talked to Pete and here lies the difference i am running 3/16 brake lines and Totals lines are 1/4.The extra travel is the fluid in the lines moving to preasure.Is mine right?Maybe is yours right?maybe the bottom line is does your car stop at 2-21/2 in travel?If it does then you are fine.
 
well its saturday here i havent been to my shop yet.
im going there in a little wile ( im also getting ready for
vacation sept 1 till 8 ) hope fully there will be no drips
under that one line . then i will do the happy dance.
then i think ill bleed agian just to be sure .

THANKS FOR ALL THE HELP GUYS !!!:lol:
 
Rick said:
I talked to Pete and here lies the difference i am running 3/16 brake lines and Totals lines are 1/4.The extra travel is the fluid in the lines moving to preasure.Is mine right?Maybe is yours right?maybe the bottom line is does your car stop at 2-21/2 in travel?If it does then you are fine.

:lol:Rick, as my build goes and I get input from different people who have built them, a nice phrase comes to mind.

"Your results may vary."

Just as there are so many varieties in colors, engines, trannys, rearends and etc., so it seems will be the problems and their solutions. One thing, however is constant, good input and the trading of experiences and ideas is awesome. It's great to have a resource like this and I am greatful.

Bottomline, make sure it's safe!
 
Stroke in the brake pedal can be caused by any increase in volume, anywhere down the (brake) line.

If a caliper A has more fluid volume than caliper B, then it will require more stroke from the master cylinder to pressurize it.

A larger line will require more fluid movement, hence more stroke.

Likewise, if you put on a master cylinder with a bigger bore, then you would need less stroke, as it would be moving more volume.

Think of it as having to fill a given container from a one quart pitcher of water. You can fill up a one pint container with half of your volume, whereas it will take all the water you have to fill a one quart container.
 
Dont feel bad about the lines not fitting. I order ther fuel line kit and had to practically "re- invent the wheel" none of it fit right, but it's all workin out slowly :cool:
 

     Ron Pope Motorsports                Advertise with Us!     
Back
Top