Ron Pope Motorsports                California Custom Roadsters               

Northstar T is taking shape

Northstar T

Supporting Member
Supporting Member
Three day weekends are nice. the past two have allowed me to make some good progress on the T. If I didn't have to do everything three times to get it where I want it (my first T project) I'd be a lot further along however
wink.gif
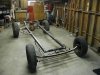
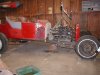
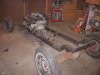
. I finally have the stance pretty close to what I want. a little lower in front might be nice, but I don't want the pan dragging the ground.
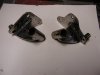
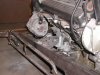
Now that it's a roller I discovered what Ackerman angle is all about. For some reason it hadn't occured to me that the suicide configuration would result in such severe skid steering. wow! doesn't this cause some pretty noticable stearing issues, as well as tire wear? I'm hoping to get some engine mounts built tomorrow, and maybe do some planning on the brakes and clutch linkage (ya.. I'm doing a T5 trans also).

Cheers,

Russ
 

Attachments

  • 1 004.jpg
    1 004.jpg
    67.1 KB · Views: 350
  • 1 007.jpg
    1 007.jpg
    66.4 KB · Views: 357
Lookin good keep posting pics of your progress.
 
I had to get the wife out of the house today before she killed someone [me], so we went for a hike in the woods this PM. before we went I was able to get the engine mounts built however, so I'm happy
<


Russ
 

Attachments

  • mount.jpg
    mount.jpg
    48.6 KB · Views: 131
The only place my wife will hike is the mall
 
It's been said ... If your not living on the edge, your taking up too much room.

Ron
 
Made some more progress on the Northstar T the past 2 days. fibnished up the motor mounts and got them tacked in place. built mounts to hang a late GM small frame alternator, and fabricated a mount that goes in the front of the valley to attach a belt tentioner to (serpentine belt). The crossmember for the T-5 transmission is fabbed and mounted as well, which means the engine/trans are now hung on the frame and no longer require wood blocks to hold them up.I'm really enjoying this build. great to have a project that I can get my teeth into for a change. The wife works tomorrow (Sunday) so I should get even more done then. Cheers,Russ
 

Attachments

  • 007.jpg
    007.jpg
    66.5 KB · Views: 231
  • 010.jpg
    010.jpg
    64.7 KB · Views: 223
Always a boost when the frame gets to the rolling stage. Are you going to have clearence problems with your rear spring?

Ron
 
Always a boost when the frame gets to the rolling stage. Are you going to have clearence problems with your rear spring?

Ron


Do you mean between the frame and the leaves, mid span? it is close there (what isn't close on a T), but I think it will be fine. A the moment there's about 2 1/2" clearance, but I expect to add a spacer of an inch or so to get the rake up a bit more anyway, so we're good to go. Today I'm working on the clutch/brake linkage so now we're talkin' close.
thumb.gif


Russ
 
A good Sunday on the T project. I got the floor cut out for trans clearance and a "tunnel" roughed out in wood. I'll blend in the steps on the tunnel once the glue dries a bit more. I also glued in a 3/4" plywood firewall reinforcement plate, as I'll be using a modified firewall mounted clutch and brake pedal assy off a Pinto. The pedals will get tweaked a bit more once I get the steering column placed between
them.
382774854.jpg
I ended up putting the MC on the firewall because the space under the footwell will become highly congested. A Northstar has the water pump mounted on the rear left head, where it's driven off the end of the intake cam. because of the pumps location, there will be quite a bit of plumbing needed in that area, as well as sharing space with the steering box, clutch linkage, and who knows what else.
382774862.jpg
The coil pack, which is now located on the right valve cover, will get relocated to the rear of the motor also, so with all that "stuff" back there, and because of the necessary forward placement of the engine, I'm playing with the idea of making a fiberglass cowl extension to help hide that area.
382774864.jpg
been at it for about 12 hours today, and I hear the hot tub calling me. Cheers,Russ
 
Lots of honey-dos this weekend, so not a lot of progress to report on the T. I did get the radiator hard lines fabbed up on the back of the motor, a bracket to relocate the coil pack to the rear of the engine, installed a different fuel rail with curved ends, finished up the belt tentioner bracket, and welded up the driveshaft that I shortened at work last week. My lathe isn't big enough to put the driveshaft in to get it true wile welding, so I just installed it in the car and jacked up one wheel so I could turn it wile tack welding and re-checking. this process worked really well for me. A picture's worth a thousand words. Cheers,Russ
383140689.jpg

 
oops
383140681.jpg
 
This weekend I fabricated mounts and installed the radiator, grill shell, steering box and both steering arms. the radiator was a bit more challenging than I expected, as I required that the brackets be unobtrusive, yet strong, as well as being designed in such a way that it will be easy to service should the need arise. I really hate working on a vehicle that has hidden bolts, or nuts that aren't welded down when you can't get to them with a wrench. to that end: "mission accomplished." the lower radiator support consists of brackets which are welded to the frame, and incorporate a 2" section of angle iron where the vertical uprights bolt on. the radiator shell is supported by the tabs you see welded on the lower sides, and bolted to the top of the frame rails. 1/2 way up the sides of the radiator shell I drilled the shell and welded in a short piece of 3/8" tubing, which allows a 1/4" bolt to be inserted and threaded into the (drilled and threaded) angle iron radiator support uprights. a grill opening screen will be added when a suitable candidate is located.I jury rigged a steering column and plywood steering wheel mockup to allow me to set the angle for the steering box (67 Mustang box) and fab up those mounts and weld them to the frame, then came the task of cutting, heating and bending the steering arm into a suitable configuration. once reconfigured, I like to cool these parts very slowly to retain their integrity. I do this by quickly burying them is wood stove ashes to cool. it's amazing how long this will retain the heat. after almost an hour they're still to hot to comfortably handle without gloves. Cheers,Russ
383513278.jpg
383513276.jpg
 
cool :rolleyes:
 
Great looking engine, Looks like your front spring will be too wide for the mounts when finished, as the shackles are already almost too far down, and a lot more weight to go on them... That will be a very different looking ride :thumb: I am glad you are thinking safety...
 
Great looking engine, Looks like your front spring will be too wide for the mounts when finished, as the shackles are already almost too far down, and a lot more weight to go on them... That will be a very different looking ride
smile.gif
I am glad you are thinking safety...


That was just a trick to see if you were paying attention Ted
hi.gif
. I have +1/2" shackles on it now for easy mock up. I can also add an extra leaf during final assembly if needed.
I'm always thinking safety. "the look" is very important, but never at the expense of safety.
thanks for showing the way Ted. I've always loved your Ts.

Cheers,
Russ
 
I love redesigning old parts to perform a new task. The expressions of confusion on peoples faces alone, as they try and figure out what the heck it was, would be worth the effort
<
384127051.jpg
 
I plan to use the lower holes, just below the headlight, to hold the windshield support rods.
384127057.jpg
 
I welded some tabs with studs onto my radiator core support this morning, to attach the electric fan.
384174865.jpg
 
then built some new (shorter for Ted
<
) shackles for the front spring, which incorporate a lower shock mount.
384174869.jpg
 

     Ron Pope Motorsports                Advertise with Us!     
Back
Top