Ron Pope Motorsports                California Custom Roadsters               

tfeverfred's project

tfeverfred

Well-Known Member
Well, I have wanted to build a T Bucket for a long time. I saw the Movie "American Graffiti" when I was 15 years old. I knew then that I wanted to own one of "those fixed up old cars" one day. a short time later, I was buying Hot Rod, Rod Action and Street Rodder. I remember seeing an ad for a product and they used a T Bucket in the ad. That is when I knew I was hooked! I carried that folded up ad in my pocket until it wore out.

For 32 years, I read all the mags and went to shows when I could. I could always be found staring at the T Buckets and dreaming. My dreams had big motors, fat tires, candy paint and TONS of chrome. That was my undoing. I had dreamt myself to the point that I thought it would never happen.

Then one day, I read about the "Rat Rodders". While I didn't get the concept (kinda ugly), I embraced the philosophy: Stay away from the chrome and billet, keep it simple, take your time and DRIVE THE WHEELS OFF OF IT !

With this in mind, I began to search out a company I had read about. Total Performance. I did a lot of research and asked customers I met about their experiences building a T Bucket.

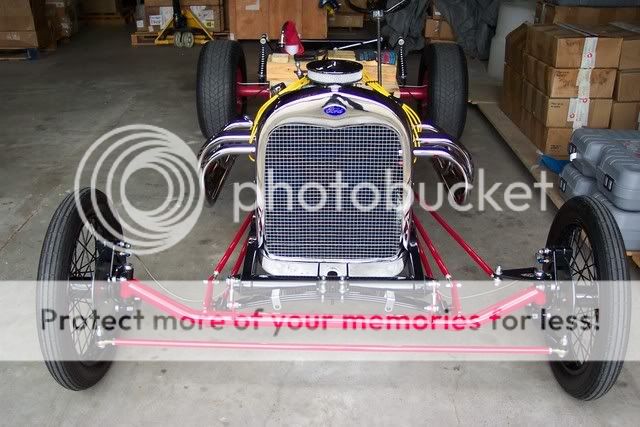
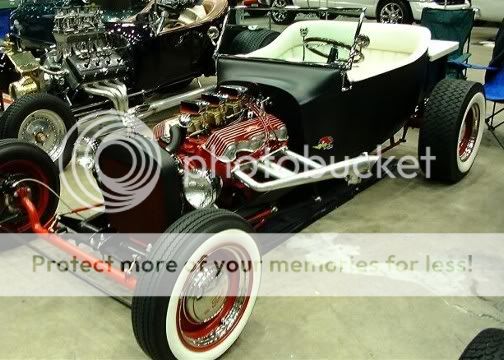
I found a pic that was kind of close to what I had planned to have my T look like.

23T_idea.jpg


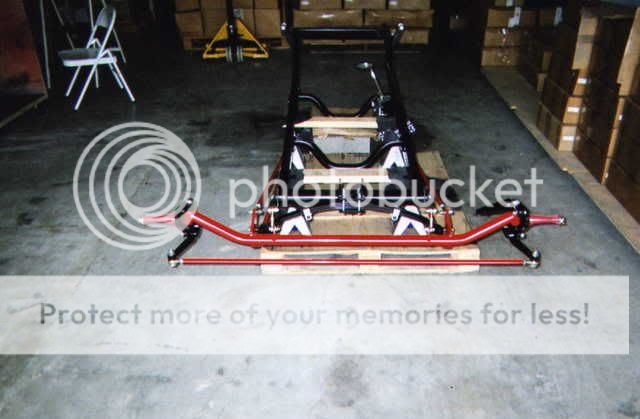
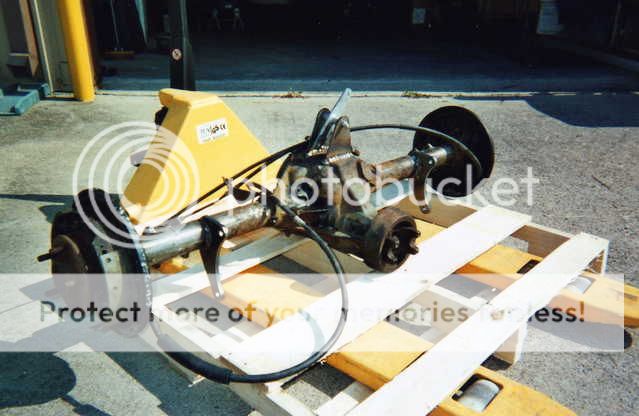
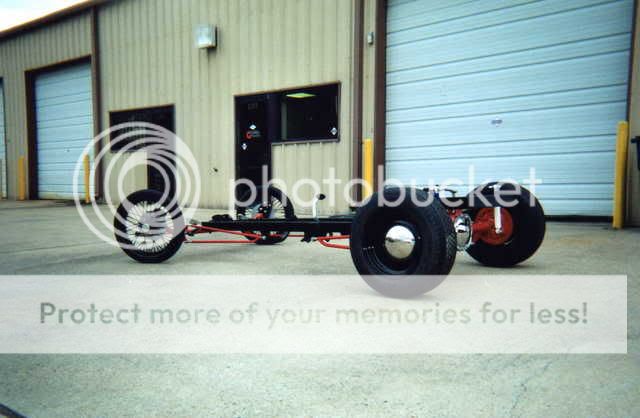
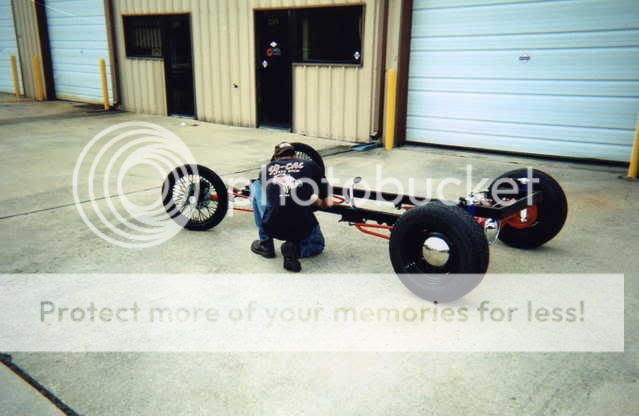
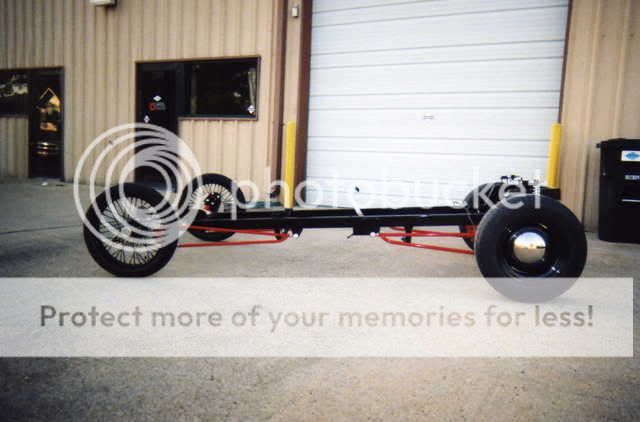
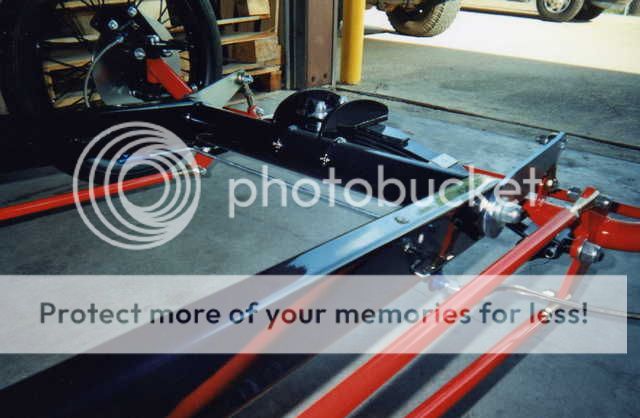
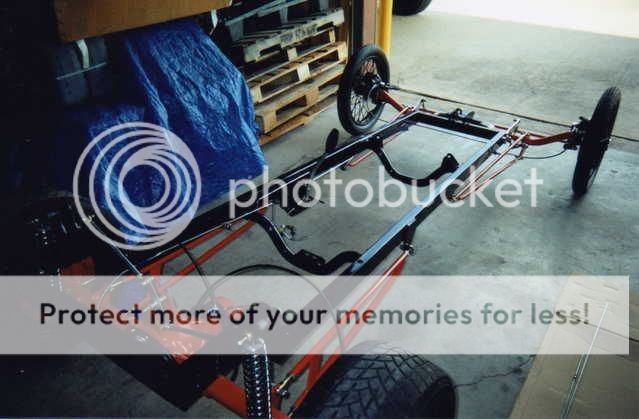
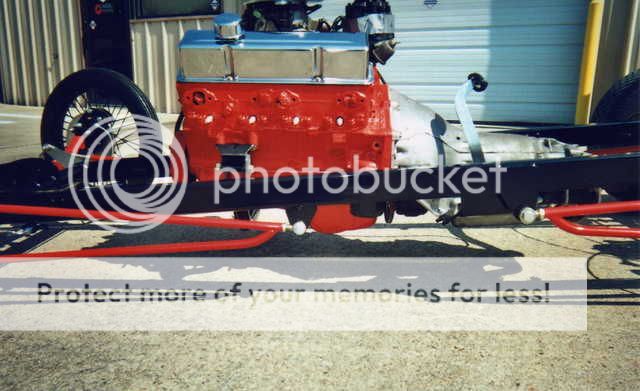
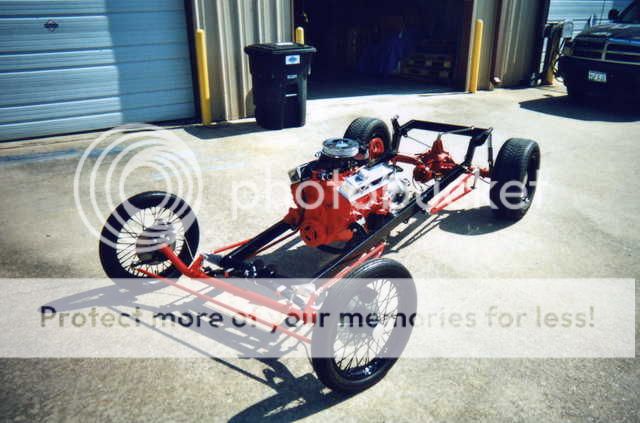
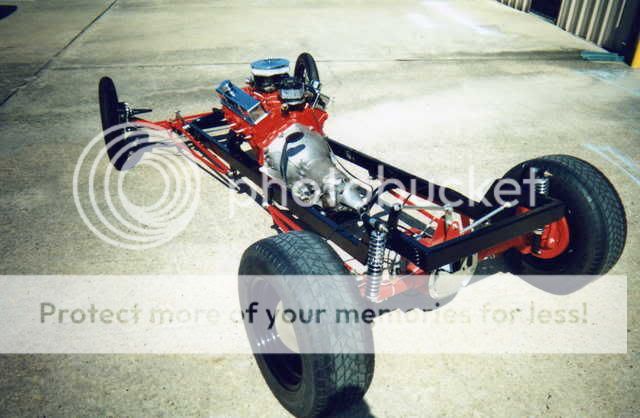
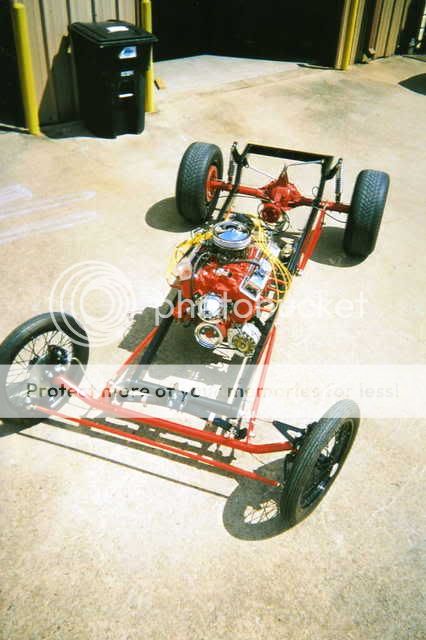
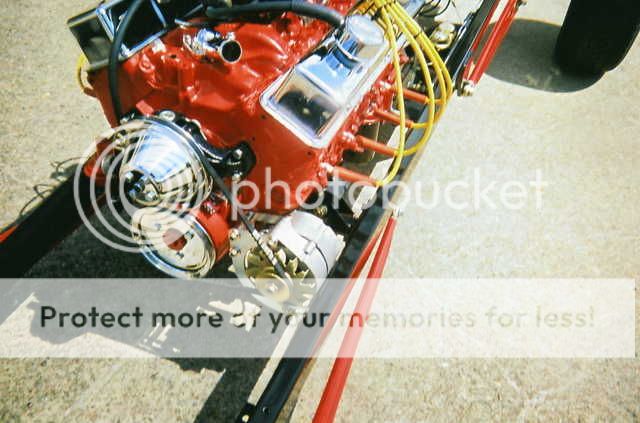
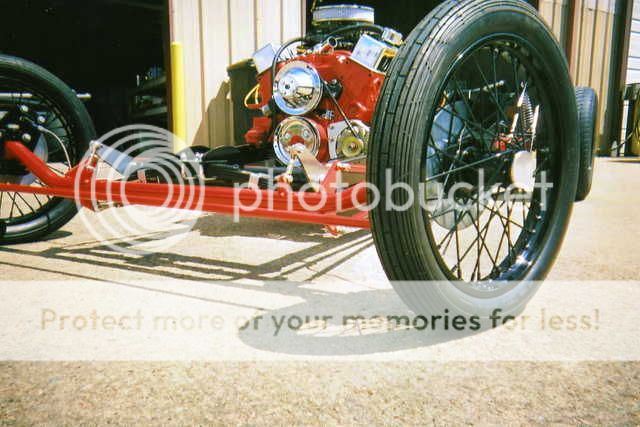
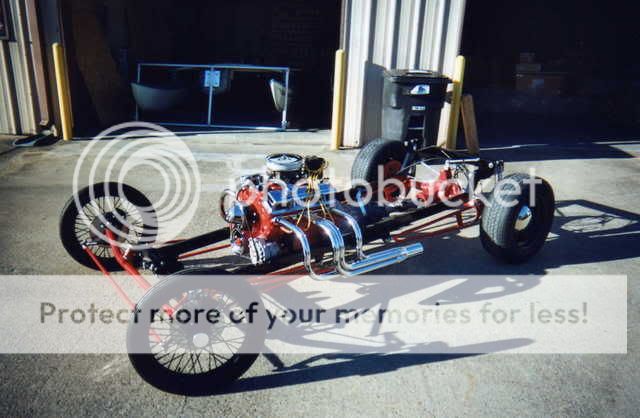
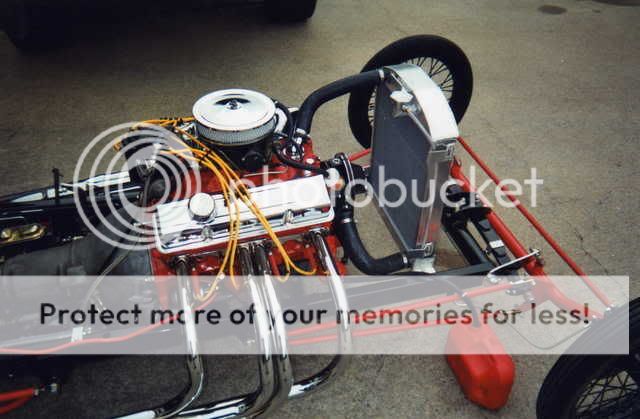
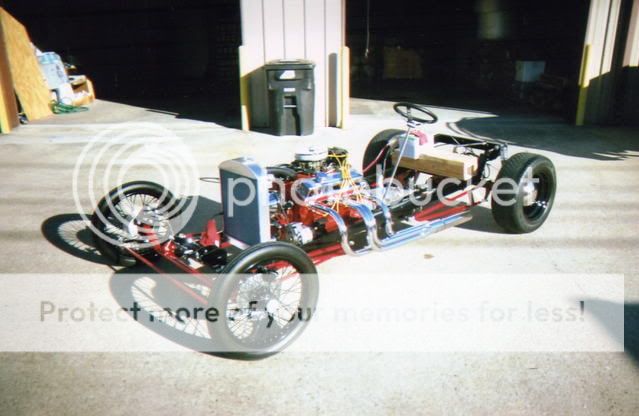
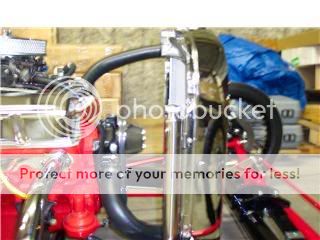
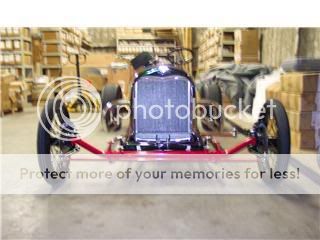
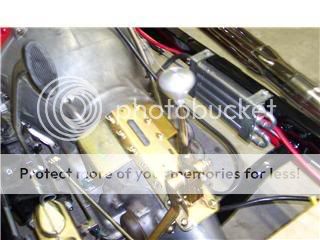
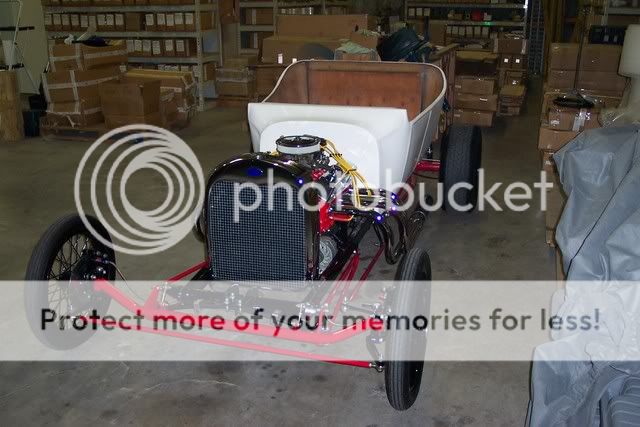
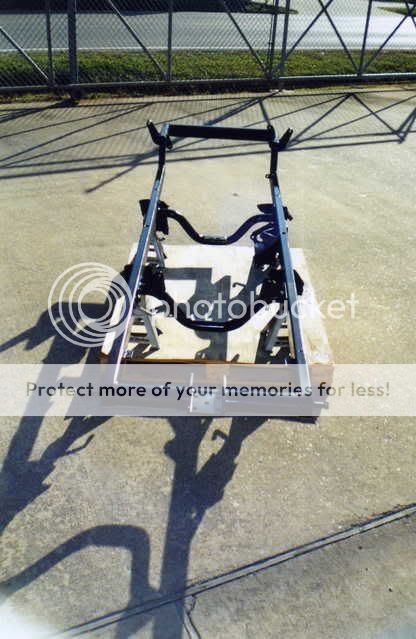
Then I got busy. I called Total and ordered my frame. It arrived on October 11, 2006. I was so excited to see the truck pull up to the shop I work at, that I nearly took the day off! So, I acted like a kid, set it up on jack stands and stared at it and formulated my plan.

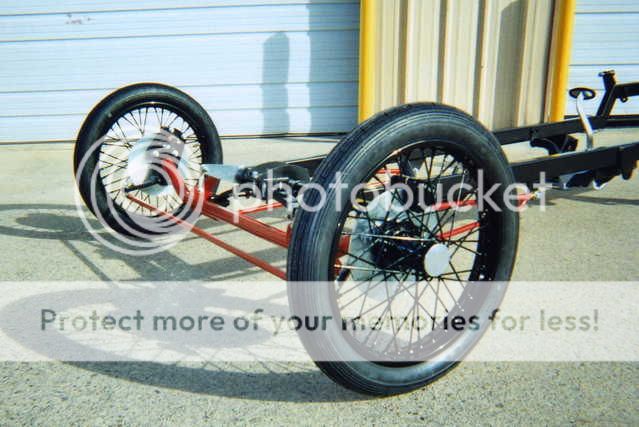
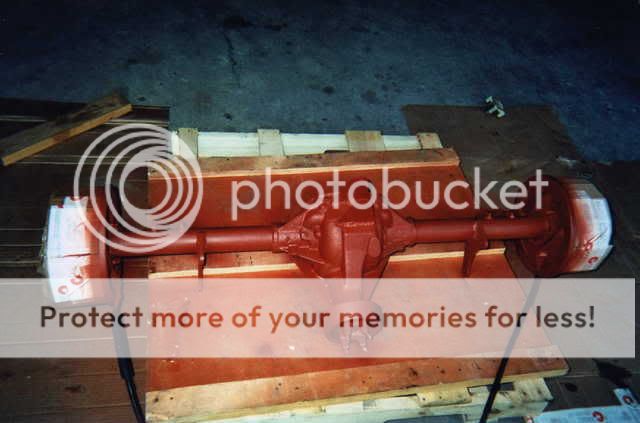
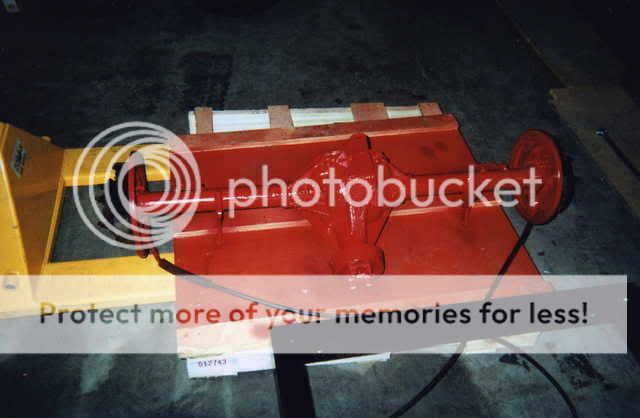
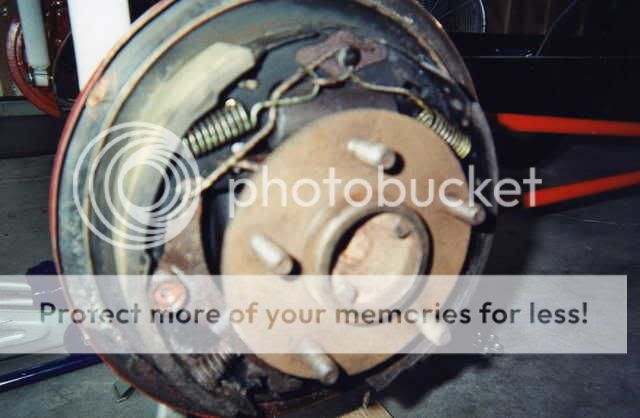
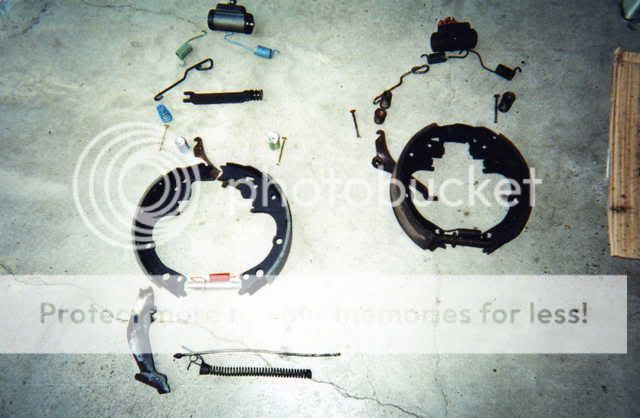
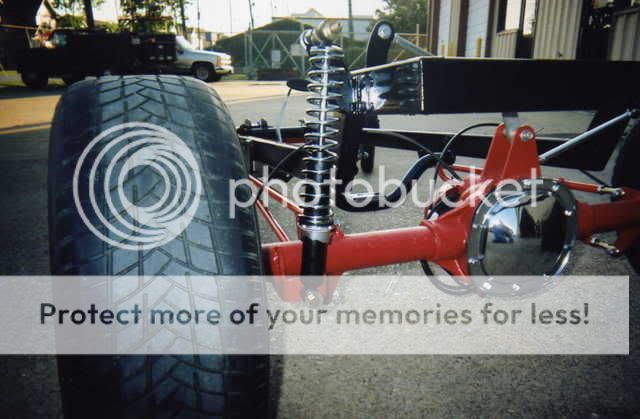
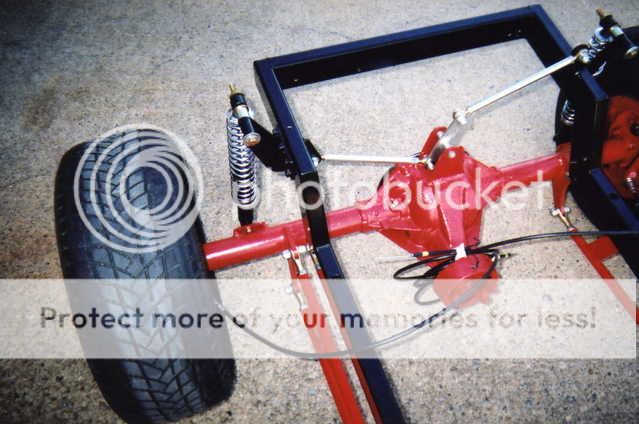
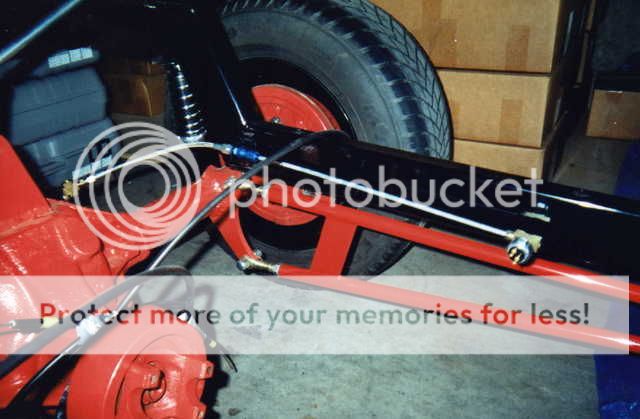
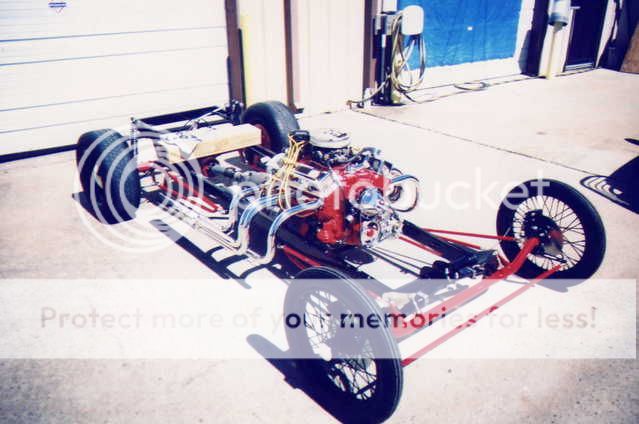
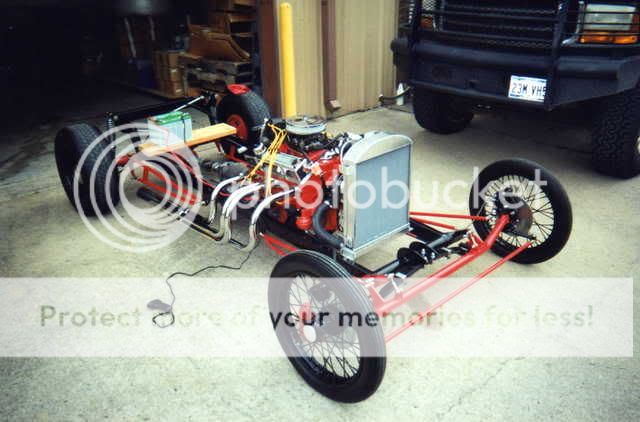
I have a limited budget, so I had to do a little at a time. I originally wanted to paint the frame and did. I figured since I was on a budget, I would use spray can paint! Boy, what the hell was I thinking!?:eek::eek: Looking back though, it was a good idea because it gave me a chance to see what the colors I had chosen would look like. First I painted the frame black.

23mine0004.jpg
 
By this time, Christmas was approaching and I had saved enough to buy the complete front end! Merry Christmas to me! It came, I painted it and installed it onto the frame.

23T_front_suspension0005.jpg


During this time I had decided to use regular tires on the front, but what I REALLY wanted was wire wheels. Way too much money for me though. Then I ran accross an ad for wire wheels and the guy lived right here in town! I checked them out. They were rough, but I knew what to do. I broke them down and had them powder coated. I ordered the tires and Wilwood brakes from Total Performance and put them on the frontend.

23T_wirewheels0005.jpg


They came out exactly as I had pictured them. The finish was great and the price was good, as well as the estimate they gave me to do the whole chassis. It was then that I decided to have my complete chassis powder coated. I ordered the rear suspension pieces and when they came, I broke everything down and sent it to the coaters. Man, the shop was empty and drab without my T chassis.

When it came back.... AWESOME! That is the only way to describe the finish. I put it together and set my sights on the rear end.
 
I didn't have the bucks for Totals rear end setup and 8" rearends were few and far between in my area. So, I researched and discovered that a Chevy S-10 rearend was just about the same dimensions and I could get one for cheap.

chuck0002.jpg


Chuck, a fellow gear head, welded the brackets on for me. A little fabbing had to be done, but everything went well. I asked if the 12 bolt was for sale and he just laughed.

chuck0001.jpg


The careful measuring and planning paid off. Everything came out perfect!

23rearend_bare0001.jpg


I ground the welds down a little, but not all the way. I wanted a slightly "rough" look because the theme of my T is slightly early 50's backyard style. I primed and painted it.

23rearend_primed0001.jpg


23rearend_painted0001.jpg
 
I had ordered a pair of rear wheels from Wheel Vintiques. Again, going with my retro theme, I got the Gennie series. The size is 15"x8". They powder coated them black to match my front wire wheels and set the backspacing to allow room for the width of the body. I picked up a set of used tires size 235-60-15 that are fairly close to the size that I will be using in the end.

On May the 21st, I rolled her out for the first time! Success! I have not gotten the rear coil overs yet, so I'm using a set of cheap shocks from Auto Zone for now. Hey, they work!:lol: I also picked up her first, of a few, piece of bling. A chrome differential cover. It won't make her faster, but it sure does looks nice against the red paint.

23rolling_chassis0005.jpg


This is my "cover shot pose" ! :lol: Like I'm fixing something! I couldn't resist!

23rolling_chassis0003.jpg
 
6-2-07

Today, I did an overhaul of the rear brakes. I also added an emergency brake set up from Lokar. My rearend is from a Chevy S-10 P/U and the Total Performance emergency brake is meant to mount on the pinion of an 8" Ford. I was also concerned that a pinion mounted setup would not satisfy the DMV here in Texas.

The overhaul was very basic. I used a Chilton's for my rearend and I have done drum brakes before, so it went rather quick.

As you can see, a few years of sitting had rusted just about everything inside. I cleaned off the backing plate with brake cleaner.

rear_brakes0001.jpg


The springs and lever kits were purchased from my auto parts store and were very complete. I did as my dad had taught me a long time ago (this made me think of him) and I did one side at a time and as I removed a piece I set it next to the new pieces. Removal of the old pieces was easy, as I had sprayed everything inside with penetrating oil the night before.

rear_brakes0002.jpg


The Lokar kit is basicly very close to the factory setup as far as the return spring length is concerned.

rear_brakes0003.jpg


I placed a washer and the nut provided over the cable and tighened it to the connecting piece on the backside of the plate. I used a larger washer here because there is a slight gap due to the Lokar cable being a smaller diameter than the factory cable.

rear_brakes0004.jpg


rear_brakes0005.jpg


There is a spring/retainer that connects the factory cable to a lever in the housing. I removed it since the Lokar cable has the sping attached to it already and placed the cable where it goes on the lever and crimped (lightly hammered) the lever to hold it in place.

rear_brakes0006.jpg


Then, I installed the rest of the hardware. It all fit as it was supposed to and I was done! So I thought.:confused:

rear_brakes0007.jpg


I did have one small set back.:eek: Before installing the new shoes, I did not check to see if they were the correct size. When I went to install the drums, they wouldn't go on. I had the adjuster fully adjusted to the closed position. I broke everything down and compared shoes. The new ones were about a 1/4" too big where the adjuster is!:mad:

Turns out the parts guy had sold me a "house" set. While they were cheaper, they were not correct. I exchanged them for a set of Wagners. I wish he had told me this from the beginning. While it's good to save a few bucks here and there, brakes are not the place to be doing it!
 
6-20-07

A couple days ago, I mounted the coil over shocks that I had gotten. They are not the style usually used. These were intended for a VW Sand Buggy. They are 2" taller and the cost was low enough to give them a shot. They are also ajustable, like the ones normally used.

As you look at the photos, notice the rake. The way I figure it, when the weight of the engine, transmission and body are added, it will sit just right. I won't know what the ride is like until I take one. If they don't work, then lesson learned.

23T_chrome_shocks0006.jpg


23T_chrome_shocks0008.jpg


I then adjusted the linkage on the Watts setup. The arms seem high, but remember, this is without weight on the rear. When the engine, tranny and body are added they will level off. I tested this by placing weight on the rear. Everything worked out. Again, this may look fine, but the final test will be while it is being driven.

23T_chrome_shocks0004.jpg
 
7-9-07

Today the brake lines came and I installed them after work. Total Performance has once again lived up to their saying. "Everything fits"!

I layed everything out and made sure it was complete. The lines for the rear brakes are NOT bent to allow owners to do it for their application.

23T_brakelines0001.jpg


I connected the front lines first. Everything went together without a hitch. The braided lines and the blue fittings look great against the black frame and red suspension pieces.

23T_brakelines0002.jpg


23T_brakelines0003.jpg


I then moved to the rear, where the line with the brake switch and the flex line for the rear lines would be mounted. Once again, trouble free.

23T_brakelines0004.jpg


Here is a shot of the completed installation. Notice that ALL the bends are PERFECT!

23T_brakelines0005.jpg


Tomorrow, I will use two pieces of coat hanger to make patterns for the bends and length for the rear lines. I will wait till the early morning hours this weekend to flare the rear lines, bleed the master cylinder and bleed the system. The heat and humidity combined with trying to do this after work took it's toll today. Texas summers suck, but it won't suck next year when I'll be cruising my T Bucket after a day at work! I can't wait!:lol:
 
7-14-07 and 7-15-07

Well, the first day was a weird day in a lot of ways. I found out one of the fittings that goes to the master cylinder from the lines was the wrong size. I called Total and they are going to send the right one. Seems the manufacturer changed designs of the master cylinder I had purchased last year. I was kinda bummed.

This morning I had to go to the parts store to get some oil. While there, I explained my problem to the counter guy. It's nice to have someone to bitch to. Well, there was a guy in line who over heard and said he could maybe help. It turns out that he had a shop not far away and he could make my fitting work! Inside his shop, he was working on a '55 Chevy! It was coming along pretty good. This guy had quite a setup and it seems he does machine work. He shaved my fitting down and rethread it to fit a 1/2" opening. We traded numbers so we can keep in touch. Needless to say, I was stoked!


Now I was ready to bleed the system. This turned out to be as big a pain as I thought it would be. I had purchased a vacuum bleeder because it seemed to be the most efficent. Well, I hooked it up to the furthest front caliper and all I pumped was a LOT of air and a little fluid. I tried on the other caliper and even the rear brakes. Same thing. I removed a bleeder from the front and rear and decided to stop at the parts store to try another option.

I had seen and heard of the Speed Bleeders, but I had little faith in them. I found the size for the front calipers, but none for the rear brakes. They were METRIC! On a 96 Sonoma rear! What the hell!? So, I looked around and saw a VERY cheap looking, one man bleeder setup. It had a 4 ounce jar with a magnet attached, some tapered fittings and a few clear tubes. It was $6 and I figured what did I have to lose.

I returned and installed the Speed Bleeders in the front calipers. I installed the tube and jar from the vac kit. I thought I would need the bigger jar. I opened the bleeder and pumped the peddle about 4 or 5 times and was soon greeted by a clear, bubble free flow. I repeated on the other caliper and was done.

Then I moved to the rear. I installed the tube on the top of the one person bleeder jar. I mounted it above the wheel cylinder, on the chassis, using the magnet. I then installed the tapered fitting and inserted the end INTO the bleeder. I opened it and pumped the brakes about 5 or 6 times and got clear, bubblefree flow. I repeated on the other side and was done!

I checked the brakes and have a fairly hard peddle and the car doesn't move. I'll bleed the system and adjust the rear brake pressure before my test run. (This winter!?)
 
8-12-07

About two weeks ago, I scored a 350 SBC for my T Bucket. All the checks showed that she would be a good, solid platform to work with. She's not much to look at, but that would change!

23T_engine_before0001.jpg


I chose to paint the engine red. Now I HAVE to go with a black body color!:lol:
A few things have yet to be purchased. Plug wires, inline fuel filter, water pump, etc. Those will come in the next installment.

23T_engine0002.jpg


In the above pic, note the ground clearance at the oil pan. It's about 4". This is still without the body installed. I don't have a block to increase the scrubline installed, but I may use it to gain another inch.

I was able to get a rebuilt tranny and chose not to paint it.I just like the way it looked and it goes with the theme I have chosen for my build.

There is NO WAY to describe how stoked I was to things turn out so well. I had accumulated a little bling and promptly installed it. I don't want to use a lot of chrome, both for looks and the pocket book.:eek:

23T_engine0001.jpg


I am going to try and use the factory Qudrajet carb, for now. This may change. For one thhing, the Quadrajet is just a butt ugly carb! Plus there are quite a few vac connections to hook up. She ran the engine well and I'll keep it until I upgrade.

23T_engine0004.jpg


Next up will be adding to few pieces needed to complete the engine and then I'll be looking to score a set of classic look headers.
 
9-8-07

I was able to score a short water pump from my local auto parts store. I got my pulleys and the bracket for the alternator from Speedway. I had to get the chrome pulleys because.... I couldn't help myself!:lol: Next I scored the plug wires, alternator and starter. Installation of everything was a snap.

23T_engine_alt0001.jpg


This was the easiest starter I have ever installed! Took about 10 minutes.

23T_engine_alt0003.jpg


The alternator and it's bracket went on just as easy. However, I have a little concern as to the clearance of the alternator to the frame. There is only about a 1/4" between the two. I may have to go with another bracket. The other bracket might give me a little more room for clearance and adjustment, but it will also mount the alternator a little lower. We'll see how it goes.

23T_engine_alt0002.jpg


Of course I had to take the obigatory artsy shot. All in all, today went very well. Once I get the headers the engine will be complete and ready to go.

23T_engine_alt0004.jpg
 
10-10-2007

September 21, I got the drive shaft for my T Bucket. Looking at it on my passenger seat had me laughing my butt off!:lol:

driveshaft0001.jpg


My rearend has an inertia balancer attached to the yoke. I had tried to remove the yoke earlier to replace the pinion seal. I tried the old fashioned way of using a big hammer. Fearing damage I got a gear remover from the local parts store and the yoke practically fell off on it's own. Memo to self: Proper tool for the job! I replaced the leaking seal as well as the rear seal on the tranny. Installing the drive shaft was a snap.

driveshaft0002.jpg


Today, the headers arrived. I wasn't able to get the extensions and mufflers because a really dumb mishap by me at work dipped into my hot rod budget. Memo to self: Do NOT use a screw driver to chip ice out of the shop freezer!

The headers are the Classic style. I liked the graceful flow and they seem to fit the theme I'm working on better than the Sprint style. When I wheeled her out for these pics, my neighbor came out. His first words said it best. "Damn! NOW it's looking like a Hot Rod!"
I couldn't agree more.

23T_headers0004.jpg
 
10-20-07

Today installed my exhaust extentions and a transmission cooler. I fabbed the brackets for the cooler and left a 1/2" gap to run the fuel line behind it.

The extentions were a gift from Blown T. A member of the National T Bucket Alliance. Thanks, bro! I cut the ends off to get a look that will go with the theme I'm going with. Will they work? I sure as hell hope so, because I REALLY dig the way they look!:lol:

23T_pipes0003.jpg


23T_pipes0004.jpg
 
Today, with the help of a good friend, I was able to start and hear my engine in the T bucket.:lol: Needless to say, I'm VERY happy and relieved that all went well. I only ran her for a little while, because the radiator isn't hooked up yet. She purrs like a little kitten with an attitude!:lol: Later next week the radiator arrives and I'll film it and post the video (I hope) for you to see.

Thanks again to EVERYONE who gave advice and kept me motivated. You guys are the best!
 
Monday, November 12, I got my radiator from Superior Radiators out of Michigan. I had decided to use a chopped '32 radiator for the look. This is a slight deviation from my original plan, but I think it will look really good in the end. It arrived on time, but most importantly, it arrived safe. They really packed it well. I had to make a bracket to mount it to the radiator tabs that are on my frame because the radiator was 1" short on the width.

My search for formed hoses was made simple by getting the numbers from a member of the NTBA. They are as follows:

top hose: Gates# 20416
bottom hose: gates# 21956

I had to cut a little off, but the bends and fit were dead on!

While I was at the auto parts store, I picked up my battery, cables and a remote starter. I connected everything up and she ran fine. I ran a hose from the fuel pump to a small gas can. I had one leak and that was from a chrome fuel filter. I switched it out to a regular plastic one and all was good. Sometimes the shiney stuff can be crap.:mad:

I'm using a 7# cap at the moment, but may switch to a 13 or 15# cap when I drive her. I'll just wait and see.

23T_radiator2.jpg


23T_radiator4.jpg
 
Well, about a week ago, I got my steering box and hooked it up. It was great to finally have her steerable. But, like the old saying, the Devil makes work for idle hands. So, I mocked up a steering column and got a steering wheel which I attached.

Here is a pic and a video. Enjoy.

steering_installed0001.jpg


Okay, after MUCH switching back and forth and trolling the internet, I decided to use a '28/'29 Model A grill on my T Bucket. I had been tossing between a Model A grill or a '32. The Model A won. First off, it was about half the cost and second, it would be a little different. I chose the chrome one that Speedway sells. Before I got it, I thought that I would have to trim a couple inces off the bottom for ground clearance, but it fit perfect. I used 1/2" squares heavy screen for the grill and attached it from the back with epoxy, after I cut it to fit.

I was originally going to attach the grill directly to the radiator tabs. Instead, I went to Lowes hardware and got 4 pieces of nylon (heavy plastic) 1" tubing. The spaces on the two bottom radiator tabs were exactly 1" from the grill and the nylon tubes fit perfectly. I used stainless steel bolts throughout.

grill1.jpg


grill2.jpg


On the two top tabs, I had to trim the nylon tubes about 1/8" and at an angle to match the curve of the top of the shell. I also got a 15" colant recovery tank and attached it to the grill. It's held in place by the bottom right nylon piece and a stainless bolt (provided with the tank) at the top mount which is diectly to the tank. The hose for the coolant tank runs along it's side and is mostly hidden by the grill shell.

grill4.jpg


grill3.jpg


In the above pic, the flash is too bright and you really can't see the grill. In person, the frame of the radiator is not so visible. The chrome on the shell is very good. I had thought about painting the radiator flat black to hide it more, but I like the look it has and I'm going to stick with it. If I change my mind later, it's just a matter of removing 4 bolts to get the shell off.

The Speedway shell has all the provisions for cowl to radiator supports, but the whole assembley is mounted very firm. I may use the supports for looks later on.

Next up was the Lokar shifter. I had considered using the one Total sells, but decided on the Lokar unit instead. It looks better and I liked the push button for shifting gears. My next consideration was room. I went with the 6" shifter. Not too small, not too tall. The Total shifter is designed to fit on the right hand side of the transmission tail and in park, it's flush with the floor. I just felt that if I had a passenger, they might want a little room too, plus if they had big feet, they wouldn't hit the shifter by mistake.

grill6.jpg


The Lokar instructions are very good, but you HAVE TO READ THEM FIRST! Naturally, I didn't and I ended up playing with it for a while. It shifts great. Good, firm movement between the gears. The push button uses teflon on the inside and it seemed to want to stick a couple times, but the more I played with it, the better it worked. After a little use, it should be perfect.

Remember when I said I might change my mind and paint the radiator? :lol: I changed it and NOW it looks like it SHOULD!

grillsmall.jpg
 
All I can say is, the will to help out anouther buckethead is strong. a casual conversation with Mike (Mikey) Daniels at the NTBA resulted in an offer for a body he had for sale! After checking to make sure it would work, I was off to his home to get it. The drive was long, but I forgot how tired I was when I saw the body! It was exactly as he described it.

The body is a CCR (California Custom Roadster) style and is way more strudy than I could have anticipated. Nice, thick glass work, along with plywood molded in for strength, will ensure that I don't have any problems later on. CCR claims that the body is sturdy enough not to need wooding for reinforcement and the interior. While I may not use it on the side and back panels, I will build a seat box when I do the interior.

Tfeverfred008.jpg


Tfeverfred006.jpg


Tfeverfred009.jpg


Tfeverfred014.jpg
 
I measured and cut the two holes in the seat bottom. Then, I measured my straps and cut them with a little overlap. I used my lighter to lightly melt the ends of the straps, so that the webbing won't come undone.

Next, I stapled them in place. I'll probably go back later and sew the straps together where they cross. I have a sample piece of the foam I'm going to be using and placed it on the seat. WOW! What a difference in comfort. It slightly (about 1/2") lowered me a little, but not enough to change my seating position. Actually, it seems my seating position may have improved.

hotrodseatwebbing002.jpg
 
I fiberglassed the seat bottom in place. It was not as bad as I had predicted, but preperation was the key. I cut all my fiberglass cloth before I started and read the instructions quite a few times before starting. the thing to remember is that the resin will dry faster than anything you have ever used! wear gloves and do not breathe the fumes! I would have worn a mask, but I was working outside. Even then, the fumes were quite strong. NO SMOKING!

I applyed two layers of cloth wth a coat of resin between layers. It was my first time working with this stuff and it wasn't bad, but I didn't have a whole lot to do.
I checked it the next day and it was SOLID as a ROCK and the seat bottom is attached permanantly! *pats self on back*

hotrod003.jpg


Before I did the seat, I installed my throttle cable assembly and the gas pedal I got from Speedway motors. It was an easy install with no drama. The cable assembly was found at AutoZone! It's made by Spectre and the price, as well as the quality, were right on.

hotrod002.jpg


hotrod001-1.jpg


After the install, I took Miss Behavin' for her first "power" run. Oh. My. God. THIS is going to be a fun car! While I was jetting around, strictly test runs:lol:, a late model Camaro convertable came by in the opposite lane of traffic. The driver (guy) had a couple of girls in the back. For about 10 seconds, his convertable may as well been a Yellow cab! :lol: This is NOT goingto be a low profile car. BONUS!;)
 
Well, today I padded the seat bottom and back. Then, I covered them with, foam, a sheet of thin plastic (water proofing), and finally vinyl material I scored at Walmart (perfect color and pattern)!

hotrodseatred001.jpg


The back is held in place with Indusrial Velcro. I left a bare spot on the back of the 1/8" board that the foam is attached to. Then, I placed the velcro on. Since the body had a smooth, glass covered wooden piece in the back, it was the perfect place for velcro. It fits and sticks VERY good. It will be easy to remove, if I ever decide to spend the bucks later for a professional interior. But for now, it suits me fine.

hotrodseatred002.jpg
 

     Ron Pope Motorsports                Advertise with Us!     
Back
Top