Ron Pope Motorsports                California Custom Roadsters               

The excitement is building

Thanks guys,

I have a plan to add some support to the rad so that the grill can mount to it and not put undue stress on it by trying to rock it forward from the weight and air resistance.

Of course that meant another McMaster order . . . we know they never come cheap!

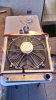
Also bit the bullet and ordered the Be Cool, "Show and Go" big-mutha, electric fan . . . . https://www.summitracing.com/int/parts/bci-75069/overview/

Figured a Big-A motor needs a Big-A fan . . .

I also have some ARP 12pt stainless bolts coming to replace those temporary ones holding the shock brackets, but they didn't get here yet.

I'm trying to make it look as professional as I can, . . trying to make things match and not look rinky-dink . . . . man, I should have looked for 1/2" 12 pt head or socket head while I was on McMaster.com
 
Got an idea on the grill mount. Is the only mount for the radiator on the bottom? I would take a 1/4” or 3/8” x 1”or 1 1/4” strap and pick up the keyhole shaped holes on the side of the radiator and a foot with 2 holes at the bottom for stability of the radiator. Then 4 angle iron off that to pick up 10x32” screws through the shell and go down the road. Does that make sense? You could also make brackets for the fan off that too.
 
Got an idea on the grill mount. Is the only mount for the radiator on the bottom? I would take a 1/4” or 3/8” x 1”or 1 1/4” strap and pick up the keyhole shaped holes on the side of the radiator and a foot with 2 holes at the bottom for stability of the radiator. Then 4 angle iron off that to pick up 10x32” screws through the shell and go down the road. Does that make sense? You could also make brackets for the fan off that too.


I ordered some 1/4" rod ends and threaded rod, plus a variety of 10-24 carriage bolts and coupling nuts so I can use the keyhole mounting slots on the sides of the rad to bring a flat piece of aluminum at the top position forward to catch a rod end and run that down to the front of the mounting rails and rearwards to provide a mounting tab for the recovery tank.

I'll run a second piece of flat stock rearward from the center keyhole mounting position to provide a second mounting point for the recovery tank.

I'll secure the flat stock to the keyhole slot carriage bolts with coupling nuts to provide attachment points for the grill shell with some short 10-24 button heads.

I ordered everything in stainless, of course.

Hopefully, the new fan will be here for the weekend, so that I have it to work out a more secure mounting than the nylon cable ties thingies thru the rad fins.


There's so much stuff that all physically inter-relates, that you have to have it all on hand to test fit and mock-up before you get too committed to a master plan.

And as a side note, I haven't forgotten the rear deck . . . . I ordered some lift supports that should do the trick to open the deck lid and hold it up, and then close with just a little force down.

I took some tentative measurements to try to use the bolt holes that secure the gas tank tabs to the frame and the bolts that hold the hinge arms to the deck lid.

Will probably take a little trial and error getting the ball stud positions just right, but it should work out quite nicely, I think.


Rear Deck Supports 1r.jpg
 
Little Saturday Update . . . .

So now that I have the rad mount roughed in last week so the grill shell can fit about where it needs to go, and after much thought, a plan to move forward with a more robust and modular setup that mounts the rad, grill shell, fan, and recovery tank, I started today to make that happen.

From the initial setup last weekend, the right side mount wanted to toe inwards at the front, rather than align straight ahead, . . . as it turned out, there was a little tweak in the rad's side rail that responded well to a piece of 2X4 and a couple firm hammer blows.

Since the grill shell will now attach to the rad, but not the main frame rails, I opted to raise the rad a little for a little more clearance for the suspension under the grill shell, and a bit of extra ground clearance for the lower "nose" of the grill shell.

I've left all the new mounting ears for the fan mount frame extra long, so that I can trim them to fit once the fan frame is secured into place.

The left side is a bit longer, as I'll be adding the recovery tank mount on that side, just behind the fan frame's mount . . . . Probably won't need half of the ear length, but better there to trim off . . than to have needed what wasn't there.

The fan frame is just mocked up for now . . . need to make a material run in the morning, but it should be all permanent tomorrow and I can mount the recovery tank.


Rad Siderail bend 1r.jpg

Rad Siderail bend 2r.jpg

Lft Side 2r.jpg

Lft Side 3r.jpg

Rt Side 1r.jpg

Frnt View 1r 2r.jpg

Fan Frame 1r.jpg
 
I’m liking that a lot. It’s cool you made the support rods go forward to be hidden. Are you making a shroud around the fan to bolt the fan on?
 
I’m liking that a lot. It’s cool you made the support rods go forward to be hidden. Are you making a shroud around the fan to bolt the fan on?


I may eventually . . .

Notice that the fan has a mounting ear exactly at the top and bottom . . .

I'll use a couple stainless steel carriage bolts and spacers so the fan's weight sits directly on the lower cross rail, and hangs equally from the top cross rail.

Once that's in, and I can get good measurements, I'll look at adding a few more points of attachment.

You may also see that there's 2 sets of holes in the top bracket and bottom bracket, so the rad can mount in either position.

I'll have to be sure to put 2 sets of holes for the fan frame so it can position with the rad.
 
Last edited:
I ordered everything in stainless, of course.

I see that you are using a lot of stainless fasteners. I am sure you know this but for those that don't, remember... Anti Seize is your friend. Mock up and fabricate in carbon steel fasteners. Assemble with Stainless. Nice work Island Girl!
 
Weekend Update . . . .

So . . . . picking up where I left off yesterday with the modular rad, fan, recovery tank module mocked up and waiting for materials . . .

I picked up some supplies, at least what I was able to get here, and cut and drilled, and tapped until I had sore blistered fingers, but the results were quite encouraging.

Everything is now tight and solidly assembled, just waiting on button head SST allen heads to replace all the hex heads, since that was all I could get here locally.

I ordered some socket heads and button heads allens, along with a few other bits from McMaster, so hoping they will be here for next weekend so I can wrap this part of the project up and work on fitting the lift supports to the trunk lid . . . yippeeeeee . . . like I haven't fabricated enough aluminum bits already . . .

I will be adding some new mounting ears to the frame so I can pick up the next 4 mounting locations on the fan, but it's already pretty well supported.

Anyway, this is how it all came out so far, Ill be swapping out the hex heads for button head allens and securing the next 4 fan mounting points . . next weekend.


Fan Frame 1r.jpg

Fan Frame 2r.jpg

Fan Frame 3r.jpg

Fan Frame 4r.jpg

Fan Frame 5r.jpg

Fan Frame 6r.jpg

Fan Frame 7r.jpg

Fan Frame 8r.jpg
 

Attachments

  • Fan Frame 1r.jpg
    Fan Frame 1r.jpg
    637 KB · Views: 7
Last edited:
Nice work. I'm enjoying watching our build. Very clever lady. I have one question, I notice the overflow tank is on the opposent side than the overflow spout on the Rad. Is there a reason you are doing it that way?
 
Nice work. I'm enjoying watching our build. Very clever lady. I have one question, I notice the overflow tank is on the opposent side than the overflow spout on the Rad. Is there a reason you are doing it that way?


Yes,

The alternator on my motor is on the passenger's side, but there's nothing on the driver's side, so I put the tank there to fill in the void, and not take a chance interfering with the alternator.

Hopefully it will have more balanced look and make working on anything nearby easier.

Front View 1r.jpg
 
Looking good! Very clean. Have you mounted the shell yet? That will cap off a nice job.


Have not mounted the shell yet, wanted to get the hardware swapped out and make a little mod to where it fits in the frame first.

Mounting it all in the chassis will probably be this weekend's adventure.

All the coupling nuts are the available grill shell mount points to use some button head allens, how many I can use, or if I need to look at other options I'll decide this weekend. Ones that don't get used will get nylocs instead of coupling nuts.
 
What kind of washers, if you are, are you planning on using? Instead of relying on the clamping force of the bolt to hold everything, maybe use rubber coated washers and /or fender washers on the inside glued in place ?
 
What kind of washers, if you are, are you planning on using? Instead of relying on the clamping force of the bolt to hold everything, maybe use rubber coated washers and /or fender washers on the inside glued in place ?


Haven't got that far ahead yet . . . There's not much clearance between the rad and the inside of the fiberglass shell, so it's possible/likely that I'll need to shorten some of the coupling nuts if I go that route.

Alternatively, I could opt for some vertical strips of flat bar on shortened coupling nuts which could then better support the inner contour of the shell and then drill tap that for the shell fixing screws. If I go with something along this idea, I could put a rubber strip along the flat bar.
 
Got a chance to work on the T today . . . .

Still waiting on a McMaster order for stainless hardware, and a Summit order for a fan shroud gasket, but I did get to fine tune the rad module mounting a bit.

I took the shims between the shock mount brackets and the frame rails out to gain a little more clearance between the upper shock mount and the grill shell, and re-fabbed the tabs to sit on the outside of the bracket, facing inwards. to mount some adjustable load stops so the rad module has a second place on each side to support it, instead of just the big 1/2" allen cap screws. A lot less chance of the rad rails suffering from metal fatigue now.

Tomorrow, I'll see if I can't devise a suitable way to get the grill shell all mounted up, now that everything else fits and mounts up nicely.

I tried working on the rear deck lift supports install . . . . but the struts do not match up to the listed specs, so that turned out to be a very frustrating waste of time and effort.

The lifts were 2" longer on compressed length, and 2" shorter on stroke than listed in the specs, so I was not at all a satisfied customer!

The brighter side is that I did come up with a better plan, although it does mean I have to buy new lift struts . . . . it's only money . . right!

Anyway, a few pics of today's progress . . . :

Lft side rad support detail 1r.jpg

Rt side rad support detail 1r.jpg

Rad supports in place 1r.jpg

Rad Mount detail rt 1r.jpg

Rad Mount Detail Lft 1r.jpg

Rad Mount detail Frnt 1r.jpg
 

     Ron Pope Motorsports                Advertise with Us!     
Back
Top