Ron Pope Motorsports                California Custom Roadsters               

Instrument panel insert attachment.

Rip VW

Active Member
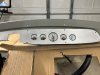
Ok so I am adding an aluminum panel flat over the recessed area of my stock 27 Dashboard. The panel lays flat against the dash and I am going to attach it with several screws around the perimeter of the aluminum panel.
So now I need to decide what type of screw head do I use right there on the panel! Do I go with a traditional chrome Phillips or maybe black anodized Phillips screws or maybe stainless button head allen screws. The main part of the dash will be satin black. The insert will be brushed aluminum so I can’t decide what to use for screws. Should I use black screws to match the main panel, or should I go with silver screws matching the insert. I dunno I am leaning toward the button head screws but I dunno… what would you do in this case? Let’s gets some opinions flowing here…ow btw the instruments have white faces with chrome trim.. There will be 4 2inch gauges and a 3inch Speedo for instruments..
 
For me, the buttonhead screws in either stainless or chrome (silver) make the most sense. With your arrangement, I would want the panel to appear to "float" on the dashboard, and not look like it was nailed down (with black fasteners).
 
I like what Spanky said. Use big 20d nails to hold on your panel! If you’re spending that much time over what kind of screw to use you’ll never finish that thing. Spend ten bucks for some screws. If you don’t like them spend another ten and buy other ones. Problem solved.
 
I would weld something like pieces of all-thread to the back of the panel, drill holes in the old dash for the whatever-you-used to go through and put nuts on the back so that nothing shows on the face. Didn't you say that you were going to put some sort of scratch pattern on the face of the aluminum? If so, that would hide any hint of the welding.
 
I am liking the button head screws. You guys are right with the black screws that it might look to cluttered. I would really like the stud idea, but I have no way to aluminum weld the studs. Yeah, if I were to decide and just do it would be done but then it might look hideous! I may be slow but when I am done I want to be proud of my accomplishments! What may seem like a good idea to me may be just wrong to the general public, so I float some ideas and see what the general thoughts may be..
 
You may look at Speedway for dash inverts. They usually are back mounted so no fasteners are visible. Search gauge panel.
 
How thick is your insert? Mine is 1/8" and I drilled and tapped shallow holes on the backside for threaded studs. So no screws on the front. Or maybe just glue the insert? Or double-sided tape so you can remove it someday? Or use a couple of the gauge hold-downs to secure it.
2013 new dash.JPG
 
Wow Potvin Guy that's a great looking dash. I really like it. What dash did you use to make the basic dash. Also, my eyes spied the connector on the harness from the dash. Is that connector an aircraft connector? I like those but they can be pricy! That looks like close to a 50-pin connector.
Someone asked about the thickness of my insert, and it is really thin at about .042 or close to that. I didn't need the thickness so much as that there is still a lot of structure left in the center of my dash. The cut-up portion was the center where the original cluster was that is just empty space but my speedo will fit there and the rest of the instruments will have the steel backing under the insert.
On a quick rant on instrument manufactures. Why do they advertise their instruments are 2.0 in diameter and then in the instructions they call out for a hole that is 2 and 1/16th in diameter? Ok rant done...
 
The basic dash is an integral part of the CCR body. The connector is an inexpensive plastic one; I'll find the source and post it. Here we are: 206306-1 | Digi-Key Electronics You buy the shell, and pins and do a lot of crimping. And of course there are male and female versions, and things like cable clamps and other pieces you can combine to make what you want.
 
Last edited:
I say to try to match the screw heads with the gauges. If the gauges are chrome, use chrome screws. If the gauges are black, use black oxide screws.
PotvinGuy, that’s some talent you have there to drill and tap a blind hole in a 1/8” thick panel. You da man!!
 
If you follow PotvinGuy’s posts about “ Rebuild of the old bucket” you will have a new hero in the bucket world!
 
I've known (virtually, if you will) ORF for years and he is an excellent judge of buckets and talent. (ORF, the usual check is in the mail)
 
Thanks PG! All donations are welcome. Being a retired postal worker I know better than to find ways to spend it before it gets here! I have set a goal of going to Branson for the NTBA Nats next year. If I don’t get it drivable I will trailer the thing for display!!
 
Won’t the gauges hold the panel in place? Assuming it’s going over something. Perhaps some predetermined spots of adhesive to prevent vibration.
 
Won’t the gauges hold the panel in place? Assuming it’s going over something. Perhaps some predetermined spots of adhesive to prevent vibration.

The Gauges do help hold the panel in place somewhat. There are large missing sections of the original panel, so A gauge bracket my only be clamping one side. The other side is a spacer to make the bracket sit level. There was enough meat left to keep the original dash solid enough to support the insert. If I were to do it again, I would use a thicker piece of aluminum. I would use something like 1/8 Alclad. As for an adhesive Which was a good idea is just plain double backed tape.

Here is one photo with the Original Panel in Primer and the insert in position with Gauges mounted. I still have some finish work to do and to smooth the upper edge of the insert. Ya can see my shakiness as is now. I still gotta decide on Ing Switch, Light Switch, wiper switch and signal indicator's locations. There is enough structure left just got to locate them. but that is something that won't hold up fitting and wire routing planning.

Oh the big steering wheel hole is cut out for a large aluminum brace that supports the column.

Dash1.JPG
 

Attachments

  • Dash1.jpg
    Dash1.jpg
    149.4 KB · Views: 2
I am planning on using a piece of stainless on my dash that I salvaged from a refrigerator door, lol... I was thinking about using either contact cement, like for laminate, or urethane, like windshield adhesive. Obviously there are very different application processes but I felt like the gauges and switches were enough to hold it in place. I just don’t want that rumbling 427 to rattle it. Even if I choose to install perimeter fasteners, I think vibration could be a factor. That’s just my view.
 
Yeah, I noticed some slight lifting when My panel is screwed to the main dashboard, so I will use the tape method to stick down the center parts. Gads how I hate a dash that rattles and shakes. Now that you mention it contact adhesive seems to be a reasonable way to go. I am not sure if I would use the windshield adhesive as it may make removing the insert almost impossible. and you know how changes can sneak in and completely mess up a plan.
 
Yeah, I noticed some slight lifting when My panel is screwed to the main dashboard, so I will use the tape method to stick down the center parts. Gads how I hate a dash that rattles and shakes. Now that you mention it contact adhesive seems to be a reasonable way to go. I am not sure if I would use the windshield adhesive as it may make removing the insert almost impossible. and you know how changes can sneak in and completely mess up a plan.
Yeah, I like that the urethane is somewhat pliable though. Adhesive silicone might even work... the good stuff.
 

     Ron Pope Motorsports                Advertise with Us!     
Back
Top