Ron Pope Motorsports                California Custom Roadsters               

CCR Seat Insert

engine24355

Member
I currently have a 23T with a CCR body and am looking to upgrade my interior. Looking at several options, but wanted to ask about the CCR drop in interior that is shown on the website. Anyone have one or have any advice on one? I am over 6' tall and affraid it may take up too much room with the pading on the sides and back of the seat. Would like to have a fiberglass insert, but not sure if a TP or Spirit will fit in a CCR body. Even if they did I am affraid the labor cost to galss in and paint would be as much as just buying a new body with the insert already in. Anyway, any help or advice would be greatly appreciated.
 
Re: CCR drop in interior

Sorry, I should have specified the California Custom Roadster drop in interior kit. Not sure how much room it takes up, but my current interior is a drop in (do not think it is CCR) and I had to take the pading out of the back and sides of the seat back to fit in the car right. I want to make the inteior retro, but need as much room as possible and do not want to run into the same problem with the CCR kit. Any advice???
 
I'm not sure if it would fit or not. Have you considered having your interior done by a shop? They could make it specificly just for you. Adding or not installing padding per your requirements. The only other way to know for sure if one manufacturers insert will fit in anothers body would be to try and get the measurements from the respective suppliers. This will take some homework, but it may be worth it.

I'm 6'3" tall and thin as a rail. Having sat in two buckets with the conventional padding, I am going to attempt to do my own. Here's what I'm planning on doing. I'm more than likely going to use the Total Performance body and will have them put in their wood kit. On the sides of the interior, I'm going to use thin padding and attach it to their wood pieces. My side foam will be as thin as 1/2" and I'll cover it with vinyl material from EZ Boy Interior products. Here is their link: www.rodinteriors.com They have material with the padding attached. You can get it in different styles, such as tuck and roll, etc. I'm going with plain smooth.

For the back, I'm going to go as thin as comfort will allow on the foam and cover that with the same, plain (no pattern) vinyl material. For the seat bottom, I'm going to use one from a mid '90s Ford Escort. I measured, it's an almost perfect fit and for the most part is fairly thin, but comfortable. I used to own one and sat in the back a couple times. If my measurements are true and correct, this set up will give me a seat height of about 6" and 4" when I am sitting in it. The 2" is the compression of the seat springs. The TP wood kit bottom tapers from about 5" down to 4" as it goes towards the back. This will give me the angle needed for comfort. You don't want your seat to be perfectly flat like an "L" shape, this would kill your back in no time.

I plan to bring the material for the sides and back as close to the top body edge as possible and then I'm going to run a thin strip of chrome flexible door edge guard (you can get it at most auto parts stores) along the edge of the body where it meets the upholstery. It should really set of the red interior and black paint I plan on going with.

Later, I will post a couple pics that Rick passed along to me from a member of the NTBA. His interior is almost exactly what I plan to do, except he used a tuck and roll pattern.
 
Here are the pics of Delaware Bill's interior, I'm sure he won't mind us using his idea. He's a member of the NTBA and would be more than happy to explain how he did his if you ask him. In the mean time, take a look at these and maybe they will make you consider another option besides the insert, if it won't fit. Also, as was told to me once, the insert is great as long as your butt fits it. Some of us are wider than others.:D The insert is divided into two specific sections for two people. If your butt or your passengers butt is too wide, it might be uncomfortable. My girlfriend has a nice size "trunk" and she will appreciate the bench seat. Now, I'll also have to make sure she doesn't read this. If it gets edited or deleted later, you'll know why!:lol:

So, here are the pics:

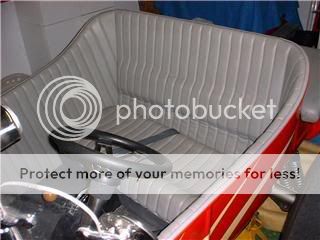
Notice in this pic, that Bill's sides and back do not have the top roll you are accustomed to seeing. While very stylish, it takes up almost 4-6" of interior room on that top edge. It also tends to push the top of your back FORWARD! OUCH! Eliminate it! You'll also notice where he said he had a problem matching the pleats of the upholstery. This is why I'm making mine plain and smooth. Also notice that the seat bottom tapers lower towards the rear. It is NOT flat. You can also see how it is about 3-4" thick and sits on top of the box like support where your wiring would go. Notice how it kicks up in front to support the bottom of your legs.

seat3.jpg


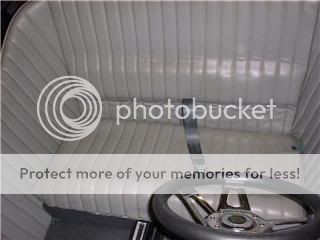
In this pic, you can see that he has added a back lumbar support. He told me in an email that he added this by using extra foam in that section. Remember, the human back is NOT flat. It curves in just above the buttocks and out again just below the shoulder blades. This support will help your back. I bet ya ain't seen that before!;) I totally dug that idea.

seat4.jpg


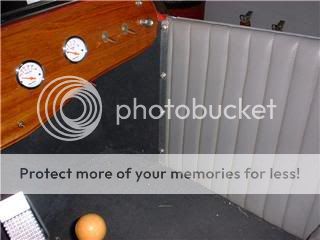
On the sides, he carried his material just to the edge of the dash bottom. I also plan to do this and use carpet for the remainder of the sides that go under the dash. This would be your kick panel. I'm planning on attaching mine with Velcro, so it will be easy to remove to clean. I'm also going to try and use that area BEHIND the kick panel, in between the wood strips, to store maps, an extra key, etc. It would be like a little, flat compartment, but hidden.;)

seat2.jpg


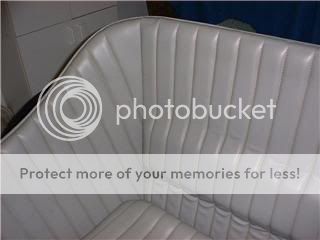
In this last pic, you can see the bead at the top of his upholstery. This is common with most interiors. I don't know how to do it, so I'm going to let the upholstered sides (which are attached to wood pieces on the interior sides) come all the way up to the top edge of the TP body. When you look at the TP body, it has a lip that goes inward. I'm going to run some 1/4" chrome door edge guard along the edge of that lip. It is self adhering and should fit snug between the body edge and the side upholstery.

seat1.jpg


So, that's what I plan to do. I have been thinking about this for a while (in case you didn't notice) and it SHOULD work, but like anything, it may need to be modifyed. Do your research, ask questions on the NTBA website and PLEASE, remember to thank Delaware Bill! His design is the best I have seen as far as comfort goes.
 
Almost forgot..... also thanks to Rick for getting these pics from Bill and sending them to me. I figure I'll be able to do my interior for $150-$200. At least I'm going to try anyway.:D
 
Thanks so much for the help and pictures. This is a big help. Bill has always been a huge help with any questions I have posted or asked. This is true also with everyone on the various T Bucket forums. Thanks to all of you for your help and advice. I grew up with hot rods, but never had a bucket so I am learning a bunch. Thanks again and have a MERRY CHRISTMAS!!
 
I'm glad I may have been able to help. Happy Holidays to both you and your family.

And a VERY Happy Holidays to our troops both at home and abroad!
 
tfeverfred... How much dose Total charge to install the wood? I've done it and it's not that hard to do. $100 in mat'l and a 3 day weekend.
 
The difference in the cost of the body with or without the wood kit installed is $125. I found out my boss has all the supplies to fiberglass, so all I need to do is get the wood. So, I'm going to get the wood and do it myself with his guidance, since it's my first time dealing with fiberglass.

The other reason I'm probably going to do it myself, is that I want to change the seat bottom angle. I had a real good look at some pics and there really isn't that much to putting it in. In fact, the only reason I can see for the fiberglass is to help tie the body together for strength. When you look at the pics of the seat box, it just a box divided into 3 sections. Building that would be no problem. It's the glass work I was trying to avoid, but not any more.

Also, the wood for the interior walls are just strips of wood cut and glued (TP uses bondo) to the body. I have their instruction manual and it gives the dimensions and where to put the pieces. I'm going to do my own. Looks to be about $30 worth of wood.
 
I'm also playing with the thought of mounting small bucket seats or maybe even (in my dreams aka "$") a set of bomber seats. We'll see what happens.
 
A bench seat adds a lot of strength to your body. I've seen cracks in the side of a body with buckets seats from people getting in and out.
 
Tfever...there's an excellent post on fiberglassing the wood in the Rat Rods Rule forum under Body Q&A.
 
Youngster said:
Tfever...there's an excellent post on fiberglassing the wood in the Rat Rods Rule forum under Body Q&A.

Thanks, I'll check it out.
 
Has anyone ever worked with "Gorilla Glue"? I've used it before (not on fiberglass) and it's some VERY strong stuff. Or how about contractors cement? I have heard the contractors glue is pretty strong, but I'm sure there are other ways to accomplish the same goal. Anyone else have thoughts on what they have used before?
 
Fred, I would be cautious about trying something new to bond that wood in. Most (all??) of these products are going to use some sort of catalytic reaction to bond things together. Catalytic reaction = heat. Excessive heat = distorted fiberglass body. Distorted body = frustrated Fred.

Gang wary with trying something untested.
 
Just a couple of thoughts for you guys to consider.

A bench seat will give you more sitting options on a long trip. I'm not all that familliar with the type of inserts you are talking about, but the ones with 2 pods built into them really limit reposioning yourself on a long trip.

I've noticed some talk about how low you sit in a bucket. Is the seat riser more that 4'' high? If it is, you are more than likely going to be sittin' tall in the saddle. ( seems to be a lot of Texan's on here so I thought I'd throw that in ) I use a seat riser that is 3'' at the forward end and 1/2'' at the back. The back cusion supports should be at 55 to 60 degrees from the seat bottom. This is called ''the comfort zone''.

Looking at resale. The next owner of your car may be a different size than you, hence the bench over the bucketseat.

On putting wood in your body...it serves 2 functions, 1) it stenghtens and holds the bodies shape, 2) to provide upholstry attachment. You want the wood to be part of the body, not an addition to it.

Glues and adheasive work great where there isn't any vibration, but can you be sure about them where there is? Fiberglassing or tabbing the wood to a body results in the wood becomimg part of the unit. Most people tell me they want to find another way to add wood because they're not skilled at the process. Let me tell you, this is one of the easiest skills to learn. It dosen't require expensive tools and the ego boost is great. After all, you've just put a chassis together from all kinds of miss matched parts, you can do this too!

Look at the post on Rat Rds Rule, It's very good!

Sorry this got so long, Youngster
 
Mike said:
Fred, I would be cautious about trying something new to bond that wood in. Most (all??) of these products are going to use some sort of catalytic reaction to bond things together. Catalytic reaction = heat. Excessive heat = distorted fiberglass body. Distorted body = frustrated Fred.

Gang wary with trying something untested.

Thanks, rick. that's why I threw that out there. To see if anyone had anything on alternate methods. I'll just stick to glassing my body since my boss has the stuff to do it and is willing to help.
 

     Ron Pope Motorsports                Advertise with Us!     
Back
Top