Gerry
Well-Known Member
PART 2
Step 5
Once we have one pipe in place it’s a simple task to cut and tack the other 3 in place using the first one as a datum point to work from.
.jpg")
I left the pipes LONG so that they could be trimmed once the T is more complete. In fact I really want the Top on to see what relationship there is between the body/top meeting point and the end of the header pipes, but that’s not going to happen so I will leave them on the long side for the time being.
.jpg")
Once all 8 pipes are tacked, adjusted and correct, its down to welding them all the way around. As mentioned above each joint has a short section of pipe installed inside the header tube to align and strengthen it. Once removed from the T and welded, its time to clean up them up. Simple???
Step 6
As these are stainless and due to be polished I looked over the interweb (LOL) for pipe polishing things, to be met with a number of different machines and gadgets all of which were very expensive and use bespoke abrasive pads, again at a premium cost.
This may have been done before but in case you have not run into it here’s how I did it. First cutting of the weld was done using a mains power file with a 3/8 wide belt. This tool is THE MOST used one in my workshop (thanks to my wife for the birthday present) and can do things nothing else will… in short its brilliant and now Ebay offers the abrasive belts at ¼ of the price of a DIY store its cheap to run.
.jpg")
.jpg")
Before and after the power file dressing
To give a smooth and good finish I came up with this:
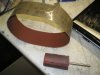
I use a bit of polyurethane bar left over from making some bushes and put 4 slots in the surface with a small rotary cutter. Drilled a hole in one end and banged a piece of rod into it.
You can use this with the same power file belts (turned inside out of course) or off the shelf sanding belts; but me being a total cheap skate I use a standard roll of abrasive paper which is cut to length, turned over and using scotch tape reinforced to make a belt. I started with duck tape but it doesn’t need it. The scotch tape lasts as long as the abrasive so that’s a good thing. Also the rolls of abrasive are available in many different grades at a good price. I use 240, 400 and 800.
.jpg")
.jpg")
Using this set up takes a little practice but its amazingly quick and efficient. Once mastered, you can ‘steer’ the belt around bends with no problem at all. In fact I only went down to the 400 to give me a surface suitable to put on the polishing mop. So far I have only finished one of the 8 pipes but the method is proven and works.
.jpg")
.jpg")
A little bit of water for lube helps.
If you look carefully you can see the ‘wrinkle’ where the weld was. Just means a little more dressing up and re-polish

With all 8 pipes on its time to turn to the rear brackets. I always wanted to run without any rear brackets but caution became the better of me and I decided to make them. After all with the design I have you can always take them off and there will be no evidence they were there in the first place unless you look from underneath.
The pictures tell the story. The rubber mounts are for a VW of some kind and came out of a parts bin at the local auto shop. They do need to be modified with some alloy brackets to get rid of the factory metal and make them T worthy, but they work just fine. The cross bar is ½’’ stainless and has been split in the middle (otherwise you wont get the rubber mounts off again). The collar was turned and cross drilled all the way though it and the 1/2’’ bar. Fixing is with nylock nuts and bolts to prevent them loosening with vibration. I did look at grub screws but vibration can be a wicked thing.

.jpg")
.jpg")

Final step will be the baffles which have not been designed yet. However the bolts from the bracket underneath the pipes will also locate the baffles in the header pipe.
That’s it so hope its been useful and maybe there’s something here you can use
Gerry
Step 5
Once we have one pipe in place it’s a simple task to cut and tack the other 3 in place using the first one as a datum point to work from.
I left the pipes LONG so that they could be trimmed once the T is more complete. In fact I really want the Top on to see what relationship there is between the body/top meeting point and the end of the header pipes, but that’s not going to happen so I will leave them on the long side for the time being.
Once all 8 pipes are tacked, adjusted and correct, its down to welding them all the way around. As mentioned above each joint has a short section of pipe installed inside the header tube to align and strengthen it. Once removed from the T and welded, its time to clean up them up. Simple???
Step 6
As these are stainless and due to be polished I looked over the interweb (LOL) for pipe polishing things, to be met with a number of different machines and gadgets all of which were very expensive and use bespoke abrasive pads, again at a premium cost.
This may have been done before but in case you have not run into it here’s how I did it. First cutting of the weld was done using a mains power file with a 3/8 wide belt. This tool is THE MOST used one in my workshop (thanks to my wife for the birthday present) and can do things nothing else will… in short its brilliant and now Ebay offers the abrasive belts at ¼ of the price of a DIY store its cheap to run.
Before and after the power file dressing
To give a smooth and good finish I came up with this:
I use a bit of polyurethane bar left over from making some bushes and put 4 slots in the surface with a small rotary cutter. Drilled a hole in one end and banged a piece of rod into it.
You can use this with the same power file belts (turned inside out of course) or off the shelf sanding belts; but me being a total cheap skate I use a standard roll of abrasive paper which is cut to length, turned over and using scotch tape reinforced to make a belt. I started with duck tape but it doesn’t need it. The scotch tape lasts as long as the abrasive so that’s a good thing. Also the rolls of abrasive are available in many different grades at a good price. I use 240, 400 and 800.
Using this set up takes a little practice but its amazingly quick and efficient. Once mastered, you can ‘steer’ the belt around bends with no problem at all. In fact I only went down to the 400 to give me a surface suitable to put on the polishing mop. So far I have only finished one of the 8 pipes but the method is proven and works.
A little bit of water for lube helps.
If you look carefully you can see the ‘wrinkle’ where the weld was. Just means a little more dressing up and re-polish
With all 8 pipes on its time to turn to the rear brackets. I always wanted to run without any rear brackets but caution became the better of me and I decided to make them. After all with the design I have you can always take them off and there will be no evidence they were there in the first place unless you look from underneath.
The pictures tell the story. The rubber mounts are for a VW of some kind and came out of a parts bin at the local auto shop. They do need to be modified with some alloy brackets to get rid of the factory metal and make them T worthy, but they work just fine. The cross bar is ½’’ stainless and has been split in the middle (otherwise you wont get the rubber mounts off again). The collar was turned and cross drilled all the way though it and the 1/2’’ bar. Fixing is with nylock nuts and bolts to prevent them loosening with vibration. I did look at grub screws but vibration can be a wicked thing.
Final step will be the baffles which have not been designed yet. However the bolts from the bracket underneath the pipes will also locate the baffles in the header pipe.
That’s it so hope its been useful and maybe there’s something here you can use
Gerry