


You are using an out of date browser. It may not display this or other websites correctly.
You should upgrade or use an alternative browser.
You should upgrade or use an alternative browser.
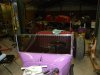
pics from railroad of windshield frame
- Thread starter putz
- Start date


rooster57
Member
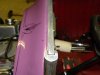
I used 7/8 round stock and cut a 5/16 slot. the one inch for me gets a bit big. To avoid using the rubber gasket on the edge i sat the glass in the frame on some oring materal then filled the void with windshield black silicone from both sides . So the silicone not only fills the sides but also goes under the glass and make a very nice seal. I used 1/4 glass from a mall door double safety and slight tint.
rooster57
Member
couple of my pics of my frame and little cap i machined to top the vertical piecesI used 7/8 round stock and cut a 5/16 slot. the one inch for me gets a bit big. To avoid using the rubber gasket on the edge i sat the glass in the frame on some oring materal then filled the void with windshield black silicone from both sides . So the silicone not only fills the sides but also goes under the glass and make a very nice seal. I used 1/4 glass from a mall door double safety and slight tint.
Thanks Putz, for putting up the pics for me.
Rooster57, looks like you have done exactly what I am working on.
I had to reduce the diameter at the bottom to seat in the bracket.
I had the grooves machined out to match the old post.
I bought some square channel, see pic, for the top and bottom
of the glass. It looks like you used the round stock for your
bottom. My original glass had no top frame and the bottom
was siliconed to the body. It was done well and did not
detract from the job. I forgot to have the glass cut to allow
for the addition of the top and bottom channel and will have to
have it shortened by that thickness. I see your post have only
one hole to attach to the brackets, as mine do also. I think
I will add a second hole. If you are interested in adding a
top frame to your glass, Lowes has an alum assortment with the
material I bought in 4 ft lengths. You could use the same
silicone method.

I finally got the glass framed. I used the window welt and it was too tight, spread the channel. After removing it, it was too
bent to reuse. I tried straightening it, but was not pleased. I used the silicon, like you and my bother suggested. Only problem so far is having to wait on it to cure. Temp is below 65 and the shop is not heated. I ran into another problem. In a trail fit of the side post in the stantions, I noticed they were at different angles. I had to grind the post to tilt, until they
were in the same plane. I also drill and tapped a second hole in the stantions and post, since I lost some of the good fit, tilting them. I will seat them in silicone, like the original ones. I'll send some pictures soon.
rooster57,
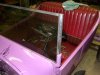
Hope these pics view OK. I still have silicone smudges on the frame and have to take it out to hit it with a buffer and seal the bottom to the cowl. If you can see I have the mirrors in the seat that Speedway sells that clamp on a 1" round tube. They are being modified to cap the top of the post and not scratch them too much. I hope they have enough adjustment behind the mirror to clamp on staight out on the windshield post. The groove in the round post for the glass is 7/16". I used enough of the welt to hold the glass off the bottom of the groove and center it on the sides. I put the silicone in the groove and stood the glass in it. If I could get some decent weather, I could do the cosmetic work and be through.
I ordered some Eastwood hi temp coating for the headers. Someone painted them with a pine top and some sort of black coating. They look like a 20 year old bbq grill. I'll let you know how it turns out. Need warm weather for this also. Has to be 65* or
better to paint.
Attachments
Windshield is installed. Siliconed and bolted. Mirrors are on. I pulled the carpet up, with plans to cut the sides off the transmission hump. The hump is a bunch larger than it needs to be and the gas pedal is on top of the hump. I will take some pics of the windshield and the floor board.
putz
Member
Windshield is installed. Siliconed and bolted. Mirrors are on. I pulled the carpet up, with plans to cut the sides off the transmission hump. The hump is a bunch larger than it needs to be and the gas pedal is on top of the hump. I will take some pics of the windshield and the floor board.
Nice to see you figured how to post pics. Really looks good.
Similar threads
