


You are using an out of date browser. It may not display this or other websites correctly.
You should upgrade or use an alternative browser.
You should upgrade or use an alternative browser.
tranny cover
- Thread starter DonnyRay
- Start date


DonnyRay
Well-Known Member
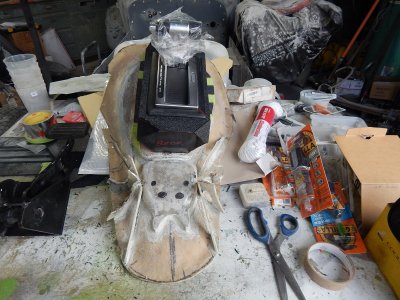
I began by making a thin skin out of one layer of 1 1/2 oz fiberglass mat. I also made a skeleton out of 1" thick pine . I layed the thin skin over the pine skeleton and applied clear silicone glue on several areas of the skeleton. I forced the thin skin around the pine skeleton framework & applied screws through the fiberglass skin above the areas i glued ( clear silicone glue). I left the freshly skinned skeleton framework overnight ( wanted the silicone to cure completely). The next morning i slowly removed all of the screws ( the silicone glue held on to the fiberglass skin ).After that i aglassed some coremat on top of the fiberglass skin. Once more i left it overnight to thoroughly set up. The next morning i glassed another layer of 1 1/2 oz fiberglass mat on top of the coremat. Again , this was left to cure overnight. Along the bottom outer edge , i screwed some 3" wide oak ( covered with aluminum hvac tape). I also screwed in 2 3" hvac covered oak on the bottom of the firewall section of the tranny tunnel ( these 2 pieces were basically vertical pieces. I glassed in 3 layers of 1 1/2 oz fiberglass mat on top of the 4 3" wide pieces of oak ( i was creating mounting lips)( or tabs) (for the tranny tunnel.).After this was done , i removed the 1" thick pine skeleton framework. I cut a hole on the top of the tranny tunnel ( center console) for the shift lever to fit through.
Last edited:
old round fart
Well-Known Member
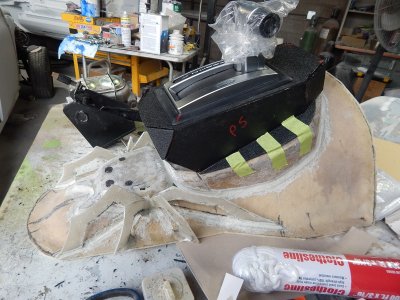
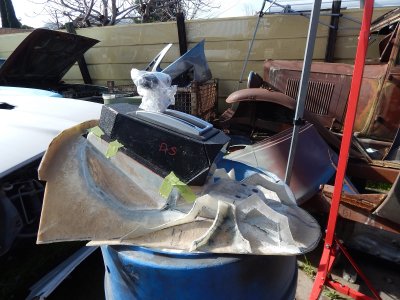
I’m going to put 1/2” foam sheets covered in packing tape so fiberglass won’t stick to it and lay glass over it. That will give me 1/2” air gap and that is all. I want it as small as possible. I’ll let you know how it works in a few days! It’s only a theory! Lol
![floor for mould (10) [640x480] (2015_11_13 11_07_31 UTC) (2021_01_12 08_56_11 UTC).JPG](https://tbucketeer.com/data/attachments/20/20574-7516e590bdb9bf39d53a2286b305a4d9.jpg?hash=dRblkL25vz "floor for mould (10) [640x480] (2015_11_13 11_07_31 UTC) (2021_01_12 08_56_11 UTC).JPG")
![floor for mould (14) [640x480] (2015_11_13 11_07_31 UTC) (2021_01_12 08_56_11 UTC).JPG](https://tbucketeer.com/data/attachments/20/20576-1e7781772544422e86733771ee6a076d.jpg?hash=HneBdyVEQi "floor for mould (14) [640x480] (2015_11_13 11_07_31 UTC) (2021_01_12 08_56_11 UTC).JPG")
![floor for mould (54) [640x480] (2015_11_13 11_07_31 UTC) (2021_01_12 08_56_11 UTC).JPG](https://tbucketeer.com/data/attachments/20/20575-d071a49d45bb6c3adf10e9bcfb645343.jpg?hash=0HGknUW7bD "floor for mould (54) [640x480] (2015_11_13 11_07_31 UTC) (2021_01_12 08_56_11 UTC).JPG")
![floor for mould (12) [640x480] (2015_11_13 11_07_31 UTC) (2021_01_12 08_56_11 UTC).JPG](https://tbucketeer.com/data/attachments/20/20577-7403ccf4c6ae2b4d5cd51f4fe93a44f1.jpg?hash=dAPM9MauK0 "floor for mould (12) [640x480] (2015_11_13 11_07_31 UTC) (2021_01_12 08_56_11 UTC).JPG")
![Floor Oct 09 (20) [640x480] (2015_11_13 11_07_31 UTC) (2021_01_12 08_56_11 UTC).JPG](https://tbucketeer.com/data/attachments/20/20578-9785e881b95ad038b0a25358348f8f32.jpg?hash=l4Xogbla0D "Floor Oct 09 (20) [640x480] (2015_11_13 11_07_31 UTC) (2021_01_12 08_56_11 UTC).JPG")
![body underside in yellow (8) [640x480] (2015_11_13 11_07_31 UTC) (2021_01_12 08_56_11 UTC).JPG](https://tbucketeer.com/data/attachments/20/20579-8bdce4bf5680a2160bce2446625e0c8a.jpg?hash=i9zkv1aAoh "body underside in yellow (8) [640x480] (2015_11_13 11_07_31 UTC) (2021_01_12 08_56_11 UTC).JPG")
DonnyRay
Well-Known Member

Similar threads
