Welcome to Our Community

Wanting to join the T-Bucket Forums discussions? Then sign up for a free forum account, today!

Sign Up

Ron Pope Motorsports                California Custom Roadsters               


Dismiss Notice
Thank you for visiting the T-Bucket Forums! This site was created in 2006, to provide enthusiasts with a place to discuss T-Buckets. Over the years, there have been many imitators, but this is the T-Bucket resource you have been looking to find. We encourage you to register a FREE account and join in on the discussions.

Alt Bantam

Discussion in 'Project Plans & Updates' started by AltBantam, Aug 28, 2022.

  1. fletcherson

    fletcherson
    Expand Collapse
    Well-Known Member

    Joined:
    Nov 7, 2014
    Messages:
    2,958
    Likes Received:
    977
    Three speeds worked well behind hi torque, lower rpm applications. Pontiac comes to mind.
     
    lincolnuT likes this.
  2. AltBantam

    AltBantam
    Expand Collapse
    Member

    Joined:
    Aug 12, 2022
    Messages:
    93
    Likes Received:
    85
    Gender:
    Male
    It's been more than a few weeks since my last post. Sorry, no pictures today. Between ordering parts, cold weather, the every growing 'honey do' list, Thanksgiving (which is why the list grew) and a pulled muscle in my lower back, I haven't had much of a chance to get much done. I did get the engine and transmission remounted, higher than originally. I swapped out the first hand built square tubing trans crossmember for a universal round crossmember since I raised the transmission mounting position about an inch. Engine is three inches higher. I welded the top and sides of the repositioned engine crossmember and trans crossmember. I'm planning to weld the bottom when I disassemble to paint. I hate welding upside down... so I try not to. Because I am using a Ford 9" rear end, I shifted the engine/transmission alignment over to center the pinon and trans yoke. This would have been more difficult with a narrower standard T bucket frame. The Buick's oil filter is on the passenger side sticking sideways. Originally, I center the engine/trans in the frame because the yoke was nearly at the same height as the pinion. The offset between the two would assure proper u-joint lubrication. So says the experts. But with the new location, I did not need that offset anymore. Plan to drive down to Lowes this afternoon and pick up a sheet of plywood. Had hoped to do that before Thanksgiving. I plan to cut and glass the floor in place, if it is warm enough, over the weekend. I have considered buying an 8' x 10' or 12' fulling enclosed tent and setting it up in front of my workshop on the concrete driveway. I could place a space heater inside and work in a 'climate controlled' area when glassing. I will take a few pictures of the frame/engine/trans sometime this weekend if I get the chance to make it to the workshop. I need to make a few measurements. May post questions about modifying the floor. I need to verify if the driveshaft will interfere with the floor or not. Before, there was no problem. Now, I may need to cut back the trans tunnel further or box the full length for clearance.
     
    fletcherson and Spanky like this.
  3. fletcherson

    fletcherson
    Expand Collapse
    Well-Known Member

    Joined:
    Nov 7, 2014
    Messages:
    2,958
    Likes Received:
    977
    You could relocate the oil filter with a remote kit if it’s not to your liking. I did that on my 455 powered Ventura. I added a small oil cooler as well just because.
     
  4. DonnyRay

    DonnyRay
    Expand Collapse
    Well-Known Member

    Joined:
    Oct 20, 2017
    Messages:
    1,869
    Likes Received:
    1,372
    Gender:
    Male
    Occupation:
    retired.
    I'll need a photo of the inside of your Austin Bantam.
     
  5. DonnyRay

    DonnyRay
    Expand Collapse
    Well-Known Member

    Joined:
    Oct 20, 2017
    Messages:
    1,869
    Likes Received:
    1,372
    Gender:
    Male
    Occupation:
    retired.
    Do you have this lip along the bottom edge of your body ? Austin Bantam Body 005.jpg
     
  6. DonnyRay

    DonnyRay
    Expand Collapse
    Well-Known Member

    Joined:
    Oct 20, 2017
    Messages:
    1,869
    Likes Received:
    1,372
    Gender:
    Male
    Occupation:
    retired.
    If you have the lip at the bottom of your body then we can work with it. Austin Bantam Body 005.jpg 
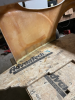
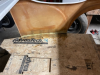
Cut right in the corner created by the body's side & the lip. Save the lip for later use. Replace the 1/4" x 1 1/2" trim (made of pine) with 2' X 2" trim (made of pine). You'll still need the 1/8' thick POLYPROPOLYENE sheets (sheets can be cut with a pair of scissors) and the ALUMINUM hvac tape. Cut several pieces of the 2" x 2" pine trim about 6" long.
     
  7. DonnyRay

    DonnyRay
    Expand Collapse
    Well-Known Member

    Joined:
    Oct 20, 2017
    Messages:
    1,869
    Likes Received:
    1,372
    Gender:
    Male
    Occupation:
    retired.
    DSCN1547.JPG The portion of the 2" x 2" x 6" pine trim protruding from the bottom of the body must be exactly the length of your desired gap. Attach the bottom lip onto the bottom of the 2" x 2" x 6" trim pieces.
     
    #27 DonnyRay, Jan 4, 2023
    Last edited: Jan 4, 2023
  8. DonnyRay

    DonnyRay
    Expand Collapse
    Well-Known Member

    Joined:
    Oct 20, 2017
    Messages:
    1,869
    Likes Received:
    1,372
    Gender:
    Male
    Occupation:
    retired.
    Once again attach the 1/8" thick POLYPROPYLENE sheets inside the body etc. Follow your previous instructions. You may need to extend the fender the same amount as your desired gap.
     
  9. DonnyRay

    DonnyRay
    Expand Collapse
    Well-Known Member

    Joined:
    Oct 20, 2017
    Messages:
    1,869
    Likes Received:
    1,372
    Gender:
    Male
    Occupation:
    retired.
    Got a photo for you : 29025439726_09b3e943c3.jpg
     
  10. DonnyRay

    DonnyRay
    Expand Collapse
    Well-Known Member

    Joined:
    Oct 20, 2017
    Messages:
    1,869
    Likes Received:
    1,372
    Gender:
    Male
    Occupation:
    retired.
    Check this out: R.jpg
     
  11. AltBantam

    AltBantam
    Expand Collapse
    Member

    Joined:
    Aug 12, 2022
    Messages:
    93
    Likes Received:
    85
    Gender:
    Male
    The Speedway body doesn't have the bottom lip for mounting the floor. Wish it did. It does have one for the firewall. Between the crazy weather, 60's one day then 40's degrees the next, and my lower back, I haven't been in the workshop in over a week. Since there's no heat in the workshop, I don't want to start something, then have to stop midway because of the cold. So, I'm not going to lower the body's sides. If I can get the body outside before the rain comes this afternoon, I hope to sand the lower inside and outside and maybe get the floor started if the temp drops this weekend. If you look back up at the red Bantam above, where the rear fender begins is where the inside body ends. There is about 30" of side to use, unlike many t buckets where the floor is glassed along the sides and rear of the body. I will have to use plywood or some other material to enclose the rear body from the floor up to the lip along the rear of the driver's compartment. But I knew this already. You can see it in DonnyRay's post with the black bantam body seen from an angle. I'll post some photo of work in progress when I take some. Thanks of the suggestions.
     
    lincolnuT, choppedtop and Spanky like this.
  12. LongJohn

    LongJohn
    Expand Collapse
    Member

    Joined:
    May 10, 2022
    Messages:
    64
    Likes Received:
    40
    Gender:
    Male
    That’s the prettiest Bantam body I’ve ever seen! I never liked the spare tire well.
     
    Spanky likes this.
  13. AltBantam

    AltBantam
    Expand Collapse
    Member

    Joined:
    Aug 12, 2022
    Messages:
    93
    Likes Received:
    85
    Gender:
    Male
    I bonded the floor to the body Sunday using Loctite marine adhesive/filler. It doesn't harden like construction adhesive, but remains somewhat flexible. I let it sit for 48 hours to cure... mainly due to the cold weather. Today I layered two layers of mat inside the body to the floor. There is three to four inches of overlap on both the body and floor. Tomorrow I plan to flip the body/floor and glass the bottom of the floor to the outside lower lip of the body. I removed the gel coat along the bottom of the body Sunday when I roughed up the lower fiberglass portion of the body. I will glass both the top and bottom covering all exposed wood later. I will post photos tomorrow. I didn't have my phone with me while in the workshop and the rain started before I finished.
     
  14. AltBantam

    AltBantam
    Expand Collapse
    Member

    Joined:
    Aug 12, 2022
    Messages:
    93
    Likes Received:
    85
    Gender:
    Male
    This is a 1940 Bantam, which actually has a backseat... It does not have the characteristic tire mount in the trunk lid. I thought about cutting out the tire mount on my body and making it flush like the 40' truck lid, but that would take away from the original 32' look, so I decided to leave it alone.
    1940 Bantam Hollywood.png
     
    Spanky likes this.
  15. AltBantam

    AltBantam
    Expand Collapse
    Member

    Joined:
    Aug 12, 2022
    Messages:
    93
    Likes Received:
    85
    Gender:
    Male
    Below are photos of the inside floor glassed to the body. I flipped the body/floor over to glass the bottom but I found a few voids where I bonded the body to the wood. So I filled those and left it to cure until Thursday afternoon. I will glass the bottom then. I also bonded 3 wood blocks underneath the rear lip of the 'trunk'. I will used those to attach a piece of 1/4" plywood to separate the driver's compartment with the rear of the car. If you look at the rear wheel well openings in the photos, you can see something must be added there to enclose it. That will all be glassed over. While the body is upside down, I need to add wood blocks for the windshield mounts, but I haven't decided what to use. I have seen Modal A and 32' Ford windshield mounts used before on Bantams. There was also a simple tube mount I saw on a T Bucket as well.
     

    Attached Files:

    Spanky likes this.
  16. old round fart

    old round fart
    Expand Collapse
    Well-Known Member

    Joined:
    Feb 5, 2008
    Messages:
    3,319
    Likes Received:
    1,287
    Gender:
    Male
    Occupation:
    Retired
    Looks like you’re getting the fiberglass fab figured out! Good job.
     
  17. AltBantam

    AltBantam
    Expand Collapse
    Member

    Joined:
    Aug 12, 2022
    Messages:
    93
    Likes Received:
    85
    Gender:
    Male
    It's been nearly three weeks since my last post. As I said in my last post, I flipped the body over and readied it for glassing the bottom to the body. The day after, I applied two layers of mat. I went to check my work the day after and found the fiberglass along the edges had lifted about a half inch along the bottom edge where the body and wood mount. One side was the entire 30". The other side, about half that. Wasn't sure why it happened, but during the next week I read not to lay fiberglass on an outside 90 degree corner. I must assume that was the reason why is lifted up. The rest of the glass was fine. So, I used a cutting disc and cut out the area which had lifted. I removed the glass back to the bare wood an additional inch or so. I then ground the edges round, added some resin then waited for the temperature to rise above 60 degrees again. After another week of waiting, it warmed up one day last week above 60 degrees, so I reapplied fiberglass to the sides and floor again. This time, I cut the mat so I could place the folded crease over the corners, which helped. I also cut fiberglass cloth and glassed the bottom, except for along the center which will be cut out for driveshaft clearance. Most of next week will be over 60 here, so I hope to get more glassing done. The back of the passenger compartment, another layer along the bottom sides, wood for mounting windshield posts, and maybe mounts for the dash. I hope to mount the body onto the frame within the next two weeks... we'll see if that happened. I hope to begin rebuilding the engine by the end of the month...
     
    rbsWELDER likes this.
  18. old round fart

    old round fart
    Expand Collapse
    Well-Known Member

    Joined:
    Feb 5, 2008
    Messages:
    3,319
    Likes Received:
    1,287
    Gender:
    Male
    Occupation:
    Retired
    Gravity may be the problem. Try to tilt the body so the new glass is wanting to lay down.
     
    Spanky likes this.
  19. DonnyRay

    DonnyRay
    Expand Collapse
    Well-Known Member

    Joined:
    Oct 20, 2017
    Messages:
    1,869
    Likes Received:
    1,372
    Gender:
    Male
    Occupation:
    retired.
    Fiberglass mat will NOT negotiate a 90 degree bend. It will lift away from it. If it's an INSIDE corner ; there's an easy fix for that problem. All you need is some plastic body filler ( BONDO ) & a tongue depressor (a wider version of an ice cream stick). Use the rounded end of the tongue depressor to radius [ ( ] the bondo inside the corner. After the bondo sets up , re-apply your fiberglass mat. The radiused bondo will ease the severity of the 90 degree corner. I learned this technique from choppinczech. PS: This method is for INSIDE corners ONLY. Sounds like you had an OUTSIDE corner . Hope this helps.
     
    #39 DonnyRay, Feb 3, 2023
    Last edited: Feb 3, 2023
    rbsWELDER and Spanky like this.
  20. 409T

    409T
    Expand Collapse
    Moderator
    Staff Member

    Joined:
    Jan 16, 2009
    Messages:
    1,832
    Likes Received:
    593
    Gender:
    Male
    Occupation:
    Retired
    I wonder what would happen if you clamped a 90 degree piece of angle over the glass on an outside corner joint, something with a square inside corner like aluminum.
     
    rbsWELDER likes this.

Share This Page


Advertise with Us! Advertise with Us! Advertise with Us!

SSL Certificate