Ron Pope Motorsports                California Custom Roadsters               

Alt Bantam

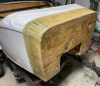
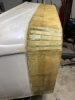
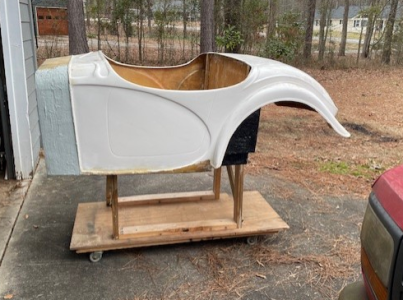
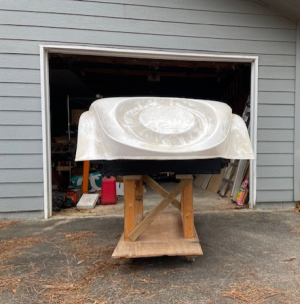
Cowling glassed to body and firewall. I started last Friday but did not realize until I was ready to mix the resin that I was almost out. I had just over 8 oz. It was enough to coat then glass about half the cowling. Sunday, I picked up some more resin. I was planning to finish Sunday afternoon, but my lower back is giving me some problems so I waited until Wednesday to finish. I will post photos as soon as I take some. The cowling is glassed to the firewall and the firewall is glassed to the floor. I was thinking of possibly adding a layer of cloth atop the mat to give the cowling that textured look. But I think I will just leave it and add a thin layer of bondo instead. Quick question/poll. I have covered the rest of the firewall with risen to seal it for now. I will be placing a metal cover over the current plywood firewall. Should I add a single layer of glass over the wood or is that overkill. To be honest, fiberglass work had been my less favorite part of this build... and I've done more than I thought I would.
 
Two photos of the extended cowling glassed in. There are two layers of glass on the curved section of the cowl. One layer with overlap on the top and sides. It turned out better than I expected. I was not sure if the fiberglass would droop or not between the wooden stringers. It didn't. What is left from the body? Instrument panel cut out and glued/glassed into place. Floor cut for drive shaft. Metal firewall cover cut and installed. Metal transmission tunnel and floor covering. Seats mounted. Doors hinged. Windshield/screen. Body bondoed, prepped and painted. The frame needs some grinding on and a little more welding before painting. Engine overhaul. Remount engine and transmission with body to chassis. Plumbing brakes and fuel. Wire harness installation. First test drive around block. Tag and insurance. Start contemplating next project.
 

Attachments

  • Fiberglassed Cowl 1.png
    Fiberglassed Cowl 1.png
    438.9 KB · Views: 33
  • Fiberglassed Cowl 2.png
    Fiberglassed Cowl 2.png
    508.6 KB · Views: 30
Looks good. I’ve learned with glass that you have to have a lot of material on hand plus the tools to work with. I ordered various weight and type of fabric, gallons of resin, acetone, rollers, brushes, etc from eBay. I get fresher product than local, but your location may vary. I also set my shop up to do it prior, by covering the floor with plastic, saw horses, etc, so I can just focus on the job. Personally, I would cover that cowl with glass to moisture proof it, but it’s your build. Keep up the good work!
 
It’s been a few weeks since my last post. Due to the holidays, getting the house ready, etc, and the early cold weather, I haven’t done as much work on the body as I would have liked. Sanded the cowling and firewall and painted the firewall for extra protection. I bought a new electric shear for metal work. I have spent a little more time getting the engine ready to rebuild. I bought the Buick motor some 15 years ago for another project. When that fell through, I spayed a little WD40 into each cylinder before putting the engine to the side. I had to unstick the motor. Over a 2 week period I tried several online remedies. ATF and acetone just made a mess. Mystery oil penetrated 6 cylinders but not the rear 2 on the driver’s side. I bought some PB Blaster. It did the trick. After spraying the rear 2 cylinders and leaving it to soak 2 days, I was able to rotate the engine. The motor has been taken down to a short block status. I plan to pull the rods and pistons, measure the journals for bearings and order what I will need to send to the machine shop.
 
Thanks, but there are issues with the pistons which come in the kit. First they are cast. Second, due the compression height, which is lower than stock, they drop the compression into the low 8 to 1 range, depending on the head gasket. For a stock rebuild, that's not an issue. But for a higher performance engine, not ideal. As I posted before, no one make forged 430 pistons anymore. So I plan to order custom pistons, once I have the block cleaned and the cylinder wall thickness check. Most 430 blocks, which are thick than its 455 big brother, can easily be bored out just over .060 to 4.250", the same as BBC pistons. That allows BBC piston rings to be used, which there are a great number made. But the block needs to be sonic tested before boring out in case of shifting during the casting. Oiling is another issue with BBB. At 4500 RPM's not so much an issue. But over 5000, aftermarket grooved bearings are better. A few block mods to increase oil flow is also need, but easy enough to do at home. The question at the end of the day comes down to the old adage, "Speed costs, how fast do you want to go?" Once I know what aftermarket parts are available to me, I will be able to answer that question then.
 
When I was building my first car I got advice from 2 old drag racers (Pete Robinson and Hoyt Grimes) advised me to go to the junkyard and get a truck motor. Then they all had 8:1 motors. Run it until they blew up and repeat. I went ahead and built a “good” motor with ported heads and all. The heads started leaking water so I replaced them with 283 2 barrel heads. I was never able to tell the difference in performance. When you stick a blower on a sub 2000 lb. car you run out of balls WAY before you reach top of performance envelope. The only thing I’m inclined to do is get a cam that goes rumpty bump and drive it. The fun is getting to 70 mph in about 50 feet!
 
I love the torque of a big block, Pontiac, Buick, olds, but it’s mostly wasted in a light weight car. Still fun, just not as pronounced as it would be in a Chevelle, cutlass, skylark, etc... with iron heads, light car, etc, I'm not sure how much compression is merited. I’m sure you can find something suitable to use for pistons. Just because they aren’t produced doesn’t mean there aren’t a stock in a warehouse somewhere, plus there are lots of engines that have similar bores, etc... sounds like you are on the right track. I have recently realized that many of the vendors that I’ve counted on over the years are gone and so is the wisdom they provided. Very frustrating to find non main stream parts nowadays.
 
Update. Due to the holidays, cold weather and being sick, I haven't spent much time in the workshop. I epoxied the steel firewall onto the wooden firewall and used stainless screws for additional security. I cut out thin sheet metal to cover the floor from the body's sides inward. Both were must do per the 67' NHRA rules. The day after Christmas I mixed up some bondo and added a thin coating to the side of the cowl extension. The temperature was 62 degrees which gave me a little more time to work the with the bondo. Unfortunately, the weather turned cold and I caught a cold. I have a wooden dolly which I plan to add a platform on top to sit the body. That way I can roll the body outside to sand the bondo without covering my shop with a coating of dust. It's been a week since I came down with the cold. Still waiting for the temp to warm up and for this cold to clear before going back to work. I hope to post the photos in the coming week or so.
 
How's the progress? The weather here in Nebraska has been beautiful for the past week. It's making me antsy! Unfortunately I have other commitments that I must finish before I can start playing with the bucket. I'm presently living vicariously through you and Long John.
 
It has been nearly a month since my last update. Why? Mainly the weather. Everyone on the eastern US knows we have had 'artic blasts' one after the other mixed with rain and more rain. As I have mentioned before, my workshop has no heat or ac so.... That said, I have moved the body off the chassis and onto a moveable wooden stand I can roll in and out of the shop. The body sits about 2 feet off the ground so that should make some of the body work easier to do. Today, I removed the front and rear suspension off the frame. Rolling the frame onto its sides, I grinded on and welded up every thing which needed work before painting. A lot of the engine and transmission crossmembers were just tacked in place. Welded that. Added caps on the open rear frame rails. Welded some gussets. I will need to add a 'pushbar' to the rear of the car, for looks. That will need to wait until after the body is reinstalled. Other than the front shock mounts, which I do not plan to add until near the end of the build, everything looks good chassis wise. Temperature is supposed to hit 63 on Friday and no rain. Perhaps I can get the frame and suspension painted.
 
It has been nearly a month since my last update. Why? Mainly the weather. Everyone on the eastern US knows we have had 'artic blasts' one after the other mixed with rain and more rain. As I have mentioned before, my workshop has no heat or ac so.... That said, I have moved the body off the chassis and onto a moveable wooden stand I can roll in and out of the shop. The body sits about 2 feet off the ground so that should make some of the body work easier to do. Today, I removed the front and rear suspension off the frame. Rolling the frame onto its sides, I grinded on and welded up every thing which needed work before painting. A lot of the engine and transmission crossmembers were just tacked in place. Welded that. Added caps on the open rear frame rails. Welded some gussets. I will need to add a 'pushbar' to the rear of the car, for looks. That will need to wait until after the body is reinstalled. Other than the front shock mounts, which I do not plan to add until near the end of the build, everything looks good chassis wise. Temperature is supposed to hit 63 on Friday and no rain. Perhaps I can get the frame and suspension painted.
Good stuff!
 
Jack. I understand what you mean. I assumed I would be driving this last summer. I am only about a year behind my original schedule, lol. But it's best not to rush things. Look at it. Think about it. Envision it in your head or on paper. Commit once you have it worked out. Planning is as important as the build. But that said, unlike wood, you can always add back to metal if you have a welder and a grinder. (Learned that over 30 years ago when I learned to weld).
 
Jack. I understand what you mean. I assumed I would be driving this last summer. I am only about a year behind my original schedule, lol. But it's best not to rush things. Look at it. Think about it. Envision it in your head or on paper. Commit once you have it worked out. Planning is as important as the build. But that said, unlike wood, you can always add back to metal if you have a welder and a grinder. (Learned that over 30 years ago when I learned to weld).
This is good advice! I am this guy. I will study anything new that I am doing, trying to think of every possibility, for hours, before I ever put flame to metal! I still make mistakes, but not as many as the gung-ho young man of my youth had! Lol

With age comes wisdom! If you'll let it!

Jack
 
Here are the promised photos from last week. Painted frame. Satin black. Body on stand. Sporadic rain is keeping outside work to a minimal this weekend. Hoping for a break next week to sand bond.
 

Attachments

  • Painted Frame.png
    Painted Frame.png
    605 KB · Views: 8
  • Side Stand.png
    Side Stand.png
    417.6 KB · Views: 8
  • Rear Stand.png
    Rear Stand.png
    412.1 KB · Views: 9
Nice work! I'm probably sticking my nose where it doesn't belong, but . . .would it make any sense to make a little hinged cover out of the center of the spare wheel cover on the back? Access for . . . ?
 
Spanky, that’s an interesting idea. But the fuel tank will take up most of the area under the rear of the car. Though, I might have to look at that once the body is positioned back on the chassis.
 
Spanky, that’s an interesting idea. But the fuel tank will take up most of the area under the rear of the car. Though, I might have to look at that once the body is positioned back on the chassis.
Speaking of fuel tanks, what happened to the sponsor that offered the under car tank? Anyone try one?
 

     Ron Pope Motorsports                Advertise with Us!     
Back
Top