Ron Pope Motorsports                California Custom Roadsters               

Drilling holes for windshield

tfeverfred

Well-Known Member
Total Performance charges $95:eek: to drill holes for the windshield. Can it be that difficult? Looking at the instructions, it seems to just be a matter of taking your time, lining it up properly, marking your holes and drilling. Is there something I'm missing? I'd hate to screw up my body, when I get it, by trying to save some bucks.
 
I suspect they are adding some sort of backing inside the body. The 'glass isn't strong enough to withstand the force of the wind on the windsheild. I like to add a tube framework to the cowl area to spread the stress out.
 
Yes, there is wood behind the fiberglass. I'm wanting to know why they charge so much to drill 4 or 6 holes? Is there some secret to it other than taking your time and measuring where the windshield supports should go?
 
I was scared about that too, but realized that I had the opportunity to "Do it my way". The FG thickness in my bod was 1/2'' min., and I planned on using the support rods so I didn't worry. You might consider the space between the two posts as in my case there were three different w/s widths. If you mess up just FIX IT. When I am driving at freeway speeds, with the air that the windshield pushes, I am amazed that the w/s stays there. You are going with the shorty w/s tilted back? Come to think of it I got the posts undrilled from SW, and had to drill them also. I've got several close up pics of other mountings if you would like to see that stuff?
 
Thanks, Lanceks. Yea, I'm going with the short, slanted back posts. I was just curious if there was some special way that it had to be done. I guess the $95 that TP charges is a standard labor rate or something. I'm sure if I take my time and make sure the post are in the right spot I'll be able to do it myself.

It didn't help that the video of the build shows how to do the guages, but not the windshield post.

I've also changed my mind on doing the wood kit install. The money I save on having them drill the windshield post, will be used to pay for the wood kit install. Every little bit helps. Looks like I'll be able to get my body by the end of next month.:lol:
 
Tfeverfred..IMO..there are better ways to wood the body than the way Total does it. The biggest problem I have with them is that the seat bottom sits so high. Are you going with the seat insert?
 
lanceks1 said:
I was scared about that too, but realized that I had the opportunity to "Do it my way". The FG thickness in my bod was 1/2'' min., and I planned on using the support rods so I didn't worry. You might consider the space between the two posts as in my case there were three different w/s widths. If you mess up just FIX IT. When I am driving at freeway speeds, with the air that the windshield pushes, I am amazed that the w/s stays there. You are going with the shorty w/s tilted back? Come to think of it I got the posts undrilled from SW, and had to drill them also. I've got several close up pics of other mountings if you would like to see that stuff?

The posts you got from SW have a blind hole and bolt from the inside.Totals bolt on from the out side.I cracked my body installing the WOOD nuts for the windshield and had to gring the crack out and reglass it.The Total bodys are about a 1/16 of an inch thick in some places and 1/8 tops in others.Pay the man to drill the holes and mount the nuts.Of corse i have the anniversary body standard might be different
 
Looking forward to seeing that body on your car Fred. Want to see how that grill looks with the body on.

thomas:)
 
I have used stock posts on most all of my builds. Tried SW once and also cracked the body. Are the ones from Total cast?
 
Yep there cast but bent.hehe.No the only problem i had was setting the wood nut teeth if you PULL them in with the bolts they want to fatigue the outside of the body i tried to tap them in as i screwed the bolts in WRONG it cracked.LET THEM DO IT!!!!
 
Rick said:
Yep there cast but bent.hehe.No the only problem i had was setting the wood nut teeth if you PULL them in with the bolts they want to fatigue the outside of the body i tried to tap them in as i screwed the bolts in WRONG it cracked.LET THEM DO IT!!!!

Thanks for the advice, Rick. I talked to a guy from the NTBA who has a TP kit and he told me the same thing. Seems he did what you did with the same results.
 
Youngster said:
Tfeverfred..IMO..there are better ways to wood the body than the way Total does it. The biggest problem I have with them is that the seat bottom sits so high. Are you going with the seat insert?

No, I'm going with a bench seat. The TP instruction manual shows the seat bottom height at 4" in the front and tapering down to what appears to be about 3". If you look in some of my pics, you'll see that I have made a mock up of where I would like the seat height to be. My mock up accounts for the spacers between the frame and the body and also the thickness of the floor. When I had the height of my mock up lower, it didn't seem right.

Also, I took a look at the TP seat insert padding and it's not that thick. Kinda like the chair I'm sitting in now, it's really just a pad. I have also read the Street Rodder build up of a TP kit, their opinion was that the pad was more than comfortable for the car. Therefore, I think high density foam will give me enough padding to be comfortable. Well, about as comfortable as a T Bucket can be, I guess.

The thing is, this car is NEVER going to be as plush as a regular car. I had considered using the seat bottom out of a mid '90s Ford Escort. It would fit fine, but I would lose the room under the seat for wiring, due to the seat springs. It may be thin enough to sit on top of TP's seat bottom, but I won't know until the body shows up.

Either way, I plan on having some sort of box for the seat bottom, so it may as well be Totals. Worse case scenerio, I cut it down, but I don't think I'll have to.

Like everything else with this car, I ask a lot of questions and do a lot of research. Sometimes, I think I do too much, but I just don't like taking one step forward and ending up 3 steps back. If spending a little more money and waiting a couple more weeks will yeild the results I want, then so be it.

That being said, this is a learning experience for a first time hot rod builder. What I find out with this one will effect what I do with the next one. When I get the body, I may be able to see how I could have done some things for myself and save a few bucks. I'm learning right now, but I have not learned enough to be fixing screw ups.

Thanks for all the advice guys. I really appreciate it. Sometimes, as the light at the tunnel gets brighter, I start thinking of ways to get her done quicker. I just need to slow down and stick to my original plan.

Now. who was it that told me that a while ago? Name started with a "R". Hmmm....
 
I also checked out the pics in the link that Bill Pederson posted. They confirm my thoughts on going with the TP seat and wood setup. It's exactly as I visualised it.
 
For what it's worth, here's how I install a set of stock posts.

First assemble the windsheild frame and the posts. Set them in place on the cowl. Usually one side seems to have a different angle. Pick the side that looks and fits the best to you and mark the holes on the body.

On the stock posts, the mounting holes are square for 5/16 carage bolts. Drill the 2 5/16'' holes in the body. Now cut a 3 1/4'' X 1 1/2'' piece of 10ga. and drill a hole 5/8'' down from the top and 1/2'' in from one end. The second hole is 1 7/8'' on center from the first hole.

On the back side of each plate, tack a 5/8'' length of round tube centered on the holes. Remember, you're making a left and a right. Bolt the post to the body finger tight.

Now go to the other side and copy the position of the windsheild frame. The frame has to be flat as you look across it. When you're satisfied with the position, mark the post holes and drill them. Look at the windsheild from several different angles to see if you want to adjust it.

Now mix a batch of Dura-glass or some other body putty with strands of fiberglass in it. A lump about the size of a golf ball for one side should be enough. Doing one side at a time, load the body putty on to the metal backing between the two pieces of tubing and reinstall it back in the body. Again don't over-tighten the nuts on the inside. Let the first side set up for 30 minutes or so and repeat the process on the other side.

Hope this helps. I'm not a tech writer, but this has worked for me on alot of bodies. Ron
 
Youngster said:
For what it's worth, here's how I install a set of stock posts.

First assemble the windsheild frame and the posts. Set them in place on the cowl. Usually one side seems to have a different angle. Pick the side that looks and fits the best to you and mark the holes on the body.

On the stock posts, the mounting holes are square for 5/16 carage bolts. Drill the 2 5/16'' holes in the body. Now cut a 3 1/4'' X 1 1/2'' piece of 10ga. and drill a hole 5/8'' down from the top and 1/2'' in from one end. The second hole is 1 7/8'' on center from the first hole.

On the back side of each plate, tack a 5/8'' length of round tube centered on the holes. Remember, you're making a left and a right. Bolt the post to the body finger tight.

Now go to the other side and copy the position of the windsheild frame. The frame has to be flat as you look across it. When you're satisfied with the position, mark the post holes and drill them. Look at the windsheild from several different angles to see if you want to adjust it.

Now mix a batch of Dura-glass or some other body putty with strands of fiberglass in it. A lump about the size of a golf ball for one side should be enough. Doing one side at a time, load the body putty on to the metal backing between the two pieces of tubing and reinstall it back in the body. Again don't over-tighten the nuts on the inside. Let the first side set up for 30 minutes or so and repeat the process on the other side.

Hope this helps. I'm not a tech writer, but this has worked for me on alot of bodies. Ron

HUH?
The Total body and windshield goes as follows:Assemble the windshiels LOOSE then align to the body tighten the bolts on the frame(follow me so far it gets tricky from here on)Take your drill with a 5/16 drill bit and put it into the holes in the posts push the trigger on your drill push drill till it's thru thr body.put the wood nut on the bolt tighten the bolt repeet 3 more times.Done. Now set the wood nuts (good luck).
 
Are the wood nuts up againest the fiberglass? Do the ''teeth'' dig into the body?
 
Youngster said:
Are the wood nuts up againest the fiberglass? Do the ''teeth'' dig into the body?

According to the instructions, there's a piece of wood from the wood kit that the wood nuts dig into as you tighten the bolt.
 
I don't mean to ask dumb questions, just trying to catch up on the Total build. Is the wood you're talking about shaped to fit the body inside the cowl?
 
Fred: Youngster has it right. Just do it yourself. Back it up with something and BOLT. I backed mine inside with a piece of 3/32" steel and bent it a little to conform.
 
Youngster said:
I don't mean to ask dumb questions, just trying to catch up on the Total build. Is the wood you're talking about shaped to fit the body inside the cowl?

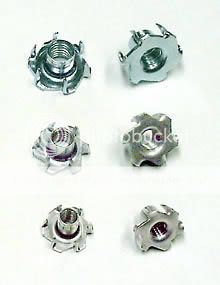
Basicly, there is a piece of wood, behind the guage panel, that is attached to the inside of the cowl where the windshield posts would mount. The bolts go through the post, through the body and on through the wood. Then you attach these Tee Nuts.

tee_nuts.jpg


As they tighten onto the bolt, they dig into the wood.
 

     Ron Pope Motorsports                Advertise with Us!     
Back
Top