Ron Pope Motorsports                California Custom Roadsters               

fletchersons T project

Hey Fletch, where you at on progress? I have been slacking the last few weeks......so close to being done, but, haven't done anything in the garage. the weather here in WI has been crazy.....great one day and snowing the next. Just kills the motivation......
Actually came to a screeching halt. I got sick, some damned bug, also ran out of resin and waiting on the brown truck. Looking forward to getting back in the shop this week and trying to finish the major glass work, at least the floor and cowl ares. I will likely do the doors and dash as seperate projects since they are a little more detailed and visible in the end. The weather also reverted to mid January, cold, grey, windy, snowy, sucked the wind out of my sail... This week has promise for improvement!
 
101_3976_zpsfufepkjj.jpg
101_3970_zpscwszodg5.jpg
Ok, I will try to include some pics of the "progress" lol. It seems that many of the pics I spent this morning uploading to the bucket didn't end up there, so I will have to try a different route at a later date...I have many more pics of the glass progress, not sure why they didn't upload. Perhaps I included too many. Technology frustrates me, I don't have time or patience for it. Too many new ways to do the same old thing...
101_3976_zpsfufepkjj.jpg
 
The file size is usually limited to some 10 MBytes or less and will reject them if not small enough.
 
That was likely the issue. I had taken quite a few pics on my shop camera in the process of doing the fiberglass work that is still underway and neglected to upload them.
 
Are the legs of the dash/cowl support curbed to the contour of the body?
 
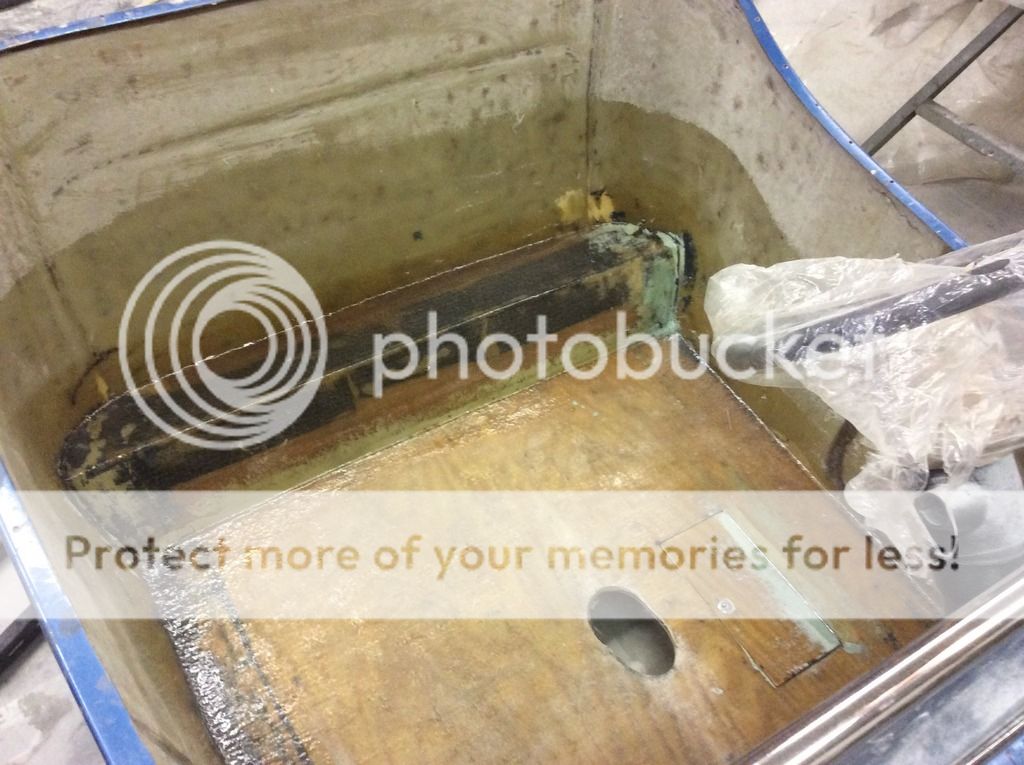
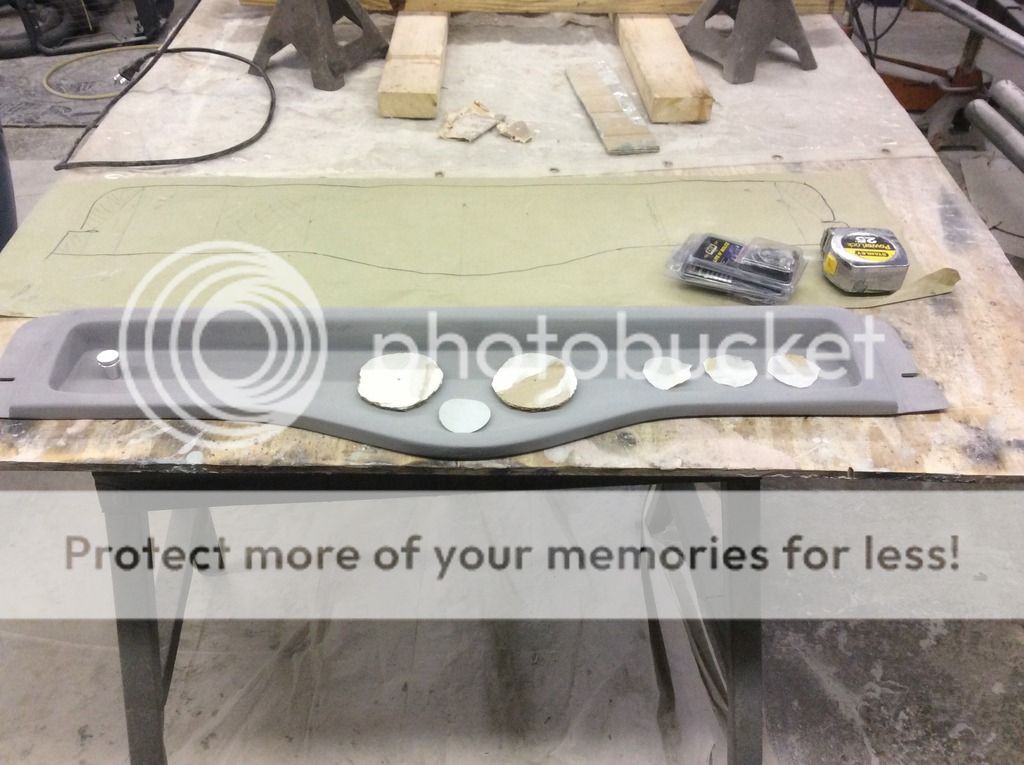
Here are a few pics from my iPad of the dash, (no lusting after my hi tec gauges), the floor, and firewall. You can get an idea what it will look like. I have a ton of time in that stupid dash. I wouldn't do that again. I just couldn't find a premolded one that I liked that would accommodate the gauges I bought and I needed to make a custom piece to help me correct the 3/8" dip that is in the cowl on my body from the original mold, and they hacked holes in the flat dash too. This will correct all issues. I initially made it without considering that the windshield posts wrapped around, so I had to cut the roll off and do it over....
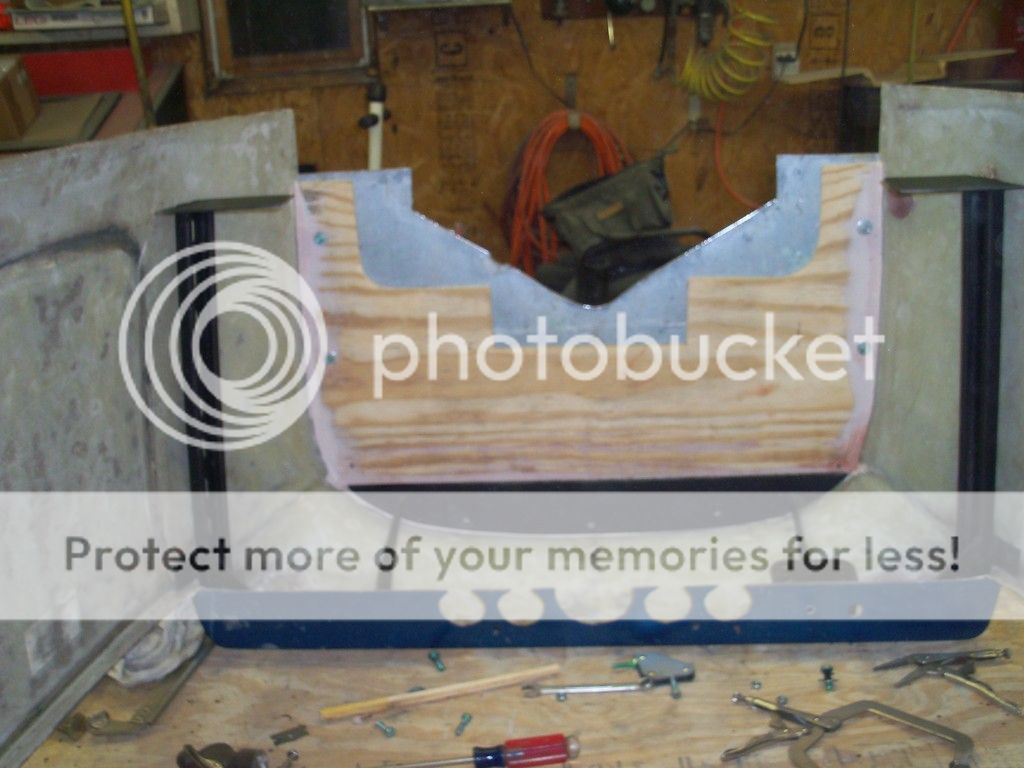
I plan on installing the oak and glassing around the doors and cutting out the old dash and installing the new one this week. I finally got my hinges and latches, I went everywhere looking for a 3-3/8" hole saw, ended up ordering one, so I will likely wait until I get it so I can pre fit and cut the holes before installing the dash. I am having a difficult time laying out the dash, I like things balanced, OCD, but between not being able to see them due to the column and the supports behind the dash, OCD be damned! Lol. Also installed a door for the master access, glassed in a ledge under when I layered the bottom of the floor with biaxial. I recessed the hinge and lock so the floor is totally flat. I think I will add a steel support to prevent damaging it, it seems very strong, but it would be a drag to fix if it didn't hold. I wanted to add a glove compartment, but there isn't enough room to work it in the dash. I have room to make one under the drivers side of the seat, and that will be a more secure and stealthy location anyways. Hard to find room to stow anything in these little cars, but I always need a place to secure small stuff. Notice the steel that is laminated into the kick up to securely mount the rear mount, seat, and seat belts as well as some rigidity in th event of a collision...not sure it will do much good, but better than nothing. The glass is much better than the pic illustrates. The ugly bondo I used to fill various voids makes it look bad. Feather fill soon to come, right after the doors and dash get glassed in... I have several rolls of various grit sand paper as well as drawers full of left over assorted abrasives from projects gone by, I just need to muster the energy to get after it. Lol. Kidding aside, I am looking forwards to it, the work will start to pay off soon. I built a jig to hold the pre cut floor plywood flat and applied one layer of biaxial to each side, then fit it into the body and attached it via two layers of chopped mat on each side, with the void being filled with fibered bondo between coats, the second layer being two inches wider while the whole thing was bolted in place to the frame, then removed it and applied a second layer of biaxial to each side after filling voids, etc... So everything including the steel frame mounts, kick up reinforcement, and attachment points are laminated together. It's very strong and really firmed up the body. Once the front seat mount/ rear door post supports are installed, the only place that flexes is right behind the seat. I will likely add a support around the top of the tub too. I just don't want to take up too much room, it was a real chore trying to fit all of the controls and seat in there to where I can drive it in a resonably comfortable fashion. Everything is a trade off....
image.jpg3_zpsgp5zdsgt.jpg
image.jpg3_zpsxtywo0k8.jpg
image.jpg1_zpsxbtyspbu.jpg
 
Last edited:
Are the legs of the dash/cowl support curbed to the contour of the body?

Are they Superstrut channel?

strut.jpg

I know it's very strong and light. I've used it in furniture for load support.
 
BUT ugly can be seen by everyone. LOL and of course" Beauty is only skin deep BUT ugly is to the bone" I got a ton of them.
 
The engine isn't forward, the manual gear box is a lot smaller than an auto and I did slide the tub back a little, but the ferewall is only about an inch or so behind the bell/block parting line, just enough room for the small cap distributor. The engine and trans does sit in the frame, not on it, so even with the channeled body, it clears. The top of the T10 is at the same level as the top of the frame. It's 100". Hence the issues I had working in the controls, seat, etc... It was built in the 70's, so it's not a low rider by any stretch. I think that afforded a little room to get the engine and trans down in the frame. I haven't compared it to any others close up, so I dont know how much difference there really is as far as ride height, etc... There is a bell housing bump, it's about 2-1/2- 3" deep, but I kept it flat and paralleled to the toe board so I can mount my accelerator pedal to it. The toe kick and the bell bump together allow room for the bell, and really cloak the void that is actually there. The T10 is just beneith the floor. I have some pics of the process that are much more detailed and illustrate it, unfortunately, they were among the files that vanished in the upload to photo bucket process. I will re do them.Yes on the super strut. It wasn't really my choise material, I had several sticks in my scrap pile, so I used it. It worked pretty well. It's all going to be encased in glass when I finish. I think I can retain the void and use it as conduit to conceal the wires, etc...
 
I thought it was " Beauty is in the eye of the BEER holder!"
Are the legs of the dash/cowl support curbed to the contour of the body?
They are a little, but not exact. I used fibered bondo to secure them to the tub and fill the small void. There wasnt much, I cut a couple slices in the sides of the strut and bent it to fit the tub, then welded them. I left room to carve some oak and fit it for the door/jam soon to come. I plan on encasing all of it in glass and just tapering into the side of the tub towards the front. They did crowd the clutch pedal foot room a little, but no getting around it without an exoskeleton, lol. Perhaps of it were a rock crawling T.... Maybe next time!
 
They are a little, but not exact. I used fibered bondo to secure them to the tub and fill the small void. There wasnt much, I cut a couple slices in the sides of the strut and bent it to fit the tub, then welded them. I left room to carve some oak and fit it for the door/jam soon to come. I plan on encasing all of it in glass and just tapering into the side of the tub towards the front. They did crowd the clutch pedal foot room a little, but no getting around it without an exoskeleton, lol. Perhaps of it were a rock crawling T.... Maybe next time!

I thought they were curved. Right now my plan is for an 1.5" roll bar esque hoop that will cross just under the dash, and do double duty as a hand hold. I'm planning on trying to bend the legs to keep them as tight to the body as possible, but I'm still worried about leg rubbing. The good thing is I have no clutch to worry about.
 
Ok, finally got back in the shop today, after a week I'd rather forget... I spent more time than I care to admit fitting the oak to the tub for the door, jamb project. I started with a pieces of old growth oak from a barn that was about 6"x 6" and a piece that was 1-1/4" x 14" or so. I actually bought a nice piece of oak from the lumber yard, but once I started digging around and setting up the machines in my wood shop, I found the pieces that I had. Newsflash, oak is not cheap nowadays. I spent $50.oo on one board.... It was a chore, but with fresh band saw blade, went smooth. I had to form one side to fit the tub, then form the other side of the jamb side to sort of match because it would have been too thick where I don't need it, right in front of the seat. I think I had to cut and widdle every side of every board except the face of two.... Labor of love, I guess. I think I used most of my shop tools for this seemingly simple project. It turned out good, I am happy with it. I have everything ready to glass the oak into the tub along with the seat riser/side support, but ran out of energy. I hope to get back to it tomorrow. I ran into a couple setbacks... I had ordered a battery box from Ron that accomodates a full size battery, like a 1000 amp, and I planned on mounting it to the frame on the passenger side just fore of the kick up so it would be under the seat, but down low enough for no interference. It just won't fit without either modifying it, the seat riser, cutting into the steel that is in the angled high part of my floor over the kick up, or a combination... I thought it was going to work, but not quite. I need to do some digging on batteries and determine what dimension I really need to allow for. I can cut a strip out of the battery box and weld it back so it will fit, or look for a different one. I can always use what I got from Ron on something else... The other hiccup is with the door opening. The way the windshield posts are, I can't cut the opening out on the outside of the door outline contour. I will either have to cut a smaller opening inside, or ignor the lines and cut the door where it fits and have a smooth body. I glassed the inside of the voids anyway for strength and to prepare to attach the oak. I almost made a drastic oversight, I had prepared a top rail for the doors out of oak and only about 1-1/2" wide. I just happened to grab my latch assembly and it's a good thing because I needed much more to properly attach them. Disaster overted...also I am wondering if a different windshield is better suited. Either a set of laid back posts, or maybe a taller one piece windshield for driver comfort. Of course, I welded in tabs to secure my existing posts. Hopefully if I decide to change up the frame and posts, they will be close enough to use my support tabs. Anyone have any thoughts on battery size or windshield posts? Oh yea, if anyone is thinking about making one of those windshield wiper setups to get approved in the inspection, Speedway has the motor with wiper arm on it for less than thirty bucks. Anyone have any preference on windshield material or brand? Glass and frame/post.
 
My last windshield frame and posts were from CCR and were made for their body. Aluminum seems to be the material of choice. Mr. Roadster has several NICE polished ones, but I think they costs too much for what you get.
 
I bought Speedways posts and frame. Have not installed, make sure you inspect there product upon arrival. My chrome posts were pitted and one of the holes was drilled on the wrong side of the post and only half way thru the post. I took them back and they brought out 3 different packages before I found a pair that were not pitted.
 

     Ron Pope Motorsports                Advertise with Us!     
Back
Top