

You are using an out of date browser. It may not display this or other websites correctly.
You should upgrade or use an alternative browser.
You should upgrade or use an alternative browser.
Front Axle Assembly
- Thread starter Dan Noecker
- Start date
Dan Noecker
Member
All of the front end parts will be chrome. I have completed both sets of the 4-bar axle brackets and will move on to the shackle hangers and the 4-bar arms for both sides. I have on the way a chrome spring, chrome shackles, and chrome spindles, along with a complete disc brake kit.
Dan Noecker
Member
old round fart
Well-Known Member
Is that whittled out of one piece of steel? I think you are playing with tools some of us can only dream about!
Dan Noecker
Member
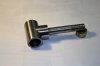
On the shackle hanger, that is two pieces that I have to still weld together. Everything came from a piece of 1 inch bar stock. It took me about six hours of machine time to get to where the shackle hangers were completed.
choppedtop
Well-Known Member
Looks great. Its nice to be able to make some of your own parts. I spend way to much time making some parts on my lathe and mill, that I could buy lots less expensive then what it takes me to build them.
Dan Noecker
Member
The main reason I spend so much time making my own parts is that way I can get exactly what I want. The brackets for the front end will all be polished so the chrome work will turn out good. To me that is important because everything up front is stuff that everyone sees and I like to pay attention to detail.
Dan Noecker
Member
The 6 degree angle is in reference to which part?
old round fart
Well-Known Member
I think the 6 degree is the angle the radius rods take to taper to the frame. In your case like mine I will make the brackets 90degrees to the axle and angle the rods to get to the frame.
Dan Noecker
Member
What I am going to do for the four links up front is come off of them with the bars at 5 degrees and cut them long at 40 inches. I will then match the parts to the frame and cut and tap the ends for that end. I am trying to be as exacting to the parts I make so I dont have to pound things together with a BFH. I truly appreciate the comments to my posts. I have found I have a whole group of friends I didnt know I had.
choppedtop
Well-Known Member
Keep in mind, the king pins should be somewhere in the 7 degree range for caster. Others may have other preferences, but that works for me.
Keep in mind, the king pins should be somewhere in the 7 degree range for caster. Others may have other preferences, but that works for me.
I'm planning on building in a 7° caster also. That is the number I've seen most often, and I don't want to try to get close to that number via heim adjustment.
Dan Noecker
Member
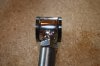
I'm starting to piece the front end pieces together, and here are a few pictures of how things are starting look. I value all opinions.


old round fart
Well-Known Member
Are the long parts of the radius rods on the bottom? I don't see welds yet.
Dan Noecker
Member
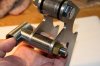
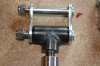
The end of the radius rod that is attached to the axle batwing has a bushing welded to it at 5 degrees, and on the other end of each rod is an adjustable end at 5 degrees. There are four radius rods, and I plan to have everything chromed. I have put up a picture of the adjustable end and a better picture of the welded up shackle hanger. The chrome adjustable ends I bought from Pete & Jakes in Missouri. They are good people there and I have never had any problem with buying things from them. The batwings are not welded to the axle yet. The prep work for the chrome process comes first, then the welding of things together.Are the long parts of the radius rods on the bottom? I don't see welds yet.
Attachments
old round fart
Well-Known Member
All I was saying is most of the time the long end is up to get the center of radius rods closer to the center of the load I think
Similar threads
- Replies
- 49
- Views
- 18K
