Ron Pope Motorsports                California Custom Roadsters               

Restoring 1970's California T-bucket with Tube Frame

Flatsman

Member
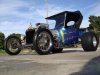
I bought this T about a year ago and got it running and drivable. The brakes were very scary so I decided to install a completely new brake system with all new lines, master cylinder, brake pedal, etc.
The more I looked underneath the T, the more I found that needed attention, so I have started a complete restoration of the car, keeping with the era that it came from. You can go to this link for the history of the car and the beginning of the story and I will continue the progress on this thread. http://www.tbucketeers.com/topic/10...eetster/page__pid__140329__st__20#entry140329 Feel free to offer suggestions and if you see me doing something really stupid, speak up. This is my first T project but I have been building stuff for a while. Thanks for your interest.
 

Attachments

  • t bucket 015.jpg
    t bucket 015.jpg
    100.6 KB · Views: 231
Looks great Fred. Looks like you had a few things to straighten out. Funny how much time you can spend on these little restoration projects isn't it?
I've seen your skills, I'm sure it is going together just fine. BTW, I sent sixpipes a couple tunes a few months back, never heard back, did they work out ok for him.
Take care,
Steve
 
Hey Steve, small world! I didn't know that you were on this site. Were the tunes for his Gen 1 or Gen 2? His Gen 1 is still in the later stages of restoration so I know he isn't ready to fire it up yet. I will give him a call and see what he is up to. Have you picked up a project yet? I think Sixpipes is starting to get the street rod bug!
 
I talked to Sixpipes this morning and I was confused as to which Gen 1 the tune was for. It is his Red one with the 30 lb injectors Speed Density. He is going to give you a call but just didn't want to bother you.
 
Fred, I looked at the label on the tune I sent him, it said Dennis' 30lb Gen1. Tell him to call me anytime, believe me he is not bothering me. except I leave next Tuesday for SEMA be back on Friday.
I'm working on a 23T myself, always had the bug, all my adult life, now retired and finially moving and groving on the T bucket.
If he needs my number, he can PM me on the NLOC.

TTYL Fred. Keep the pics coming.
Steve
 
I put the engine and tranny back into the frame this morning. The new motor mounts look real good compared to what was on the car. I just laid the tubular tranny mount across the frame for support right now and we will weld that onto the frame this next week. It will be designed to be taken out. I am shooting for a negative 3 degrees on the engine and a positive 3 on the pinion. While the motor and tranny are in place, I will do the final mock up of the master cylinder and brake pedal.

DSC02698.JPG
 
Yesterday, I installed the new rechromed Raduis rods with new heims joints and installed the rear suspension back on the car for the mockup of the adjustable panhard bar. Today we will start the fabrication of the master cylinder bracket for the new brake system and begin the fabrication of the round tube tranny cross member. After this work is completed, the T will be striped back down to just the frame and hopefully this next week, it will be blasted, primed, and painted. That is the latest!

DSC02700.JPG
 
More progress today. We got the master cylinder bracket fabricated a tacked to the tube frame. Monday we will fabricate the transmission cross member and get that welded inplace. We have the design finished so that it is removable.
DSC02705.JPG

Today I also started dealing with the body and firewall. The master cylinder was mounted to the firewall when I got the car so there was the old mounting hole that I was going to deal with. The easiest way for me was to just remove the old firewall and install a new one. After I took the old stainless fire wall out, you could see where the builder messed up and had to relocate the cylinder. The body on this car is a very cheap body and I am going to reglass the firewall and the inside of the shell to give it more strength. The last pictures are of the Swiss Cheese firewall.
DSC02703.JPG


DSC02704.JPG
 
Just a quick update. All welding and fabrication is completed and yesterday I removed everything from the frame and took the engine and tranny back out. The frame is ready for blasting, priming, and painting, but will do that after the Thanksgiving Holidays. I am currently working on stripping down the engine and preparing it for paint and detailing. I am also working on the Body, getting the firewall repaired and new aluminum installed. I hope everyone has a great Thanksgiving!
 
Keep up the good work Fred. Make sure to post up some pics.
This is inspiring me to get back out in the cold garage and get something going on my project.
 
Just a little update on the Restoration. I sent the frame out and got it blasted and primed. There were a lot of little imperfections and dings in the frame that had been covered up with a surface bondo and all of that was blasted away. I am going back over the frame now and fixing the problem areas and when that is finished, I will paint it Satin Black. I also am getting the SBC and tranny ready to paint. I wirebrushed the motor today and all the blue paint came right off leaving bits and pieces of Chevy Orange underneath. I bought a Chevy Blue engine paint that goes well with the body. I got a little carried away and also ground off all the casting marks on the heads and block. I sure wish this T-bucket could talk to me and tell me where all it has been and what has happened to it along the way. It would be a story to tell!
 
The insanity continues! I actually had a fun afternoon but I do wish this car could talk. After cleaning and prepping the engine and tranny for painting, I fould a hair-line crack around the second bellhousing bolt on the right side. So I seperated the tranny and it is going down to my friends shop tomorrow to be welded and I will grind the weld down and make it disappear. Lucky I did this because I found that my Torque Convertor was holding on with just two bolts! Someone had sheared the third bolt and the threads were broken off in the convertor. I was able to drill the bolt and back it out. I retapped all the threads and will use new convertor bolts when I put it back together. The body is down at the paint shop and I haven't settled on just what I will do yet. I would like to keep the original flames and body color if I can but it could turn out to be a total repaint. I would like to paint the engine and transmission the same color as the body and may go that route. More later! I will try to put some pictures up soon. How about a few Pros and Cons on using nonengine paint on the drive train. Thanks.
 
Usually the same paint that you put on the body can go on the engine and trans.
 
Today I got the broken ear on the tranny welded up and ground down. It was welded on the inside and the outside. I am considering repainting the whole car and losing the original flames. The cost of trying to save everything is greater than a repaint. I am now considering painting the car 2004 Ford Sonic Blue. That color resembles the original paint and I will paint the motor and tranny the same color. At least it is Ford paint. Thanks for the info 409T.
 
Buy some yellow and a cheap airbrush and re-do the flames as well. One way is to draw a template on a large sheet of paper, use a pounce wheel to mark the outline, tape the template on your car and spray the dots left by the pounce wheel. This will transfer the dots onto the car and then you can follow them to tape off the design. Flip the paper over and do the other side of the car. Mask everything and spray. If you tape just outside the dots so they are in the area to be sprayed they will get covered up and everyone will think you are a masking wizard.
 
Hey Zack, The old 70's Ts had what I call a Horse and Buggy look to them that set them apart. I like the old era look too.
409T, I must confess that I didn't know what a ponce wheel was but I looked it up and I think that is a great idea and will probably give it a try. I just floated the idea of no flames but didn't think I would really get by with it! Thanks for the inspiration!
 
Latest update on my project. Yesterday, I started painting the frame satin black and it is looking real good. Over the holidays I bought a set of Lester Corvette Valve Covers that were polished and will be putting those on the motor with a paint scheme on them. The Block is now painted Ford Sonic Blue and it look real good. I used a engine paint primer as a base coat. I will try to get some pictures up when the valve covers are finished. Yesterday, I also pulled the lower crank pully off and the Harmonic balancer just didn't look right to me. I am a Ford Guy but this thing just was wrong. I took it off and went to NAPA and bought a new balancer for a 350 SBC and here they are side by side.

DSC02719.JPG


Well, the old balancer had come apart and the outer ring was gone and only the inner ring was on the crank. The crank pulley was just bolted onto the central hub of the blown up balancer!! That is the new balancer on the left and the old one on the right. This motor was installed just before I bought the car and I think it only had about 10 miles of driving on that balancer. Later I will post up some pictures of the frame and motor.

Fred isn't it amazing the stuff you find when you jump into the middle of it? I approach all the used stuff I have purchased with caution, I'm still worried about my TH350 (bought from a buddy) until it is going down the road and proven. Keep the pics coming, lets see some paint work.
 

     Ron Pope Motorsports                Advertise with Us!     
Back
Top