

You are using an out of date browser. It may not display this or other websites correctly.
You should upgrade or use an alternative browser.
You should upgrade or use an alternative browser.
Steering Column - Serious set back!
- Thread starter AndyMenon
- Start date


AndyMenon
Member
You guys reread his full post. lol
He needs to space it 1/2" up off the floor NOT side to side.
")
Keeper
Active Member
Any chance you could loosen the body mount bolts and push the body over a touch to center that u joint? I ran into the same thing with that nut.
Though looking at that picture more closely it does not look like it will help.
How confident are you with cutting that mount and using a bigger piece of tube on the bottom? That would solve most of your issues. Bigger hole, bigger tube, no clearance issues.
Though looking at that picture more closely it does not look like it will help.
How confident are you with cutting that mount and using a bigger piece of tube on the bottom? That would solve most of your issues. Bigger hole, bigger tube, no clearance issues.
AndyMenon
Member
Any chance you could loosen the body mount bolts and push the body over a touch to center that u joint? I ran into the same thing with that nut.
Though looking at that picture more closely it does not look like it will help.
How confident are you with cutting that mount and using a bigger piece of tube on the bottom? That would solve most of your issues. Bigger hole, bigger tube, no clearance issues.
I haven't even tightened the body mount bolts yet. But the body is accurately lined up and I can hand-tighten the body-mounting bolts.
I haven't welded in ages. Therefore that is something I am not comfortable with. But I agree, the bracket should've had a larger tube welded to the bracket first , and then that should've been welded on to a round tubing to hold the steering column.
I think the bracket is designed the way it is because it is easier to take a stock tube and weld it to a flat plate.
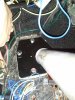
These pictures were taken when I cut the first piece which is 3/4" thick. Since then, I've cut another spacer which is about 0.2" thick, and there is considerable improvement. If I add in another spacer of the same thickness, the jam nut will completely clear the round tubing. If you've observed in the pictures, the center hole in the spacer is much larger than the one in the bracket. Therefore, the coupler must rotate freely without the jam nut touching anything in the spacer.
If the jam nut still continues to be an issue, I may have to replace that screw with a cheese-head bolt.
thanks,
Andy
Screaming Metal
Active Member
That, or enlarge your thru holes thru the floor, so you can float the mount centered. Loosed your steering box just a touch and center. After things are aligned, drill a couple of holes for roll pins for future lineup purposes on steering box mount. Then use some thick washers with the right sized hole, commonly referred to fender washers or cheek washers on the bottom and the top. Center your stuff and cinch down tight.
Tube Dia. is/would be a plus.
Tube Dia. is/would be a plus.
Screaming Metal
Active Member
That, or enlarge your thru holes thru the floor, so you can float the mount centered. Loosed your steering box just a touch and center. After things are aligned, drill a couple of holes for roll pins for future lineup purposes on steering box mount. Or Shoulder bolts.... Then use some thick washers with the right sized hole, commonly referred to fender washers or cheek washers on the bottom and the top. Center your stuff and cinch down tight.
Tube Dia. is/would be a plus.
Tube Dia. is/would be a plus.
AndyMenon
Member
That, or enlarge your thru holes thru the floor, so you can float the mount centered. Loosed your steering box just a touch and center. After things are aligned, drill a couple of holes for roll pins for future lineup purposes on steering box mount. Then use some thick washers with the right sized hole, commonly referred to fender washers or cheek washers on the bottom and the top. Center your stuff and cinch down tight.
Tube Dia. is/would be a plus.
Yep, to enlarge the hole in the floor was my first line of thought. Unfortunately, there are so many cuts and slots in that region of the floor, that if I enlarge the hole, there would be no strength left in the wooden floor. Two of them are located in places where there is very little material to begin with . The first one is the mounting hole on the firewall side. And the second one is the one on the transmission tunnel side.
BRUCE DYDA
New Member
The other thing you can do is that they sell set screws with a nylon locking pin in the threads and eliminate the jam nut altogether. Use a standard set screw for mock-up and then for final assy use the locking type with a little locktite for insurance.
Screaming Metal
Active Member
What He said! You could do a double jam setscrew, a short one jammed out on top of another one. Its a total Bitch to loosen after done though. I drill a slight indention into the steering shaft then do the setscrews.The other thing you can do is that they sell set screws with a nylon locking pin in the threads and eliminate the jam nut altogether. Use a standard set screw for mock-up and then for final assy use the locking type with a little locktite for insurance.
NyLoc setscrews can be had thru any good hardware store or Fastenal, Grainer, or machine shop supply....
AndyMenon
Member
The other thing you can do is that they sell set screws with a nylon locking pin in the threads and eliminate the jam nut altogether. Use a standard set screw for mock-up and then for final assy use the locking type with a little locktite for insurance.
Thanks Scream and Bruce!
I just put in the steering column and it went it quietly without the jam nut in place!
I will check out the resources that Scream mentioned .
Will post some pics tomorrow.
Andy
AndyMenon
Member
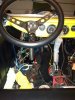
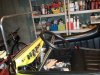
And here's where I'm at. The steering column has been test-installed. Steering box has rotation from end-to-end without issues.
The body mounting bolts are lining up without issues.
Also, I have a couple of new options to dispense with the jam nut.
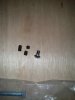
Replace the single set screw with 2 shorter set screws. The shorter one goes in first and locks the shaft. The longer one goes in after it, and prevents it from backing out. Loctite goes on both of them screws.
Or
Replace the set screw with a single chrome pan-head bolt. When compared to the jam nut, the pan head has a softer profile especially at the corners that will keep it from touching anything around it as the coupler rotates.
Will be trying this out sometime this week
The body mounting bolts are lining up without issues.
Also, I have a couple of new options to dispense with the jam nut.
Replace the single set screw with 2 shorter set screws. The shorter one goes in first and locks the shaft. The longer one goes in after it, and prevents it from backing out. Loctite goes on both of them screws.
Or
Replace the set screw with a single chrome pan-head bolt. When compared to the jam nut, the pan head has a softer profile especially at the corners that will keep it from touching anything around it as the coupler rotates.
Will be trying this out sometime this week
Attachments
AndyMenon
Member
From safety point of view, and also from the adjustments I've made thus far, I'm thinking my idea to use 2 set screws is the way to go. Here's why :
Let's suppose I use a single pan head bolt. If by chance this bolt backs out, it will prove to be unsafe for 2 reasons
a. This is the *only* bolt holding the shaft in place, and if this backs out, there is no backup in place!
b. When the bolt backs out, the head can still touch the inside of the mounting bracket and obstruct the steering all of a sudden! This is a pickle I would not like to be in when I'm on the highway and changing lanes!
Instead, the odds of 2 screws backing out at the same time are very low. Therefore, even if the second set screw backs out, the inner one will be a redundant back up that will still be in holding the shaft in place .
Also, given that the set screw is headless, it's chances of falling off are higher than getting in the way of the steering unlike the pan head bolt.
Thoughts?
jimbo01
Member
I've been following along & if I understand .... the set screw is the only thing that "locks" the steering shaft together??? No roll pin ,no splines , no flats [double D ] no woodruff key ???? This seems pretty unsafe , hope I'm missing something ?!?!
dave
I see splines in the coupler. Look very close at the first posted picture.
AndyMenon
Member
I see splines in the coupler. Look very close at the first posted picture.
Correct! There are splines in the coupler. And on the end of the steering shaft as well.
fordsbyjay
Active Member
I have had my setscrew come loose and the steering column come out in the middle of a turn and it was not very much fun. I threw that useless allen head screw in the trash and put a jam nut on a 1/4" bolt. I applied some loctite to the bolt and tightened it down then tightened down the jam nut. I found the allen head screw would strip out so easily I don't thing you could ever get it tight enough (not to mention it is was damn near impossible to get out). With a bolt head you can properly torque the fastener. You can also get to it with a 7/16" wrench easily. It sticks our maybe a 1/2" but there is plenty of clearance to the floor and steering mount.
fordsbyjay
Active Member
Everybody gets excited about trusting a 10-24 set screw to save their lives. In my opinion, the steering components should be fastened in well enough that you don't even need a set screw.
You don't have a TP/Wintec bucket do you? The steering shaft goes on the box then the column goes over the shaft with a bushing at the top. All that holds it all together is the where the base is welded to the column. If the lock nut comes loose the steering column can lift up and come off the steering box. How is yours held in place?
AndyMenon
Member
You don't have a TP/Wintec bucket do you? The steering shaft goes on the box then the column goes over the shaft with a bushing at the top. All that holds it all together is the where the base is welded to the column. If the lock nut comes loose the steering column can lift up and come off the steering box. How is yours held in place?
It's a TP bucket with a TP body. It was my intention to use the TP steering shaft as you described. But by the time I could bu yall the parts , TP left us in the drink. Therefore I had to use the steering column from Wintec that comes with a universal coupler.
In the long term, I may have to plan to move the steering box out from under the car and out on the frame. But that takes time and planning. Idea is to get the bucket running before my wife decides to throw it out, and then plan out the longer solution at a later date.
Similar threads
- Replies
- 22
- Views
- 4K
