


You are using an out of date browser. It may not display this or other websites correctly.
You should upgrade or use an alternative browser.
You should upgrade or use an alternative browser.
The "what's left of my build thread!"
- Thread starter Hotrod46
- Start date
Hotrod46
Member
Keeper - Glad to help!
Ron
Thanks. The writing is actually more difficult for me than the building. I'm always worried that I'm not explaining myself clearly. The last thing I want to do is confuse someone. It's getting a little easier though! I guess paractice really does help.
Mike
Ron
Thanks. The writing is actually more difficult for me than the building. I'm always worried that I'm not explaining myself clearly. The last thing I want to do is confuse someone. It's getting a little easier though!
I guess paractice really does help.Mike
Hotrod46 said:Keeper - Glad to help!
Ron
Thanks. The writing is actually more difficult for me than the building. I'm always worried that I'm not explaining myself clearly. The last thing I want to do is confuse someone. It's getting a little easier though!
Mike
Mike,
I think your writing is great! What I like about your style is instead of just showing people what you're doing, what you actually do is show people how to think and solve a problem. Much better!
")
David
Hotrod46
Member
Well gang, I have to make a slight correction to an earlier post.
Turns out my math was slightly off on the wheel cylinders.
The 1" and 15/16" combo I'm using actually gives me a 12% difference instead of the 19% I posted earlier.
The 1 1/8" and 1" combo is actually a 21% difference.
The 36% difference number is right, though.
I don't even know what combo of numbers I had scribbled in my notes I used to come up with the wrong numbers. The math should have been so simple, I didn't even recheck it. Don't know where my brain was that day, but apparently it wasn't with me!
Looks like I'll have to proof read a little better in the future.
Dang, first mistake I ever made!:lol: Yeah, right!!!
Turns out my math was slightly off on the wheel cylinders.
The 1" and 15/16" combo I'm using actually gives me a 12% difference instead of the 19% I posted earlier.
The 1 1/8" and 1" combo is actually a 21% difference.
The 36% difference number is right, though.
I don't even know what combo of numbers I had scribbled in my notes I used to come up with the wrong numbers. The math should have been so simple, I didn't even recheck it.
Don't know where my brain was that day, but apparently it wasn't with me!Looks like I'll have to proof read a little better in the future.
Dang, first mistake I ever made!:lol: Yeah, right!!!
Hotrod46
Member
It's Going back together!!!
Thanks minchione!
Now that Christmas is over, I thought I would take time to post an update. I hope everyone had a good holiday.
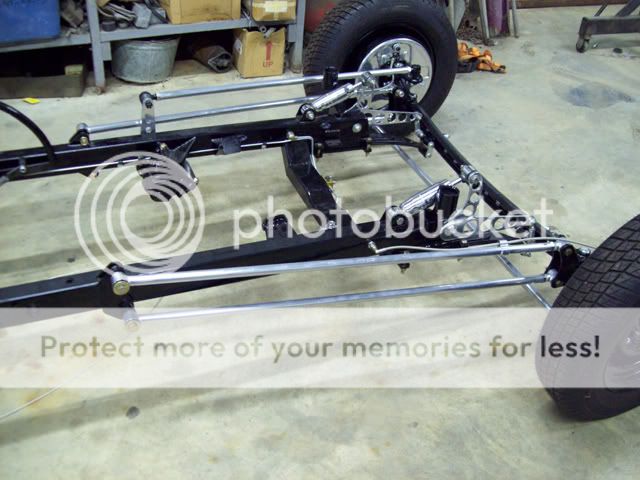
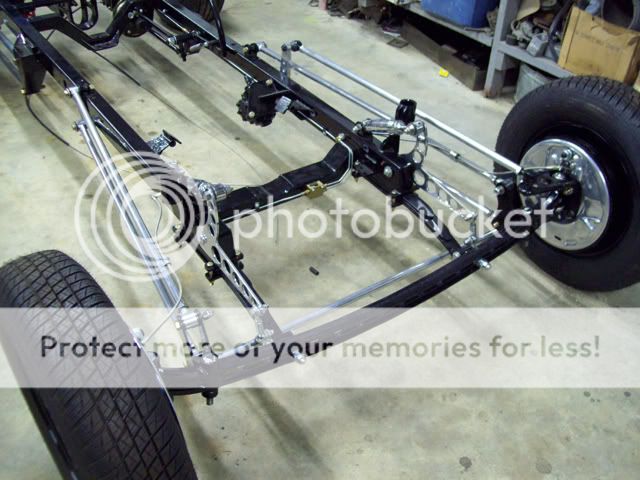
The front and rear suspensions have been assembled and squared. I still need to set the pinion angle on the rearend and the caster angle on the front end. Im waiting until the engine is in for that step. I can go over all the bolts then and make sure they are tightened and locked.
The air compressor, valves and air bags are all mounted and plumbed. The valves are small 1/8 stainless steel units, but they're big enough for what I'll be using them for. I mounted a valve directly to each bag using solid pipe fittings to keep the two sides of the car separate. Each bag will be a separate "spring", so there shouldn't be any air transfer from bag to bag when the car leans. Should also help keep any small leaks at the tubing connections from bleeding the bags down overnight since they're essentially sealed. It has been aired up for about 2 weeks now and doesnt appear to have leaked down.
When I was testing this setup earlier in the build, it only took about 30-40 lbs. of air to hold the car at ride height with one person on board. I would be surprised if it took more than 50-60 when it was fully loaded. Each bag has an 800 lb rating at 100 PSI. There is one valve with a restrictor mounted on an aluminum manifold to bleed off air, so only 3 valves are needed for the whole system. There is no air tank; the air compressor will push air directly into the bags. During earlier testing, the compressor took only a few seconds fill the bags if they were empty. There is a safety switch on the distribution manifold that will kill the compressor if the system gets to 105 PSI.
Im using a GM control switch to keep the ride height where I want it. These were used on high end GM cars in the 70s through the 90s. They are not much bigger than a pack of cigarettes and attach to the frame. An arm and linkage attaches to the rearend. The length of the link determines the ride height. Not as sophisticated as the programmable controllers on the market today, but theyre usually cheap and as close as your local junk yard. Add a couple of automotive relays and youre good to go.
Hard to see in the pics, but I rounded the ends of the leaf springs to make them look a little better. I also added a third leaf to the front spring packs. I didnt feel real confident about using just two leafs. These are heavier thick leafs.
I spent a lot of time chasing threads and fitting parts where they were powder coated. Note to self: Dont build this stuff so tight if youre going to powder coat it! The ceramic coating is aluminum based, so I used liberal amounts of anti-seize compound. I didnt want to risk galling the threads.
The brakes are bled, but not without some problems. I had a new wheel cylinder leaking!! No, it wasnt one of the modified cylinders. It was one of the new ones I bought for the front. I pulled it apart and found that it was full of crap that looked like kitty litter. Nothing was damaged, but the crud had gotten under the cup lips and wasnt allowing it to seal. After cleaning it up everything was fine, but I use a pressure bleeder and it sure made a heck of a mess before I saw it was leaking. I hate to think that Im going to have to start pulling NEW parts down and check them before I use them. More of that good Chinese crap!
All of the hard fuel lines, the fuel pump and filter are installed. I still have to make up the braided flex lines for the fuel system.
The engine and trans is going in tomorrow.


Thanks minchione!
Now that Christmas is over, I thought I would take time to post an update. I hope everyone had a good holiday.
The front and rear suspensions have been assembled and squared. I still need to set the pinion angle on the rearend and the caster angle on the front end. Im waiting until the engine is in for that step. I can go over all the bolts then and make sure they are tightened and locked.
The air compressor, valves and air bags are all mounted and plumbed. The valves are small 1/8 stainless steel units, but they're big enough for what I'll be using them for. I mounted a valve directly to each bag using solid pipe fittings to keep the two sides of the car separate. Each bag will be a separate "spring", so there shouldn't be any air transfer from bag to bag when the car leans. Should also help keep any small leaks at the tubing connections from bleeding the bags down overnight since they're essentially sealed. It has been aired up for about 2 weeks now and doesnt appear to have leaked down.
When I was testing this setup earlier in the build, it only took about 30-40 lbs. of air to hold the car at ride height with one person on board. I would be surprised if it took more than 50-60 when it was fully loaded. Each bag has an 800 lb rating at 100 PSI. There is one valve with a restrictor mounted on an aluminum manifold to bleed off air, so only 3 valves are needed for the whole system. There is no air tank; the air compressor will push air directly into the bags. During earlier testing, the compressor took only a few seconds fill the bags if they were empty. There is a safety switch on the distribution manifold that will kill the compressor if the system gets to 105 PSI.
Im using a GM control switch to keep the ride height where I want it. These were used on high end GM cars in the 70s through the 90s. They are not much bigger than a pack of cigarettes and attach to the frame. An arm and linkage attaches to the rearend. The length of the link determines the ride height. Not as sophisticated as the programmable controllers on the market today, but theyre usually cheap and as close as your local junk yard. Add a couple of automotive relays and youre good to go.
Hard to see in the pics, but I rounded the ends of the leaf springs to make them look a little better. I also added a third leaf to the front spring packs. I didnt feel real confident about using just two leafs. These are heavier thick leafs.
I spent a lot of time chasing threads and fitting parts where they were powder coated. Note to self: Dont build this stuff so tight if youre going to powder coat it! The ceramic coating is aluminum based, so I used liberal amounts of anti-seize compound. I didnt want to risk galling the threads.
The brakes are bled, but not without some problems. I had a new wheel cylinder leaking!! No, it wasnt one of the modified cylinders. It was one of the new ones I bought for the front. I pulled it apart and found that it was full of crap that looked like kitty litter
. Nothing was damaged, but the crud had gotten under the cup lips and wasnt allowing it to seal. After cleaning it up everything was fine, but I use a pressure bleeder and it sure made a heck of a mess before I saw it was leaking. I hate to think that Im going to have to start pulling NEW parts down and check them before I use them. More of that good Chinese crap!All of the hard fuel lines, the fuel pump and filter are installed. I still have to make up the braided flex lines for the fuel system.
The engine and trans is going in tomorrow.
Hotrod46
Member
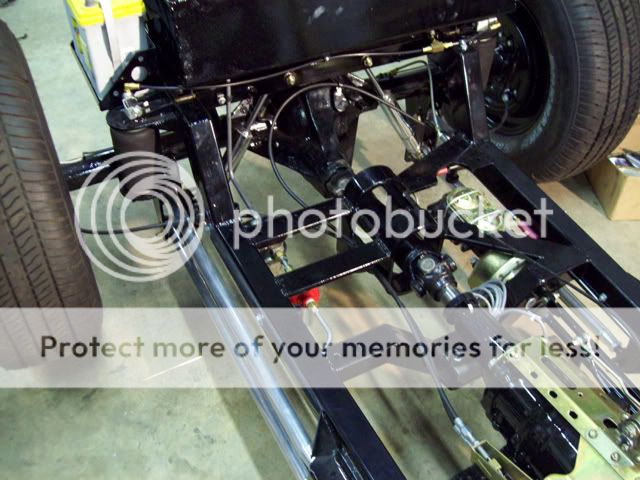
LumenAl said:one question... I see you have a clip or such device that supports the brakeline along the 4-link setup... did you make that?
Yeah, I was pretty much forced to go with the long hoses and I knew they were going to flop around pretty bad, so I made a support for the middle. It's a piece of thin flat stock that I formed around a jig. I played with different positions on the bar until it worked good. It's welded to the top bar. A short piece of rubber hose wraps around the line to cushion it where it goes through the support.
Mike
 Nice detail... I suspected it was custom! Again, very nice setup!
Hotrod46
Member
I got a lot accomplished on my days off over the holidays.:welcome:
The shifter is on and the linkage is finally worked out. I wound up fabbing the long link out of steel tubing, since the all-thread Lokar provides wasnt stiff enough when bent to clear the brake pedal.

The engine and trans are together and in the frame.
The alternator is back together and installed on the engine. Same with the fan, pulleys and belt.

I reprimed the oil pump (just to be sure), reinstalled the distributor and retimed the engine to 10 degrees BTDC.
The body had to be dropped back on (temporarily) to check the routing of the spark plug wires around the steering shaft. I had to make up a couple of mounts for the Made For You looms Im using, but the wires tuck in nice under the headers AND clear the steering.
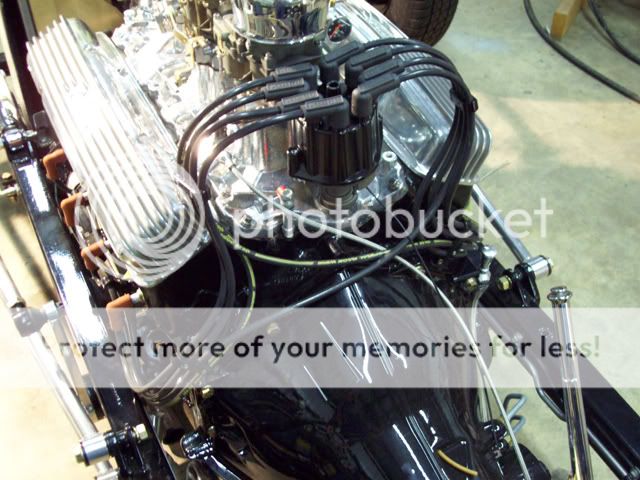
The fuel pump and filter unit went back on with all of the plumbing. I made up the braided hose that runs from the regulator to the fuel manifold on the engine. Im using a regulator because these 2Gs dont need more than 4-4 PSI. I also drilled the rear of the fuel manifold and installed a fuel pressure gauge.
After running the hard line from the tank to the pump, I realized that I wouldnt be able to pull the tank with the body on. I had to add a coupling so that the upper bend could be removed.


The trans cooler lines are back on and the transmission throttle valve cable (Lokar) is installed. I got lucky because the trans cable stud on the throttle arm was pretty close to where it needs to be for a 700R4. If youve never used a 700 before, you need to know that the location of that stud is very important. It needs to follow a specific radius as the throttle is opened or you can burn your trans up. That info can be found here:
http://purplesagetradingpost.com/sumner/techinfo/700R4p1.html
http://purplesagetradingpost.com/sumner/techinfo/700R4p1.html
The driveshaft is assembled, installed and the pinion angle is set. On the front I set the caster angle at 6 degrees.
The emergency brake cables are hooked up and partially adjusted. I left them a little loose for now because the handle needs to be straight up for the body to go on. When the body is bolted on, Ill give it the final adjustment.
I also moved the body to a location in the shop where I can get started on the sanding and body work. If the weather permits next week, I may start on some of that. I can always work on the frame while its cold, but the paint likes the weather a little warmer.
Because I tend to be slower than Christmas, I have hesitated to set a firm time goal for getting this thing on the road, but there are two shows in March that I would really like to take it to. I figure I can make it pretty easily, but Im going to have to paint when I can. Might not have any interior, though.
When my off time ran out, I was working on final fitment of the radiator, shell and plumbing.
Mike
The shifter is on and the linkage is finally worked out. I wound up fabbing the long link out of steel tubing, since the all-thread Lokar provides wasnt stiff enough when bent to clear the brake pedal.
The engine and trans are together and in the frame.
The alternator is back together and installed on the engine. Same with the fan, pulleys and belt.
I reprimed the oil pump (just to be sure), reinstalled the distributor and retimed the engine to 10 degrees BTDC.
The body had to be dropped back on (temporarily) to check the routing of the spark plug wires around the steering shaft. I had to make up a couple of mounts for the Made For You looms Im using, but the wires tuck in nice under the headers AND clear the steering.
The fuel pump and filter unit went back on with all of the plumbing. I made up the braided hose that runs from the regulator to the fuel manifold on the engine. Im using a regulator because these 2Gs dont need more than 4-4 PSI. I also drilled the rear of the fuel manifold and installed a fuel pressure gauge.
After running the hard line from the tank to the pump, I realized that I wouldnt be able to pull the tank with the body on.
I had to add a coupling so that the upper bend could be removed.
The trans cooler lines are back on and the transmission throttle valve cable (Lokar) is installed. I got lucky because the trans cable stud on the throttle arm was pretty close to where it needs to be for a 700R4. If youve never used a 700 before, you need to know that the location of that stud is very important. It needs to follow a specific radius as the throttle is opened or you can burn your trans up. That info can be found here:
http://purplesagetradingpost.com/sumner/techinfo/700R4p1.html
http://purplesagetradingpost.com/sumner/techinfo/700R4p1.html
The driveshaft is assembled, installed and the pinion angle is set. On the front I set the caster angle at 6 degrees.
The emergency brake cables are hooked up and partially adjusted. I left them a little loose for now because the handle needs to be straight up for the body to go on. When the body is bolted on, Ill give it the final adjustment.
I also moved the body to a location in the shop where I can get started on the sanding and body work. If the weather permits next week, I may start on some of that. I can always work on the frame while its cold, but the paint likes the weather a little warmer.
Because I tend to be slower than Christmas, I have hesitated to set a firm time goal for getting this thing on the road, but there are two shows in March that I would really like to take it to. I figure I can make it pretty easily, but Im going to have to paint when I can. Might not have any interior, though.
When my off time ran out, I was working on final fitment of the radiator, shell and plumbing.
Mike
Hotrod46
Member
Thanks, guys.
Al - I'm getting anxious to hear it run and to drive it at least to the end of the driveway. The little details are driving me crazy! Getting really hard to go slow. Gotta do it though!
putz - With only a little fiberglass between my butt and a bad case of driveshaft induced hemriods, I thought that loop might be a good idea.
Mike
Al - I'm getting anxious to hear it run and to drive it at least to the end of the driveway. The little details are driving me crazy! Getting really hard to go slow. Gotta do it though!
putz - With only a little fiberglass between my butt and a bad case of driveshaft induced hemriods
, I thought that loop might be a good idea.Mike
Similar threads
- Replies
- 208
- Views
- 13K
