Gerry
Well-Known Member
Hi
As a couple of you suggested its worth putting the build of my steering 'system' up (for reference) here goes.
First thing first. I spent well over 120 hours on this little baby and am lucky enough to have access to a good lathe so its not just a case of buying some bits and putting them together. Dont let me put you off having a go... none of us get it right first time out.
The other thing thats very important is any welding that has to be done. I qualified as a welder some 30!!!! years ago BUT on this part of the T I enlisted the help of a friend who is a welder but does it everyday for a living. Reason is that no matter how good I think I can weld there is nothing like a professional on CRITICAL components
With that said here goes. I will appologise in advance if it seems like I am trying to teach people who have done this sort of things for years how to do it all over again
As Approaching Suicide is a Fad and based on Legshow (thanks Danny for your help and info over the last few weeks) It was a no brainer it needed a vertical column.
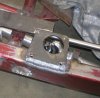
Getting the right position is of paramount importance for comfort and drivability. I started by positioning the rack so that the 'rodend' was in line with the rear mount for the radius rod. This way we eliminate Bump Steer as far as we can. With the rack mounted so it is clamped between two brackets, one of which is split. I needed to allow it to rotate so the UJ would line up with the column cleanly (No sign of binding when turned).

Once this was all finalised I had a couple of plates laser cut with mounting holes for the column itself. To increase strength the plate that fixes to the chassis goes over the top of the frame rail by about 2/3rds of the frame width. This give me a really good fillet weld on that side of the plate.
The second plate was used for the base of the column itself but with a 'cut out' to allow the shifter arm to stick out to the side. A couple of gussets were made and TACED into place. Final weldeing will be done much later when everything is working.
OK thats it for now. Next time I will start on the column itself.
Any comments or feedback is always welcome so dont be shy 9even if you want to say this is a waste of forum space
Gerry
As a couple of you suggested its worth putting the build of my steering 'system' up (for reference) here goes.
First thing first. I spent well over 120 hours on this little baby and am lucky enough to have access to a good lathe so its not just a case of buying some bits and putting them together. Dont let me put you off having a go... none of us get it right first time out.
The other thing thats very important is any welding that has to be done. I qualified as a welder some 30!!!! years ago BUT on this part of the T I enlisted the help of a friend who is a welder but does it everyday for a living. Reason is that no matter how good I think I can weld there is nothing like a professional on CRITICAL components
With that said here goes. I will appologise in advance if it seems like I am trying to teach people who have done this sort of things for years how to do it all over again
As Approaching Suicide is a Fad and based on Legshow (thanks Danny for your help and info over the last few weeks) It was a no brainer it needed a vertical column.
Getting the right position is of paramount importance for comfort and drivability. I started by positioning the rack so that the 'rodend' was in line with the rear mount for the radius rod. This way we eliminate Bump Steer as far as we can. With the rack mounted so it is clamped between two brackets, one of which is split. I needed to allow it to rotate so the UJ would line up with the column cleanly (No sign of binding when turned).
Once this was all finalised I had a couple of plates laser cut with mounting holes for the column itself. To increase strength the plate that fixes to the chassis goes over the top of the frame rail by about 2/3rds of the frame width. This give me a really good fillet weld on that side of the plate.
The second plate was used for the base of the column itself but with a 'cut out' to allow the shifter arm to stick out to the side. A couple of gussets were made and TACED into place. Final weldeing will be done much later when everything is working.
OK thats it for now. Next time I will start on the column itself.
Any comments or feedback is always welcome so dont be shy 9even if you want to say this is a waste of forum space
Gerry