Garage Merch                Ron Pope Motorsports                California Custom Roadsters               

Cut, Buff and Polishing question - issues with body lines.

Keeper

Active Member
Since I painted the bucket a few weeks ago I have been working on sanding the orange peel and buffing things up.

How does one polish near all the body lines without screwing things up? I thought I was all finished until I got the car in the sunlight and realized that near all the body lines there were dull spots. I was more afraid of burning through the clear so I tended to stay away completely.

3%20May%202013%20003.JPG_595.jpg


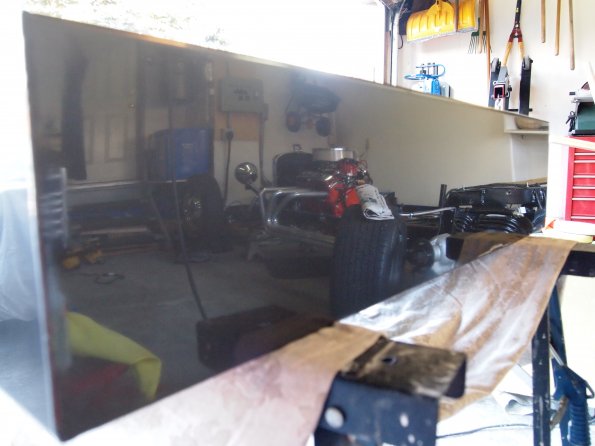
Right side is done, left side is where I started. This is also where I am running into the dull spots right along these lines. (You can actually see a dull spot at the top of the right hand side)

I am using a PC 7424 random orbital polisher, so no super wool pads or anything, just a slow cut and polish.
 
Any ridge or edge should be protected with masking tape as they are far too easily damaged in the sanding and buffing process. I use several grades of paper working my way to the finest then I use several grades of compound. I then unmask and do the ridges and edges by hand. They cut easily so be careful and you'll have a great finish.

Jim
 
They were protected with tape. I went through 5 stages of paper, 1000, 1500, 2000, 2500, and a 3000 3m trizac pad.

For polishing I used:

Meguires #4 heavy cut on a orange pad
Mequires 83 on a white pad
Poor boys Polish and sealer on blue pad.

I finally got my hands on some Meguires m105 and m205 so I plan on going over the whole car one more time. It looked great in the garage, but once in the sun I could see it needed more work.

Its been a ton of work, but it sure is nice when you see the results!

Here is the gas tank :) nice and flat making it easy to polish!
1%20may%202013%20004.JPG_595.jpg
 
We sand with 1500 grit only. We used to do time studies on identical panels large panels, about 5' x 12', and found that by sanding from 600 grit through 2000 grit using 4 or 5 steps took 26 man hours per panel, where sanding with just 1500 grit took 18. Secondly, if you sand to flat with the 600 you are going to leave deeper residual scratches than if you sand to flat with 1500. This means you have to remove even more material to get out the 600 grit scratches than you would removing only 1500 grit scratches. That is important if you didn't put on plenty of clear to protect the base coat.

After sanding flat with 1500 grit paper we buff using a gray foam pad on a disk buffer running at 1100 rpm and 3M brand compounds. First #6060, then #6062 and finally #6064 Swirl Remover. Lastly hand applied #6066 Final Glaze.
 
Keeper, Looking good. You got a lot of patience and are doing a great job.
 
We sand with 1500 grit only. We used to do time studies on identical panels large panels, about 5' x 12', and found that by sanding from 600 grit through 2000 grit using 4 or 5 steps took 26 man hours per panel, where sanding with just 1500 grit took 18. Secondly, if you sand to flat with the 600 you are going to leave deeper residual scratches than if you sand to flat with 1500. This means you have to remove even more material to get out the 600 grit scratches than you would removing only 1500 grit scratches. That is important if you didn't put on plenty of clear to protect the base coat.

After sanding flat with 1500 grit paper we buff using a gray foam pad on a disk buffer running at 1100 rpm and 3M brand compounds. First #6060, then #6062 and finally #6064 Swirl Remover. Lastly hand applied #6066 Final Glaze.

I sanded up to 600 before we applied the paint, since I went with metallic.

I sanded through the higher grits due to the fact I do not have a rotary polisher (I was not going to learn on this project!). Sanding to the higher grits, just made it easier to polish out using my da polisher.

I can completely understand once you are competent with a rotary to save the time. I have nothing but time so I can take it slow.

I should have some new pics tomorrow as I finally got all the interior done and installed.
 
When I ordered the M105/205 polish I grabbed some 4 inch pads and backing plate. These made things much easier to work around the body lines. I worked on it some today and its coming along.

Hopefully tomorrow I will get it out in the sun for some updated pics!
 

     Ron Pope Motorsports                Advertise with Us!     
Back
Top