


You are using an out of date browser. It may not display this or other websites correctly.
You should upgrade or use an alternative browser.
You should upgrade or use an alternative browser.
Drilling holes for windshield
- Thread starter tfeverfred
- Start date
tfeverfred
Well-Known Member
lanceks1 said:Yes Fred,
I say if it's not thick enough, BUILD IT UP WITH WHATEVER, then drill. You have meet many challenges before with this car, it's only minor rocket science after all.
I'm not worried. DO I LOOK WORRIED!?!?

tfeverfred
Well-Known Member
lanceks1 said:Has anybody told you you're getting more gray on top, since you started building? But how satisfying!!! I just finished a picture book for my car, and it's scarey seeing what I did.")
:lol:No, but then, I wear a baseball cap most of the time. I have noticed and keep my hair cut Micheal Jordan style. Damn near bald. The ladies love it!
tfeverfred
Well-Known Member
butch27 said:Fred: Youngster has it right. Just do it yourself. Back it up with something and BOLT. I backed mine inside with a piece of 3/32" steel and bent it a little to conform.
Wow, Butch. I totally over looked your post. Now THAT's a good idea! A plate, combined with using lock washers and nylocs would seem to do the trick. I think the plate may even spread the load also.
More food for thought.
tfeverfred
Well-Known Member
Okay, here's a sketch I just did. Not to scale. I think this may work. Any opinions?
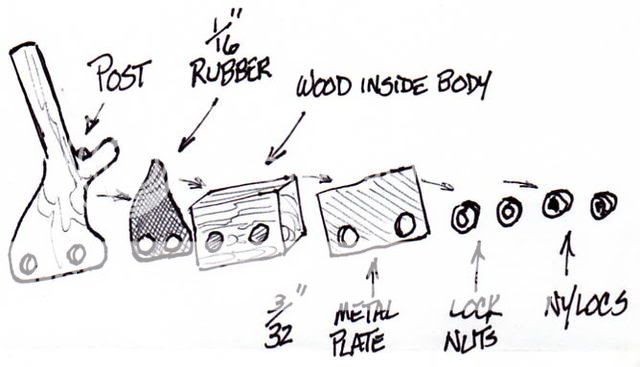
Sorry it's not in color. I was in a hurry.")
Sorry it's not in color. I was in a hurry.
Fred...you have the right idea. One thing to remember is you don't want any movement between the windshield and the body. Everything needs to be as solid as you can make it. If not, cracks in the 'glass and chipped paint or cracked glass could be the result.
Here are some thoughts. The rubber, while it would protect the paint, is compressable. This would let the windshield vibrate at speed. To get the wood blocking to fit as close to the body as possible, install it with some body filler between it and the body. Not much, but enough to fill any voids in that area. With the Ny-locs, you won't need the lock washers.
Here are some thoughts. The rubber, while it would protect the paint, is compressable. This would let the windshield vibrate at speed. To get the wood blocking to fit as close to the body as possible, install it with some body filler between it and the body. Not much, but enough to fill any voids in that area. With the Ny-locs, you won't need the lock washers.
tfeverfred
Well-Known Member
Thanks, Youngster. Thanks, Butch. I should have put an explanation of what was going on. Okay, the post attach to the body. Skip the rubber. Inside the body, the wood is attached to the cowl with bondo as per the way Total does it. Then the washers, then the nylocs. I know I don't need lock washers with nylocs, but they couldn't hurt, I guess.
tfeverfred
Well-Known Member
Thanks guys! I think I just shaved $95 off the price of my body!

Well kids pull up a chair this is my $1.00 worth on mounting the wood and windershield.First go to Home Depot or such and pick up 6 spring clamps about 8 inches long with the rubber slide on tips.Now you get 30 foot of 1x3(3/4 x2-3/4)now as per the manual cut the required pieces for each length.Now ya got a big pile of little pieces.Start by putting a big champfer on the edge that will go under and against the under lip area.Where the pieces meet angle the edges to 45 degrees where they meet(more surface area for the Bondoto bond test fit to about 1 1/2 under the cowel area where the windershield goes clamp that in place now go to the next piece champfer and fit clamp that in place etc.,etc. Always work 5 to 6 pieces at a time.Now mix up some bondo(how much?)alot.Now start by taking a putty knife and smudge a ton under the lip back batter the wood slide it in place tight now clamp make sure the angles have a bunch.Do 6 then go get a beer relaxe for a couple hours to set.Be prepared to go with pieces 1 in long up around the curve of the body.Congrads you now have started an episode of "This Old Car"Youngster said:Yeah, well.... you did and you didn't....you'll spend that much on the suplies and wood. But then there is something else to tell your grandkid about!
As you can see the first pic is Totals with the built in posts i did that on the last Bucket.HAVE FUN.OOPS to many


tfeverfred
Well-Known Member
No Youngster, the $95 saving will come from not having Total drill the windshield holes.Youngster said:Yeah, well.... you did and you didn't....you'll spend that much on the suplies and wood. But then there is something else to tell your grandkid about!
As for the wood kit install....... looking at Ricks pics, I could do that. IF I was working in my own shop or garage. I'm not. I'm building this at work and my boss has been more than generous with allowing me to pursue my folly. The next 4-5 months are our busiest. Lots of weekends and moving and shipping will be done. I wouldn't have the amount of room to work, even for a weekend, to do what looks like may be needed. Not to mention the mess I would probably make. I just can't take advantage of the generosity. The build up of where the windshield post would go, wouldn't be so bad. He wouldn't mind that. So, I guess I'm back to getting the body with the wood kit installed. Maybe for my next T Bucket or project, I'll be able to rent a space where I'll be able to have more freedom to be creative. I just don't right now.
"IS THIS GUY EVER GOING TO MAKE UP HIS DANG MIND? SIGHS"

Similar threads
- Replies
- 0
- Views
- 15K
