Welcome to Our Community

Wanting to join the T-Bucket Forums discussions? Then sign up for a free forum account, today!

Sign Up

Ron Pope Motorsports                California Custom Roadsters               


Dismiss Notice
Thank you for visiting the T-Bucket Forums! This site was created in 2006, to provide enthusiasts with a place to discuss T-Buckets. Over the years, there have been many imitators, but this is the T-Bucket resource you have been looking to find. We encourage you to register a FREE account and join in on the discussions.

Covid Project - 80's Project T-Rod

Discussion in 'Project Plans & Updates' started by Randy Steel, Oct 6, 2020.

  1. Randy Steel

    Randy Steel
    Expand Collapse
    Member

    Joined:
    Aug 25, 2020
    Messages:
    58
    Likes Received:
    63
    Gender:
    Male
    Here is a pic of my T-bucket I bought in Aug 2020...was sitting for 3 yrs. Needs a full tear down and restoration. This is going to take a couple of years and a lot of patience....wish me luck. I'll post pics as I continue to progress.
     

    Attached Files:

    James Louis likes this.
  2. Randy Steel

    Randy Steel
    Expand Collapse
    Member

    Joined:
    Aug 25, 2020
    Messages:
    58
    Likes Received:
    63
    Gender:
    Male
    Tear down beginnings
     

    Attached Files:

  3. Randy Steel

    Randy Steel
    Expand Collapse
    Member

    Joined:
    Aug 25, 2020
    Messages:
    58
    Likes Received:
    63
    Gender:
    Male
    Eliminated the Ford 9 inch towing package....lol
     

    Attached Files:

  4. Randy Steel

    Randy Steel
    Expand Collapse
    Member

    Joined:
    Aug 25, 2020
    Messages:
    58
    Likes Received:
    63
    Gender:
    Male
    Alternator was rigged with some crazy type of idler pulley contraption. I removed the alternator and performed a drivers side re-mount. The frame was in the way on the passenger side to allow movement, so I had to revert to an elevated mounting on the drivers side.
     

    Attached Files:

  5. Spanky

    Spanky
    Expand Collapse
    Well-Known Member

    Joined:
    Jul 29, 2016
    Messages:
    3,023
    Likes Received:
    2,428
    Gender:
    Male
    Great project, Randy. It is a little rough, but the bones are there, so with a little work and a lot of TLC it should make a nice bucket. What will you use to replace the wooden bed box?
     
  6. choppedtop

    choppedtop
    Expand Collapse
    Well-Known Member

    Joined:
    Jan 10, 2014
    Messages:
    1,924
    Likes Received:
    631
    Gender:
    Male
    Occupation:
    Retired
    Good looking project to start with. Lots of good stuff there to work with.
     
  7. Bad Bob

    Bad Bob
    Expand Collapse
    Supporting Member
    Supporting Member

    Joined:
    Aug 11, 2019
    Messages:
    63
    Likes Received:
    23
    Gender:
    Male
    Occupation:
    Administrator with rolled up sleeves
    Nice pics.
    Mine came with the exact same body you have... the "ridge" along the back is identical.
    Not sure if it is an old Total Performance one or not... the glass they used to fabricate the body is that old thick orange-y stuff.
    It's still strong, but if you plan on cutting a door, be sure to add some more wood for reinforcement.
    I hated those "sleigh horns" sticking out at the bottom tail, so I cut 'em off and glassed over the holes.
    Let the fun begin!
     
  8. Randy Steel

    Randy Steel
    Expand Collapse
    Member

    Joined:
    Aug 25, 2020
    Messages:
    58
    Likes Received:
    63
    Gender:
    Male
    Thanks for the input...I may slash the "sleigh horns" as well. I noticed there's a tiny crack on the edge of them and they don't really add any appeasement to the body. Last night, I cleared the firewall and removed the body. I built my own inexpensive hanging system to elevate the body (until I get around to bodywork and paint). I simply used (4) small plant hooks, (4) straps of equal length, and two 2x2x6's.
     

    Attached Files:

    Bad Bob likes this.
  9. Randy Steel

    Randy Steel
    Expand Collapse
    Member

    Joined:
    Aug 25, 2020
    Messages:
    58
    Likes Received:
    63
    Gender:
    Male
    To replace the rear wood box...I'm considering my options about what I should do. My first thoughts were a standard fiberglass bed and lid for the fuel cell and battery. Any thoughts?
     
  10. Spanky

    Spanky
    Expand Collapse
    Well-Known Member

    Joined:
    Jul 29, 2016
    Messages:
    3,023
    Likes Received:
    2,428
    Gender:
    Male
    That's my preference, obviously. My head is still in the 60's for hot rods, and both Grabowski and Ivo chose that look. Works for me . . . :rolleyes:

    E.jpg
     
  11. choppedtop

    choppedtop
    Expand Collapse
    Well-Known Member

    Joined:
    Jan 10, 2014
    Messages:
    1,924
    Likes Received:
    631
    Gender:
    Male
    Occupation:
    Retired
    What Spanky said. And put a bulkhead between tank and battery.
     
    Bad Bob and Kevinrevin like this.
  12. Bad Bob

    Bad Bob
    Expand Collapse
    Supporting Member
    Supporting Member

    Joined:
    Aug 11, 2019
    Messages:
    63
    Likes Received:
    23
    Gender:
    Male
    Occupation:
    Administrator with rolled up sleeves
    In addition to having the traditional look, a bed gives you lots of ways to hide things, plus a wee bit of storage if you plan it right.
    Like choppedtop said, be sure to physically separate your battery from your tank... thus keeping explosions to a minimum.
    I also highly recommend an Odyssey Extreme battery if you can afford one.
    They are small, sealed and take up so little room I was able to mount mine under the dash.
     
  13. Randy Steel

    Randy Steel
    Expand Collapse
    Member

    Joined:
    Aug 25, 2020
    Messages:
    58
    Likes Received:
    63
    Gender:
    Male
    Thanks. I’ll definitely separate the battery and tank if I mount the battery in the rear. I’ll also check out the extreme battery. It may be a good option for mounting in the bucket floor under the seat? I’m considering all my options.
     
    lincolnuT likes this.
  14. choppedtop

    choppedtop
    Expand Collapse
    Well-Known Member

    Joined:
    Jan 10, 2014
    Messages:
    1,924
    Likes Received:
    631
    Gender:
    Male
    Occupation:
    Retired
    I have my Odyssey 925 Under/behind the dash. Helps with keeping the cables short to the starter and ground.
     
  15. Randy Steel

    Randy Steel
    Expand Collapse
    Member

    Joined:
    Aug 25, 2020
    Messages:
    58
    Likes Received:
    63
    Gender:
    Male
    The battery behind the dash sounds interesting. Any chance of sharing a pic or two on your mounting and installation?
     
  16. DonnyRay

    DonnyRay
    Expand Collapse
    Well-Known Member

    Joined:
    Oct 20, 2017
    Messages:
    1,805
    Likes Received:
    1,319
    Gender:
    Male
    Occupation:
    retired.
    I separated my battery & gas tank : DSCN0678.JPG
     
    rbsWELDER and Spanky like this.
  17. DonnyRay

    DonnyRay
    Expand Collapse
    Well-Known Member

    Joined:
    Oct 20, 2017
    Messages:
    1,805
    Likes Received:
    1,319
    Gender:
    Male
    Occupation:
    retired.
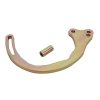
    Small block chevy lower aldernator bracket ( on ebay or speedway motors or ron pope motorsports ) : s-l500 (1).jpg It mounts the alternator on the driver's side by the frame. It costs about $20.00.
     
  18. Randy Steel

    Randy Steel
    Expand Collapse
    Member

    Joined:
    Aug 25, 2020
    Messages:
    58
    Likes Received:
    63
    Gender:
    Male
    It's been a while, but I'm making some progress on my project. Here's some pictures of adding the rear shocks and pan-hard bar. Took off the rear drums and did a cleaning and evaluation. Everything is clean and the shoes and wheel cylinders look good.
     

    Attached Files:

    rbsWELDER and James Louis like this.
  19. Randy Steel

    Randy Steel
    Expand Collapse
    Member

    Joined:
    Aug 25, 2020
    Messages:
    58
    Likes Received:
    63
    Gender:
    Male
    Some updates on the new front axle and spindles.
    IMG_3792.jpg IMG_3793.jpg IMG_4106.jpg IMG_4159.jpg IMG_4160.jpg IMG_4161.jpg
     
  20. Randy Steel

    Randy Steel
    Expand Collapse
    Member

    Joined:
    Aug 25, 2020
    Messages:
    58
    Likes Received:
    63
    Gender:
    Male
    I had to figure out how to fabricate my own "vega" steering mount for cross-steering mounting. There wasn't any room to mount it inside the frame, so I had to create an external mount that would allow the steering box to maintain clearance with the radiator dipping down.
    IMG_4158.jpg

    IMG_4345.jpg

    IMG_4350.jpg

    IMG_4344.jpg
     

Share This Page


Advertise with Us! Advertise with Us! Advertise with Us!

SSL Certificate