Ron Pope Motorsports                California Custom Roadsters               

Headlight mounts. Bolt on or weld on?

Keeper

Active Member
So I made my own headlight mounts, I set them up so I could either weld them on to the frame, or bolt on to the frame.

27%20dec%202010%20005.JPG_595.jpg


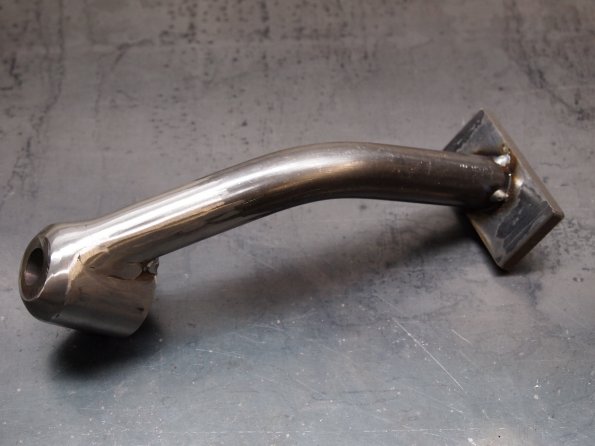
I still have to shape the bases, but I wanted to decide if I am going to bolt/weld them on first. That will determine the final shape.

So what do you suggest? Bolt or Weld?
 
I can't think of any reason to ever unbolt them so to make it simple I would weld them on. I will have a headlight/shock mount combo in mind for mine.
 
I can't think of any reason to ever unbolt them so to make it simple I would weld them on. I will have a headlight/shock mount combo in mind for mine.

Yep.
Works for me as well.
Far cleaner looking and easy to wipe a rag over when they get dirty.

headlitebrackets.jpg


Gerry
 
As I said in the other thread, chrome 'em and bolt 'em. And also, what type of shocks will there be?


I agree with John. Paint them now and if somewhere down the road you want to add a little bling you can have them plated.

Ron
 
If you want to draw attention to the mounts, chrome and bolt on. If you want to draw attention to the headlights only, chrome the headlight buckets and weld and paint the mounts. My preference would be the latter. I'd rather direct attention to the equipment, not to the brackets, but I'm sure either way would look great.

Jeff
 
May be this will help you make your mind up either way.
My Headlight bucket also had holes in the back of them but I turned up a brass disk, soft soldered it on and then painted them to match the chassis. Bracket were drilled with an 8mm long series drill to allow for wiring. (That was fun. I borrowed the drill which was about 125 Bucks worth).
Either way its YOUR decision.

Fronton.jpg


Fronton2.jpg


Gerry
 
For now I went with bolt on. The mounts will be painted. The headlights are already chrome.

As for the wiring. There will be a short piece of flex tube that will run from the mount to the back of the headlight. It will be painted black and hopefully will "disappear" when you look at it.

You can see the lights better in these shots.

27%20dec%202010%20014.JPG_595.jpg

27%20dec%202010%20012.JPG_595.jpg
 
That's such a cool picture it just says "Get out of my way. NOW!!"

Fronton.jpg
 
That's such a cool picture it just says "Get out of my way. NOW!!"

Fronton.jpg

I am not quite sure why loads of people like this picture. Its just the front of a T.

Sorry to Hi-J the thread.
Gerry
 
If you're going to attach shocks to the headlight mounts, I'd probably weld'em on and make sure there was sufficient radial (about butt lines) strength for the shocks which can transmit more energy than one might think..... yeah. I'm that one who thinks that.....

Bolt on headlight mounts afford an opportunity to shim or modify the mounts should you find a bit more adjustment is needed. A bolted design makes it somewhat easier to paint or chrome. My chassis has become so heavy, I'm not sure I can afford to have it powder coated together with an apprehension the powder coater may not be able to get into all the little nooks and crannies.

My design slogan.... If you're not real sure of what you're doing, make everything adjustable. I would have trade market that phrase until I discovered CAD.

To incorproate shocks and headlights on the same celery stalk when designing for a bolted arrangement, make sure you have sufficient fastener strength in all attitudes.

Gerry, are your "celery stalks" tapered to the top? Are they solid or tubes? Darn, you're good. Everyone loves your car.
 
Gerry, are your "celery stalks" tapered to the top? Are they solid or tubes? Darn, you're good. Everyone loves your car.
[/quote]

Started with some MS round stock. Rifle drilled it with a long series 8 mm drill borrowed from the engineering company I know; boy that was fun as the drill was 200 bucks worth and I still had to drill from each end. As you know when the two holes meet in the middle it can be quite interesting! With the hole done I then turned the taper. Had to take two goes at that because I did not have enough travel on the compound slide.

Then turned up the mounting boss, cross drilled it for the wires and welded it on.
Finally welded them to the chassis with arc and filled and shaped the bottom with a mig.

There all done.

Gerry
 
Took some pics so anyone whos interested in going for welded ones can see a bit more detail.
hl4.jpg
hl3.jpg
HL2.jpg
HL1.jpg


The back of the brackets on the bowls will have a cover plate over them to hide the wires etc. I also plan to put LEDs in each side for the turn signal indicator lights. I can see both of these from the driving position. On the right hand side one I am going to add a blue LED for the main beam indicator. This is all to keep my dash with just that one instrument in it. No warning lights, switches etc just a speedo

Hope it helps
Gerry
 
Gerry,

You need to make a taper turning attachment for that new lathe that you just got. I made one for my old Atlas 12 x 36 that is pretty easy to make and works well.

006.jpg
 
Gerry,

You need to make a taper turning attachment for that new lathe that you just got. I made one for my old Atlas 12 x 36 that is pretty easy to make and works well.

006.jpg

Thats really cool and simple to make, trouble is I dont have that much tapered stuff left to machine. By the way how do you disengage the cross slide lead srew?

I do have an adjustable tailstock that will go up to 5 degrees taper. Just cant be bothered to rest it and turn a 18'' length of bar to get back to parallel.

Gerry
 
You have to run the cross slide in all of the way until the nut is disengaged from the lead screw and remove the nut from the cross slide before hooking up the slotted plate to the cross slide.

Fooling with offsetting the tail stock and realignment is exactly why I made the attachment. Besides, making tools is fun!...for me it is at least.

TaperAttachment.jpg
 
Just a side note, when making a single headlight mount like that, I also like to drill the lower backside so the tapered mount will now weld at the top and also the bottom (backside) this will keep things from ever wanting to fatigue just that top section of frame material... Do a test part, nothing fancy, weld it to a piece of frame material, hold the piece in a solid mounted vice, now either by hand or with a cheater tube, flex that mount until it breaks out of the frame, now you will understand why I do a though frame bracket, you can cross drill the tub for the wires, if you want them to stay inside the frame... Just me here as I have had to redo a few early brackets after some years of good driving by customers... :)
 
Hey Keeper and Gerry, -Thanks for the photographs. Nice work on both set of headlight brackets. Simple and clean. I'm looking forward to seeing what's behind that Chevy grill shell.
 

     Ron Pope Motorsports                Advertise with Us!     
Back
Top