Welcome to Our Community

Wanting to join the T-Bucket Forums discussions? Then sign up for a free forum account, today!

Sign Up

Ron Pope Motorsports                California Custom Roadsters               


Dismiss Notice
Thank you for visiting the T-Bucket Forums! This site was created in 2006, to provide enthusiasts with a place to discuss T-Buckets. Over the years, there have been many imitators, but this is the T-Bucket resource you have been looking to find. We encourage you to register a FREE account and join in on the discussions.

T Bucket Interiors

Discussion in 'Bodies' started by tfeverfred, Sep 20, 2017.

  1. tfeverfred

    tfeverfred
    Expand Collapse
    Well-Known Member

    Joined:
    May 26, 2007
    Messages:
    5,058
    Likes Received:
    582
    Gender:
    Male
    Occupation:
    Receiving Clerk
    Hell. NO!
     
    mountainman likes this.
  2. tfeverfred

    tfeverfred
    Expand Collapse
    Well-Known Member

    Joined:
    May 26, 2007
    Messages:
    5,058
    Likes Received:
    582
    Gender:
    Male
    Occupation:
    Receiving Clerk
    Today, I drilled through the plastic, just enough to touch the foam. Then, I used a punch to go through the vinyl. The S/S screws went in easy.

    [​IMG]
     
  3. tfeverfred

    tfeverfred
    Expand Collapse
    Well-Known Member

    Joined:
    May 26, 2007
    Messages:
    5,058
    Likes Received:
    582
    Gender:
    Male
    Occupation:
    Receiving Clerk
    After the seat back was done, I measured, cut and placed the wood in the body where I want it to go. Notice I lettered and numbered each block. My memories not what it used to be.:D I'm not sure I'll use wood on the bottom of the panels or not. Because the panel vinyl will extend beyond the panels a few inches and be glued to the floor. Then, that part of the vinyl will be covered by the carpet. I'll make a decision later.

    [​IMG]

    [​IMG]
     
    cooter and Spanky like this.
  4. tfeverfred

    tfeverfred
    Expand Collapse
    Well-Known Member

    Joined:
    May 26, 2007
    Messages:
    5,058
    Likes Received:
    582
    Gender:
    Male
    Occupation:
    Receiving Clerk
    Bonded the wood in this evening. I used 3M Marine Adhesive Sealant Fast Cure 5200, that Potvin recommended.
     
  5. tfeverfred

    tfeverfred
    Expand Collapse
    Well-Known Member

    Joined:
    May 26, 2007
    Messages:
    5,058
    Likes Received:
    582
    Gender:
    Male
    Occupation:
    Receiving Clerk
    About 3M 5200 Marine Adhesive. This stuff is permanent! Here's a review of it I found. "It is very tenacious, and what ever you caulk with it may have to be destroyed if you ever choose to remove the item." While that was impressive, I had been fooled by adhesives before. So, after I finished installing my wood strips, I bonded a couple small pieces of wood to see how long it would take to set and cure.

    This morning, I tried to take them apart and it was a futile effort. I'd probably need a hammer and something to pry them apart. I checked my body and it was the same. That wood is on there for good. Happy with the results, I bonded a strip of wood near the floor on the drivers side, as well as adding a strip on each side, where the panels run next to the seat. They'll give me a few more attachment points for the panels.

    Earlier, it was suggested that I use foam in the voids behind the panels to help keep things rigid. This morning, I decided to just use small wood stripes and be done with it.

    3M™ Marine Adhesive Sealant 5200 Fast Cure | 3M United States
     
  6. PotvinGuy

    PotvinGuy
    Expand Collapse
    Well-Known Member
    Staff Member

    Joined:
    Feb 22, 2008
    Messages:
    1,851
    Likes Received:
    770
    Gender:
    Male
    Occupation:
    Quantum Mechanic (semi-retired)
    Glad I could help. Boat makers use 5200, and that is a really harsh environment.
     
  7. rubicon

    rubicon
    Expand Collapse
    Active Member

    Joined:
    May 28, 2007
    Messages:
    859
    Likes Received:
    254
    Gender:
    Male
    I like what I see so far. I still have work to do on my interior. You ate giving me itch to get to it.
     
  8. tfeverfred

    tfeverfred
    Expand Collapse
    Well-Known Member

    Joined:
    May 26, 2007
    Messages:
    5,058
    Likes Received:
    582
    Gender:
    Male
    Occupation:
    Receiving Clerk
    Here are the bonded pieces in place. As you can see, I added a few pieces. A piece along the bottom of the drivers side and a couple to fill the voids in the individual panels. The plan was to use foam in the voids, but I didn't think foam would be a rigid support. I used yellow pine in my structure because it's light weight and easy to screw into.
    [​IMG]

    [​IMG]

    I'm going to let them set until tomorrow. A light coat of black paint will finish this step. The black paint on the wood will mask any wood that may show up between the upholstered panels. Dark colors hide the sins of the amateur.;)
     
    Spanky and cooter like this.
  9. tfeverfred

    tfeverfred
    Expand Collapse
    Well-Known Member

    Joined:
    May 26, 2007
    Messages:
    5,058
    Likes Received:
    582
    Gender:
    Male
    Occupation:
    Receiving Clerk
    Capping off the day was upholstering the panels. I did them the same way I did the seat back panel.

    [​IMG]

    If you look at the passenger side panel, you'll notice a flap I built into it. That flap covers the door support and latch assembly. I'm going to use velcro to keep it in place. Trying to get wood in that small cavity would have been a fight I probably would have lost.
     
    cooter likes this.
  10. guilld

    guilld
    Expand Collapse
    Active Member

    Joined:
    Jul 30, 2009
    Messages:
    331
    Likes Received:
    104
    Thanks for link on the adhesive. I save links like this in my favorites for future use.
     
  11. tfeverfred

    tfeverfred
    Expand Collapse
    Well-Known Member

    Joined:
    May 26, 2007
    Messages:
    5,058
    Likes Received:
    582
    Gender:
    Male
    Occupation:
    Receiving Clerk
    Well, I had to work a full day today.:mad: I'm beat. Got home and only had the strength to paint the wood strips that will support the interior panels. I used a very small dot of red paint to mark the holes in the interior panels for the screws. Then, I discovered the velcro I purchased isn't the kind with the adhesive.o_O Memo to self: Do NOT go shopping in a hurry!

    [​IMG]

    [​IMG]

    I'll install the panels tomorrow. Hopefully, my Christmas present will be a drama free installation.
     
    Spanky likes this.
  12. Spanky

    Spanky
    Expand Collapse
    Well-Known Member

    Joined:
    Jul 29, 2016
    Messages:
    3,015
    Likes Received:
    2,422
    Gender:
    Male
    Why not use the Marine Adhesive to secure the Velcro?
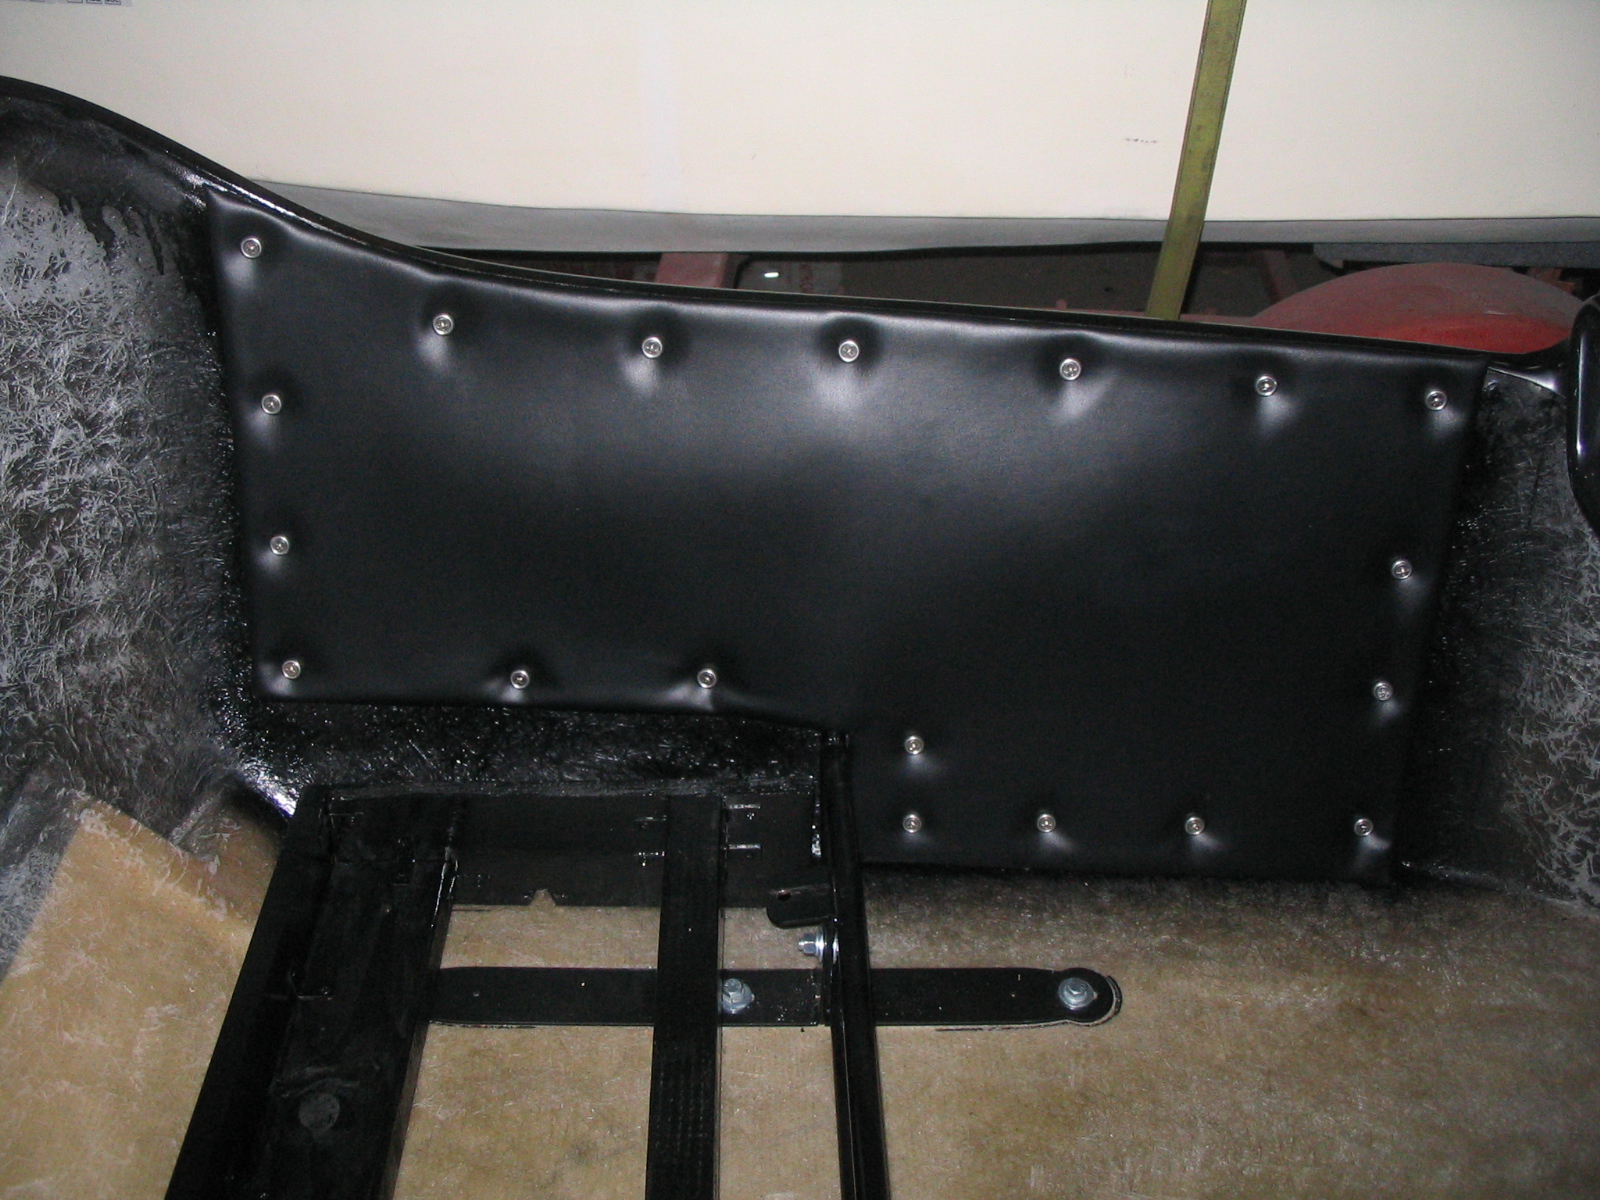
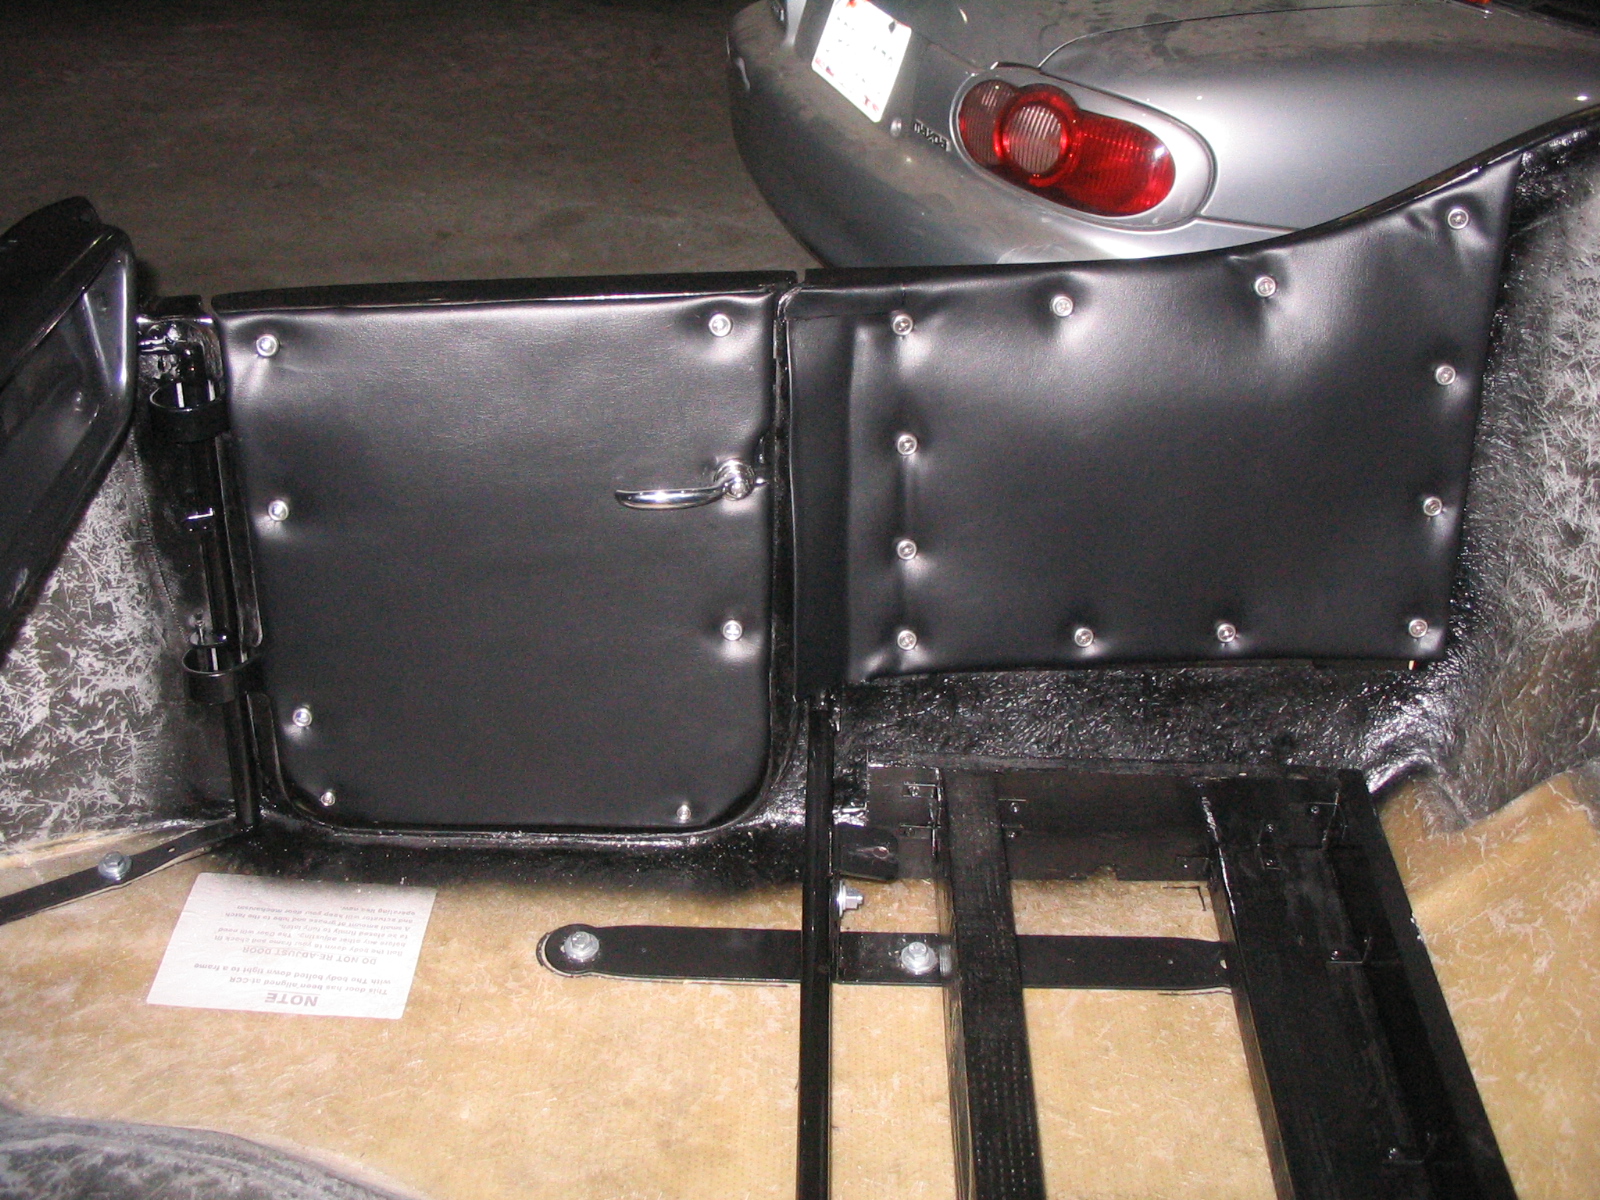
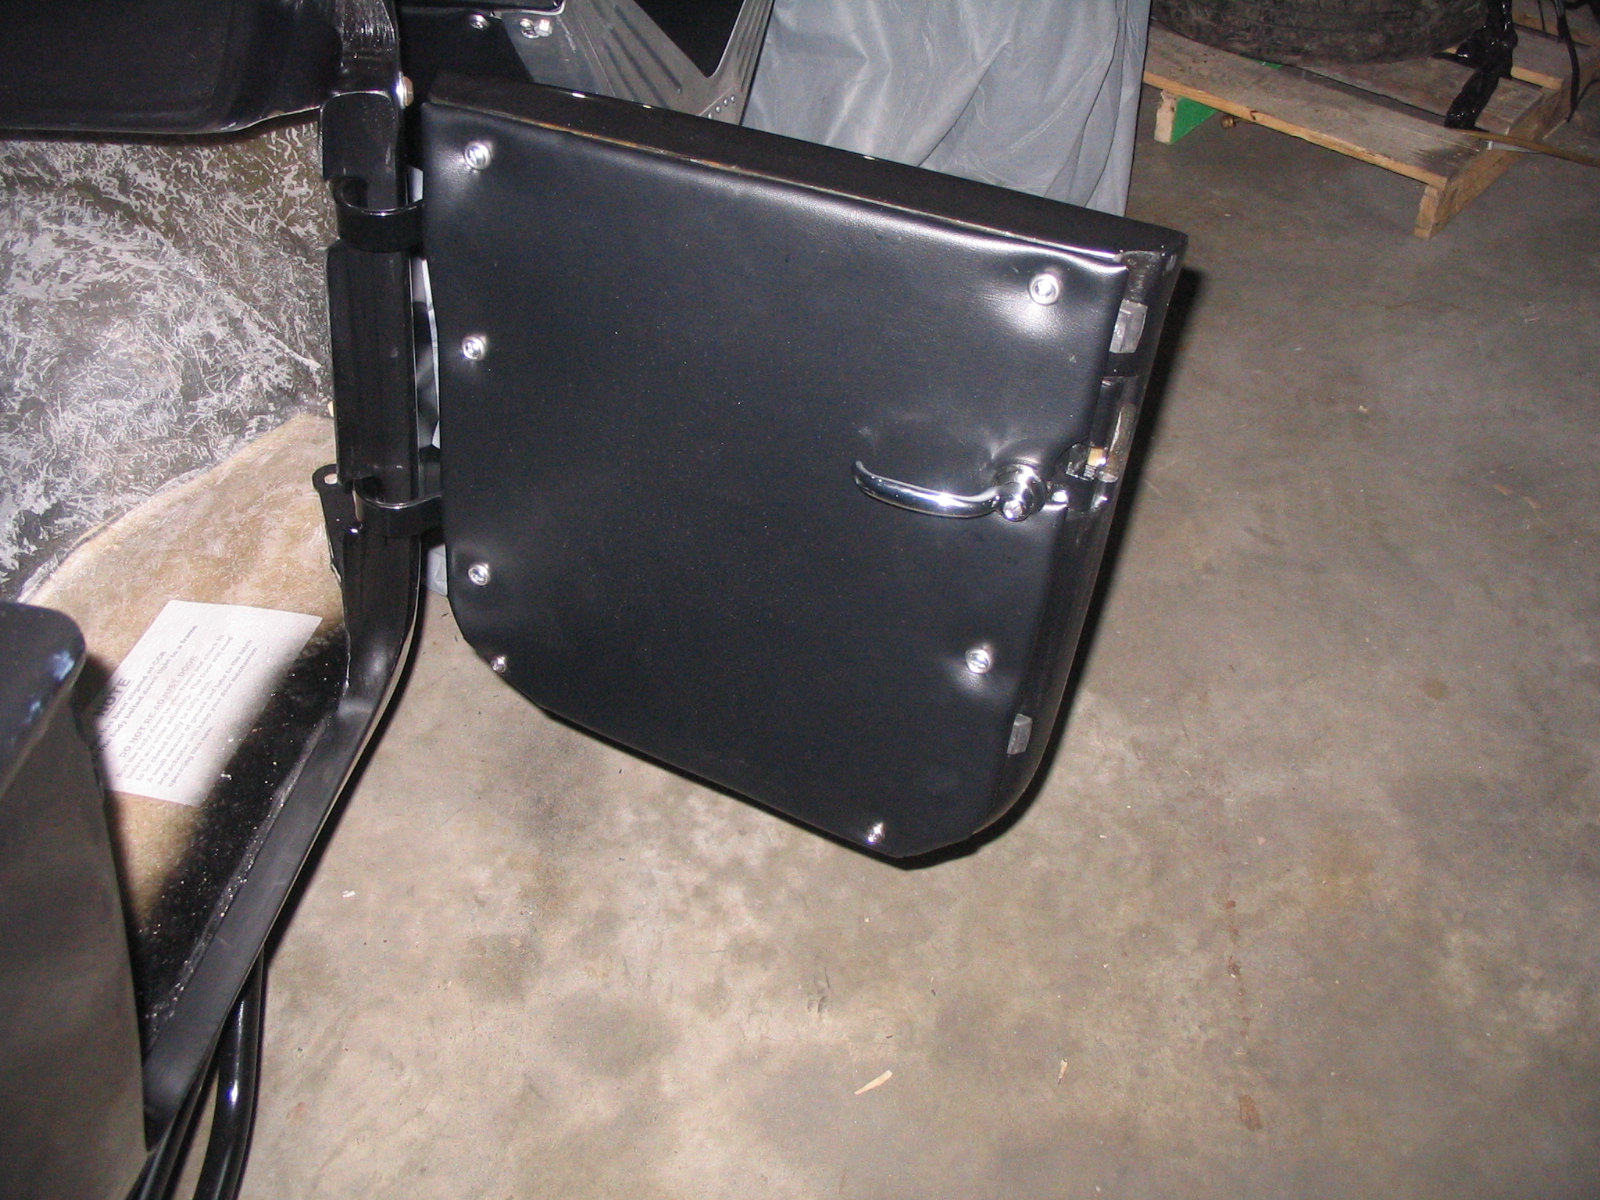
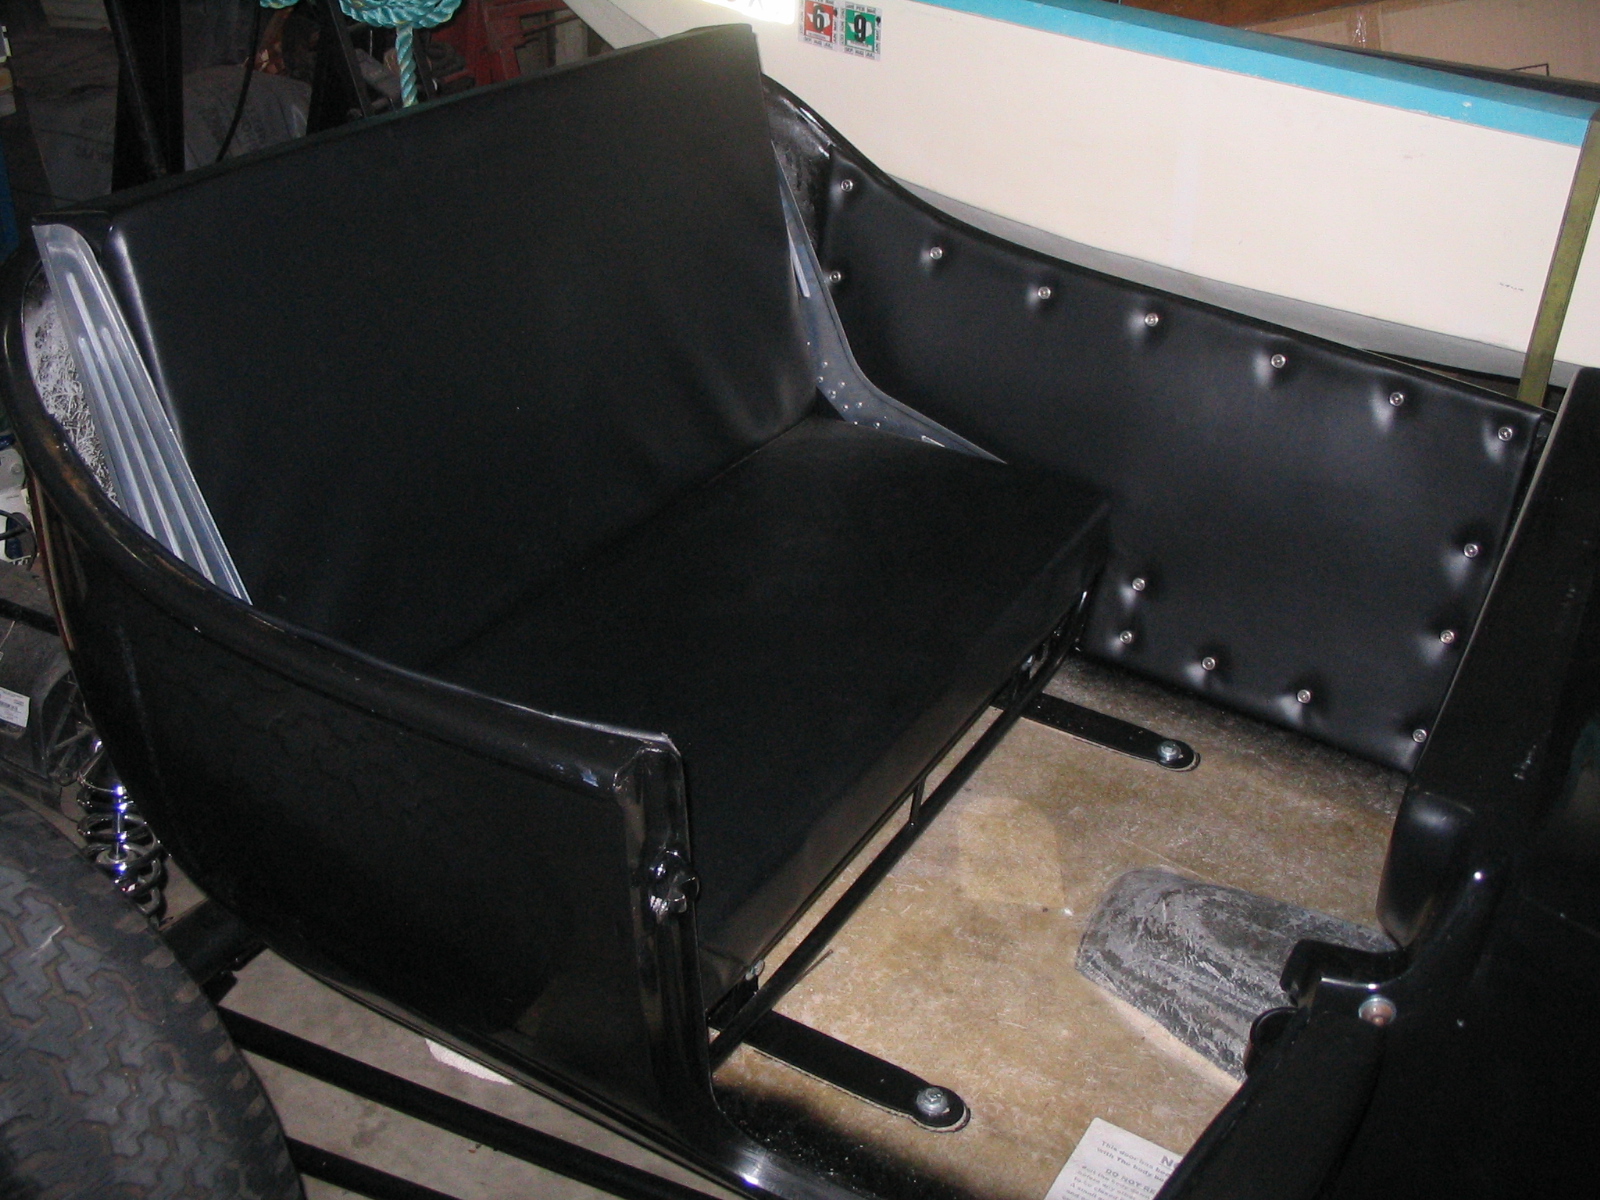
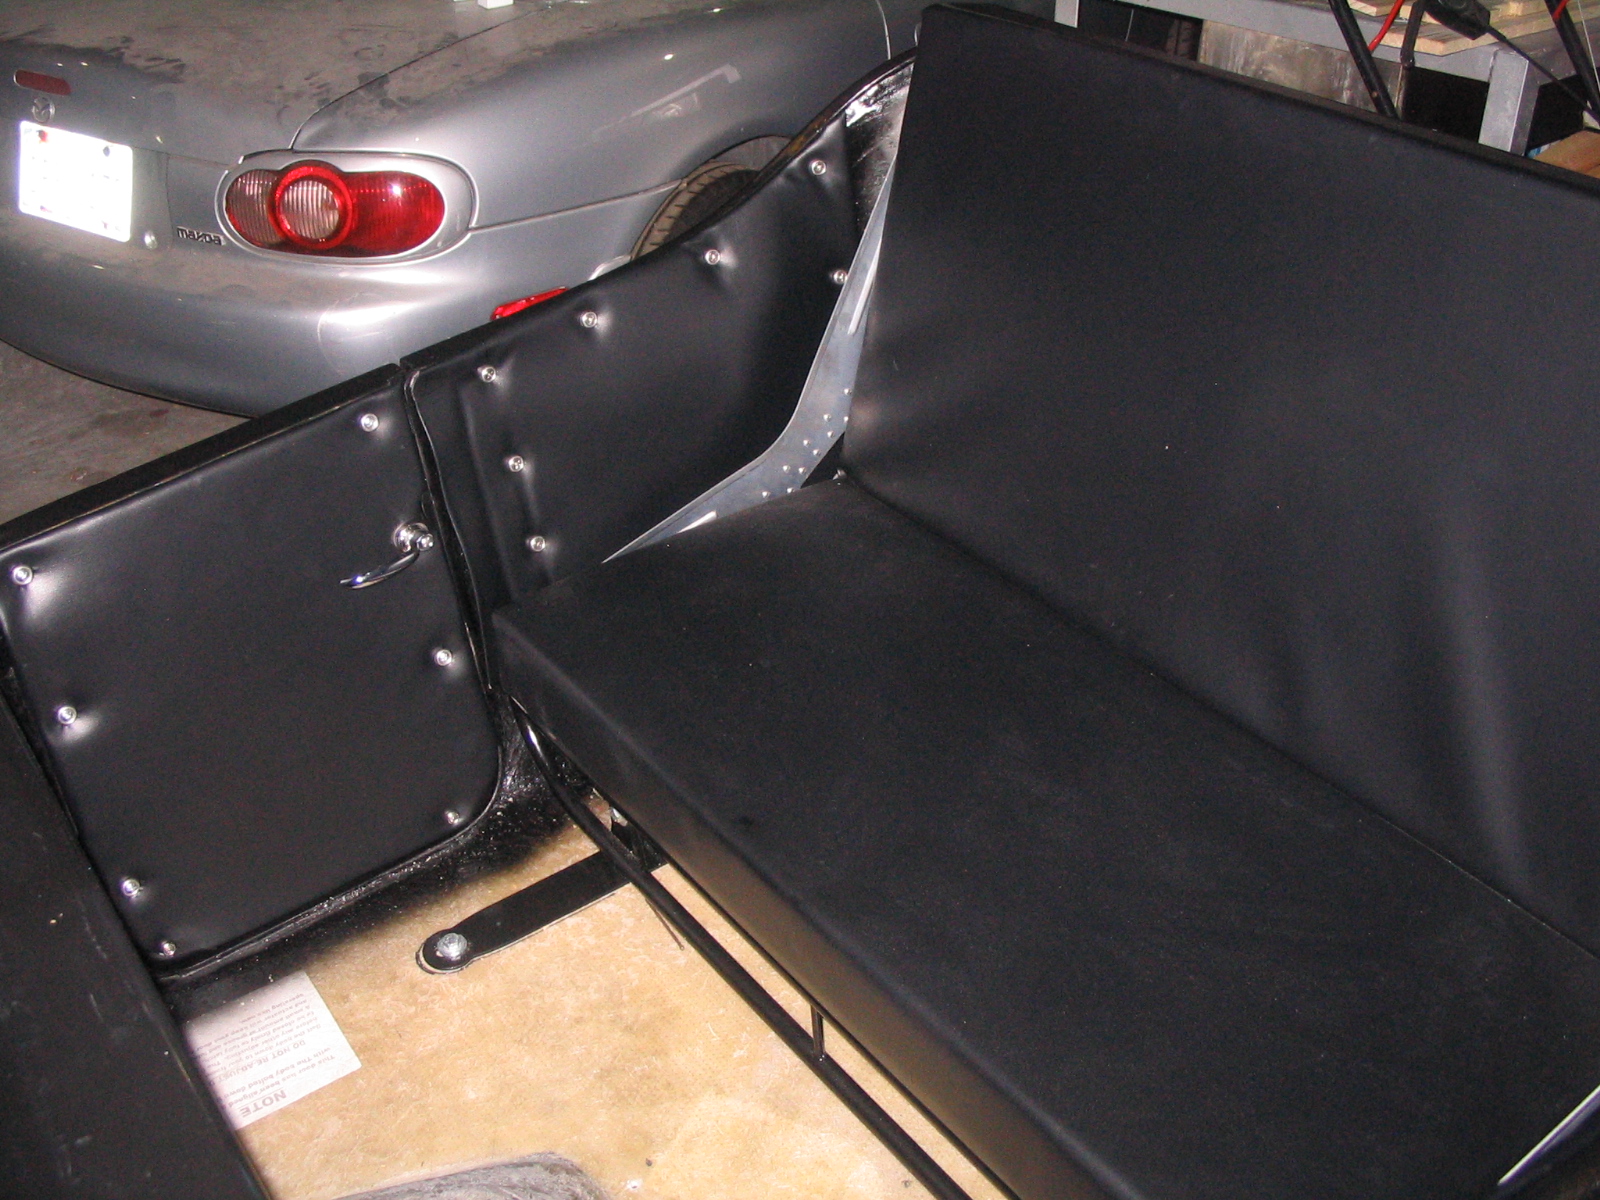
 o_O
     
    tfeverfred likes this.
  13. tfeverfred

    tfeverfred
    Expand Collapse
    Well-Known Member

    Joined:
    May 26, 2007
    Messages:
    5,058
    Likes Received:
    582
    Gender:
    Male
    Occupation:
    Receiving Clerk
    An idea worth considering. Thanks!
     
  14. tfeverfred

    tfeverfred
    Expand Collapse
    Well-Known Member

    Joined:
    May 26, 2007
    Messages:
    5,058
    Likes Received:
    582
    Gender:
    Male
    Occupation:
    Receiving Clerk
    Merry Christmas.... to me! Like a sleepless kid, on the night before Christmas, I couldn't help myself and went for my present early. With Chuck Berry's, "Chuck Berry Is on Top", cranking in the background, I got to it. The panels went in as planned. There was one minor glitch that I can live with. On the passenger side, I extended the vinyl a 1/4" past the template and the top of the panel covers the edge of the body. However, on the drivers side, I didn't do it. I just plain forgot and didn't make a note on the template to remind me. Shit happens. It's one of those things that's not really noticeable, unless you look closely and compare both sides. I'm okay with it.

    The flap on the passenger side, that covers the door brace, will get a strip of velcro to cover the gap. I'll get that next week. On the top of the door, I could use a screw in the middle, but again, it's not that noticeable. A 4" strip of velcro will fix that, because I'm not comfortable drilling a hole in the door. Looking at where the panels end, at the top corner of the seats, the black paint on the corner of the body is hardly visible, which confirmed my plan to either use bed liner on that area and the back panel or just paint it black. All in all, I'm very pleased with my first effort at an interior. Is it perfect? No. But it's pretty damn good, in my opinion and that's what counts.

    So, here are the pics.

    [​IMG]

    [​IMG]

    [​IMG]

    [​IMG]

    [​IMG]

     
  15. Spanky

    Spanky
    Expand Collapse
    Well-Known Member

    Joined:
    Jul 29, 2016
    Messages:
    3,015
    Likes Received:
    2,422
    Gender:
    Male
    Well done, my man!:thumbsup::thumbsup::thumbsup:
     
    tfeverfred likes this.
  16. RPM

    RPM
    Expand Collapse
    Administrator
    Staff Member Forum Sponsor

    Joined:
    Oct 16, 2007
    Messages:
    5,072
    Likes Received:
    656
    Looking good Fred.
     
    tfeverfred likes this.
  17. tfeverfred

    tfeverfred
    Expand Collapse
    Well-Known Member

    Joined:
    May 26, 2007
    Messages:
    5,058
    Likes Received:
    582
    Gender:
    Male
    Occupation:
    Receiving Clerk
    Thanks, guys! That 3M adhesive Potvin suggested was a rreal game changer.
     
  18. T-Bucket Bob

    T-Bucket Bob
    Expand Collapse
    Member

    Joined:
    Feb 5, 2008
    Messages:
    189
    Likes Received:
    43
    Gender:
    Male
    Great Job! Fred
     
    tfeverfred likes this.
  19. tfeverfred

    tfeverfred
    Expand Collapse
    Well-Known Member

    Joined:
    May 26, 2007
    Messages:
    5,058
    Likes Received:
    582
    Gender:
    Male
    Occupation:
    Receiving Clerk
    I decided to add 2 screws in the top door panel to close that small gap that was bugging me. I also added one in the middle of the bottom of the door. She's nice and snug, now.

    [​IMG]

    I'm testing a couple strips of velcro, using 3M black adhesive. If they hold, I'll use it on the door support flap. Otherwise, I'll get a small tube of 3M 5200 and be done with it.
     
  20. T-Bucket Bob

    T-Bucket Bob
    Expand Collapse
    Member

    Joined:
    Feb 5, 2008
    Messages:
    189
    Likes Received:
    43
    Gender:
    Male
    Hey Fred, what type of backing board, foam, and fabric did you use? Boy, if my interior comes as nice as yours, I will be one happy camper.
     

Share This Page


Advertise with Us! Advertise with Us! Advertise with Us!

SSL Certificate