Ron Pope Motorsports                California Custom Roadsters               

Caster degree

tenbears

New Member
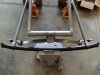
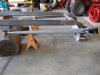
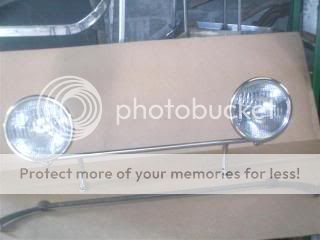
Hello Guys, Attatched photos of my flathead T project. Following the Youngster's advice on an old school front end set up, am I ready to weld? Photos show what I've done,end result is 8 degree caster with no load. The way I see to reduce the degree, is to trim the store bought bracket for the wishbone. Many thanks to all with thier advice, especially Ron. Want to share what I have with the fifties look I want. Of course I am anxious to weld everything up and move onto the next step but am looking for advice.
 

Attachments

  • t bucket 006.jpg
    t bucket 006.jpg
    159.1 KB · Views: 119
  • t bucket 007.jpg
    t bucket 007.jpg
    176 KB · Views: 124
What degree caster do you want? I run mine at 7 degrees.
 
From my reading, I understood that 5 degrees was the desired caster. Does yours handle the way you want? I hope everyone understands I will cut off the spring perch sticking out and it will be a flush weld. Is the loaded weight going to change the caster much?

What degree caster do you want? I run mine at 7 degrees.
 
I had mine at 5 degrees and had a death wobble, reset it to 7 and it goes down the road straight and true. I have a 4 bar suspension, I don't know if that makes any difference.
 
Have you had the hubs and spindles with wheels and tire mounted as yet?? Should put at least the driver's side together to see if you are going to get the turning radius you can live with, otherwise you can heat the radius rods about16 to 18 inches back, and bend them in a bit, to get them closer to the frame for tire turning clearance, you will also have to make a bit bigger hole in the back side of the radius rod for that spring perch to work at a greater angle, which I would not weld up until you have a bit more weight on the spring, to make sure you get the correct perch/spring angle, don't want that spring twisted at all, plus you can still move the rear frame radius rod bracket "in" towards the center of the chassis to get the radius rods in closer to the frame even more... Just something to think about, clean job you are doing... :rolleyes:
 
Have you had the hubs and spindles with wheels and tire mounted as yet?? Should put at least the driver's side together to see if you are going to get the turning radius you can live with, otherwise you can heat the radius rods about16 to 18 inches back, and bend them in a bit, to get them closer to the frame for tire turning clearance, you will also have to make a bit bigger hole in the back side of the radius rod for that spring perch to work at a greater angle, which I would not weld up until you have a bit more weight on the spring, to make sure you get the correct perch/spring angle, don't want that spring twisted at all, plus you can still move the rear frame radius rod bracket "in" towards the center of the chassis to get the radius rods in closer to the frame even more... Just something to think about, clean job you are doing... :rolleyes:

These are a few things I haven't considered. I know the Youngster said I wouldn't have a short turning radius which I can live with. I have oblonged the holes for the spring perch so they can be parralell with the spring, frame. Just tack welding the spring perch is my biggest concern because I know if the spring binds in it's travel one could have some excitement that isn't really needed when going for a putt. Thanks for your thoughts.
 
That's a great job Mike. Yes your turning radius is going to be a little larger but it is easy to get used to. Your axle is a '37 to '40. If it had been a'41 to '48 , you would need to heat and bend the bones for tire clearance. Oncee you get the front end all assembled with rims and tires, you will need to add a pad to the spindle stop area. More on this when you get to that point.

here's that picture of the headlight bar and the steering wheel we talked about;

headlitebar001Small.jpg


and another one;

shopwork009Small.jpg


and the steering wheel;

27rat003Small-1.jpg


Ron
Thanks for the photos, it had me in the back looking for a Model A light bar. I have one but it is in very tough shape. I envy the steering wheel and will put it on the want list. With the encouragement I am getting, it's back to work . Mike
 
The one pictured is from a '28-9 "A". The '30-'31's have a straighter end on them and will require some heating and bending to get them to work. The ends are nice forgings and clean up nice with a grinder and files. If the center tube is bent or rustd badly, I use the steering shaft out of a early Ford column to replace it. Be sure to have your headlights on hand when you build it. On some of them the mount is further back on the bucket than others. In that case you will want to tilt the pod for the light forward a bit or you won't have enough adjustment.

Ron
 

     Ron Pope Motorsports                Advertise with Us!     
Back
Top