Garage Merch                Ron Pope Motorsports                California Custom Roadsters               

front end bounce issue

Triodluvr would you happen to have a paper template of your front shock mount ?? Also what shocks did you use ? I really like the look. Thank You....

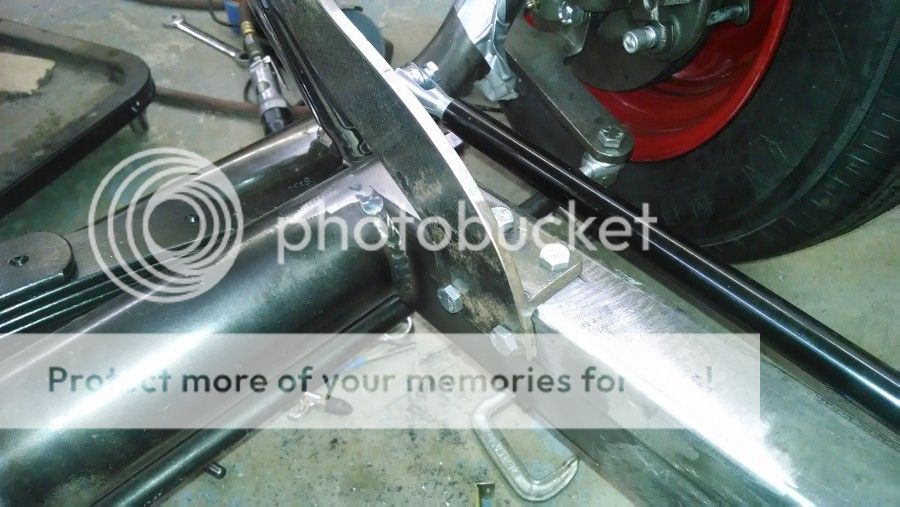
Sorry, I only have the CAD/CAM files used for milling. It might be possible to do a screen shot and scale it for hardcopy printout, but I haven't tried that before. You should be aware that mounting shocks this way isn't as easy as it probably looks. The exact position of the upper shock bolt is critical to achieving the correct ride height for the shocks. I measured the position of the axle relative to the frame carefully before drafting the design. After the brackets were cut, I bolted each one up semi-snug using only the center stud, rotated them fore-aft for the correct ride height, then drilled each one through only one of the four mounting holes into the frame. That set the alignment so I could drill and tap the remaining holes. Then I went back and countersunk the holes in the bracket for socket head flat screws (1/4 x 20 x 3/4). Drilling the frame was a bear, and if I had it to do again, I would locate the centers of the mounting bolts on a slightly smaller diameter. As it was, I didn't quite clear the edges of the rectangular frame stock where the holes through the cap break through inside. Also, I decided later that 5/16" screws might be preferable for additional strength. In my design, the larger countersunk heads would extend past the edge of the bracket. If the bolt pattern was moved onto a circle even just 1/8" smaller, both problems would be solved. Anyway, if you're still interested after reading all this, I'll take a look over the weekend to see if it's possible to print from my files. If so, it shouldn't be too difficult to modify the bolt pattern at the same time.

The shocks are Speedway 582SM300 with a 9" ride height. Speedway says these have the same internal construction as their part no. 582SM300C, which is smaller and less expensive. However, they were out of those when I ordered, and I didn't want to wait. Either should work fine.

Jack
 
I think Jerry from CCR may have your answer. I had a similar problem last year. I started with 1/8" toe in and would get some bounce at around 40 mph. I headed out to a good stretch of stretch of road, brought a couple of wrenches and just started adjusting. I tried more toe in, problem got worse. I started to turn toe out and kept making little adjustments until I could get to speed without any bounce. I have no idea how much toe out I have but I can take it to 70 with no bounce issues. I don't have to adjust to do 100 as 70 is fast enough for me. Before you spend any more money on spin balancing your tires you might want to try it. It's free and if it doesn't work it won't cost you anything.
 
I've ordered new front wheels, hopefully they'll be here by the end of the week. If that doesn't cure it, and if the tires look true when they're mounted on the new rims, I'll take a second look at alignment.
 
There are very good reasons why manufacturers dropped the beam front axle early on, and this is one of them.
If things were out of round or out of balance they would progressively get worse as speed increases, not suddenly go beserk.

I had a lengthy conversation about this on another forum, right after I bought the car. That was before I aligned the front end and made other changes that calmed it down somewhat. Now I can see the bounce building up just as I pass 60 mph or so. Before, it would do exactly what you said - suddenly go berserk. At the risk of drawing ire from all the traditionalists out there, a modern type anti-sway bar would go a long way toward civilizing these front ends. This type geometry has a natural inclination to see-saw, and an anti-sway bar would counteract that motion. If I could find a bar that's easy to adapt, I'd install it in a heartbeat.
 
Jack, what I think you're missing is [condensed version] this , these cars have ladder frames [no torsional ridgidity] & tires & whls & axles that are heavy [relative to the car weight] + are mounted in such a way as to make controlling the "unsprung weight" damn near impossible + the axle/radius rod configuration already acts as an anti-sway bar , ponder these things & I think you'll come to same conclusion & realize why no one runs "anti - sway bars" ! I gotta go to work :)
dave
 
If you have radius rods on your car, they act like a sway bar already. Check it by jacking one side of the axle up and see how much you lift it before the other side comes up. John
 
The radius rod system is too flexible in that plane of motion to serve such a purpose. Yes, jacking up one side tells me there's little or no anti-sway mechanism at work in all this. The ratio of spring stiffness to vehicle weight is deceiving in this regard. It inhibits sway around corners, but it doesn't function in the same way as an anti-sway mechanism when one wheel is impacted by a transient force.

Jack
 
Dang, if it wasn't for bad luck... well, you know the rest. I just installed two brand new Weld ProStar rims on the front of the bucket. One of them is tweaked, right out of the box. Out of round and too much runout, a genuine factory defect. How does crap like this get past QC? Don't they spin the damn things before they send them out?? Grrrr...

Oh yeah... the runout is much less than the Centerline I took off, but I don't think the bounce has been resolved. There's still something wrong in this front end.
 
Last edited:
triodeluvr , Thank you for sending me a picture of the top front shock mount . I think I can use it. iajjpop
 
It's always the little details that come back to bite ya on the rear. For the benefit of anyone wanting to build something similar, I need to post this followup regarding my one-off shock mounts...

p1720578603-4.jpg


Basically, I had a lot of trouble with these loosening up at the frame. After working on the problem for awhile, I discovered two issues. First, I originally installed only two 1/4" machine screws into the frame, in addition to the large center stud that had originally held the friction shocks. My thinking was that I only needed to keep the brackets from rotating, and that the large stud and nylon lock nut would do the rest. However, the screws and the nut worked loose several times, even after being installed with blue Loctite. In an attempt to fix this, I drilled two more 1/4" holes in each bracket and drilled/tapped the frame for the additional screws. Everything worked loose again.

During a close inspection of the parts, I realized I had done several things wrong. First, I had drilled and tapped the frame for 1/4" x 20 threads. I should have tapped it for 1/4" x 28 fine threads. That would have helped to counteract the lateral force being leveraged against each screw. Second, I had used flathead cap screws like the one below. These have a nice clean look, but in retrospect, it's impossible to apply the amount of torque needed in this application without stripping the head.

p592628428.jpg

A few weeks ago I started considering my options. One was to cut a fresh pair of brackets, drill four more holes rotated 45* from the existing ones, then tap the frame in the new locations for 1/4" x 28 or even 5/16" screws. The second option would require paying a shop to cut similar brackets from steel, grinding down the stud on the frame, then welding the new brackets to the frame and repainting everything. Neither of these methods was particularly appealing, especially considering I have several other ongoing projects involving the car that I don't want to delay.

As a last resort, I decided to pull out all the screws and replace them with flathead phillips equivalents. The head pattern in the new screws is cut really deep, and much more torque can be applied during installation. I used a right angle handheld phillips driver, and I cranked down the screws as hard as I could without the driver slipping out. Like before, I Loctited all the screws and the lock nut.

So far, this method has worked. It's been about three weeks, and there's no sign of loosening. The car has been driven over lots of RR tracks, and the other day I even managed to accidentally drive over a row of 3" tall lane markers that really beat up the front end.

My point in posting this is to make other builders aware that a bolt-on mount like this may experience more force than is immediately apparent. Make it stronger than it needs to be the first time, and you won't have to do it again.

Here's a pic of the final mounting configuration:

p408295404-4.jpg


Jack
 
Thanks for the update. I drilled & tapped the frame for 5/16 fine thread and have 4 bolts per bracket. I plan on just using stainless hardware & blue loc-tite for the final assembly & keeping my fingers crossed...


For maximum strength the thread engagement should be no less than the bolt diameter. For my RPM shock mounts like those above I used three, through the frame, 1/4 bolts with lock nuts. Two on top, one on the side. Just didn't trust tapping the 3/16th tube wall to be sufficient for the forces that the shock mount might experience. Might be overkill but didn't want to risk any failures.
 
I think you'll both be fine with those designs. If I had built this car from scratch, I probably would have done something similar. In my case, I wanted to get rid of the TP friction shocks, and this design makes use of all the existing fittings. :D
 
Just to follow up, I've resolved the front end oscillation (bounce) in my car. I had already replaced all four tires and wheels, changed from friction shocks to hydraulics and installed a steering dampener. One of the new front wheels had to be replaced again (excessive runout), and it turned out that one of the new front tires was also defective. What a fiasco! Anyway, I replaced the defective tire today, and the front end is stable now at 75-80 mph. This is a major breakthrough - I can drive her on the interstate! Whoo-hoo! :thumbsup:

Jack
 
Good deal! But, omg what a crazy situation! I thought I had bad luck buying defective parts! Wow, well glad you got it resolved. I guess this just shows how sensitive these cars are to adjustments and that just because a part is new, doesn't mean it's good... (I've demonstrated that many times!)
 

     Ron Pope Motorsports                Advertise with Us!     
Back
Top