Garage Merch                Ron Pope Motorsports                California Custom Roadsters               

Fuel tank for Fad

Gentlemen,

This has been an excellent thread thanks to Gerry's talents and the contributors along the way.

I little detour if I may regading the mounting of the tank or a tank on suspension bushings or other vibration isolators.

If you're considering htis be sure to have a ground strap or wire between tank and your chassis. You do not want the tank "electrically isolated" and the chance of static electricity build up. Be sure to have a flexible fuel line and not a hard line (hard line coud crack) between the tank and chassis, If you use a flex fuel line with woven SS covering, do an Ohm meter check as that could pass for an electrical connection - tank to chassis.


I think I will be mounting it solid to the perch. As it has a fuel sender I need a good electrical contact for that. The fitting in the bottom are all for SS braided lines. thats feed, breather & return. Boy this thing has turned out to be a lot of work. I think its indicative of why the Fad has taken so very long to build. Every step is like a new learning experience and as most of us do this in our spare time we dont have the advantage of 8 hours a day to get things sorted and done.
G
 
Ben,

Could you please educate me a bit... I previously mentioned that getting into the low areas with the powder might pose a problem. As I understand it, since this is an electrostatic process, the powder will seek the shortest route to the metal (the other electrical charge), and doesn't like to get down into crevises and depressions since that make for a longer route. Is it your experience that Gerry's tank does not look to have this problem, or do you have a solution if it does? Perhaps the problem is only for much smaller holes/depressions that you can't spray the powder into??? Please describe when / if this is a problem and what the solutions and limitations are. It could affect future designs, if we knew what to avoid on parts we intend to have powder coated...

Thanks much,

Corley (trying not to look too dumb on this, but really I am...)

You're right that the powder is electrostatically charged, but we use apply it on in a way that it will blow the powder into smaller areas. The application guns we would use for this application are fully adjustable on how much we charge the powder, so if we have an area that is not getting enough, we can dial it back and "Fog" it in. Getting powder into these areas is usually not an issue, but there are ways and trick to get around it. If the powder absolutely refuses to stick, we can heat the part and apply the powder to the hot surface. This is called "hot-coating" and is done on certain applications. Different powders and parts sometimes act differently, but like anything else, that's where the experience comes in. We coat a lot of parts with intracate surfaces and crevices like motorcycle frames, intake manifolds, etc and its not a problem. We always inspect each crevice with a bright light prior to baking off to make sure everyting is coated properly and evenly. Just yesterday, we coated a Jr Dragster chassis in a 2-stage metallic purple. It came out pretty sweet!

Hope this helped!
 
Thanks Ben, you have abaited my concerns. As usual, the pro's know the details and tricks...
Corley
 
Hi-jack alert! :hijacked:

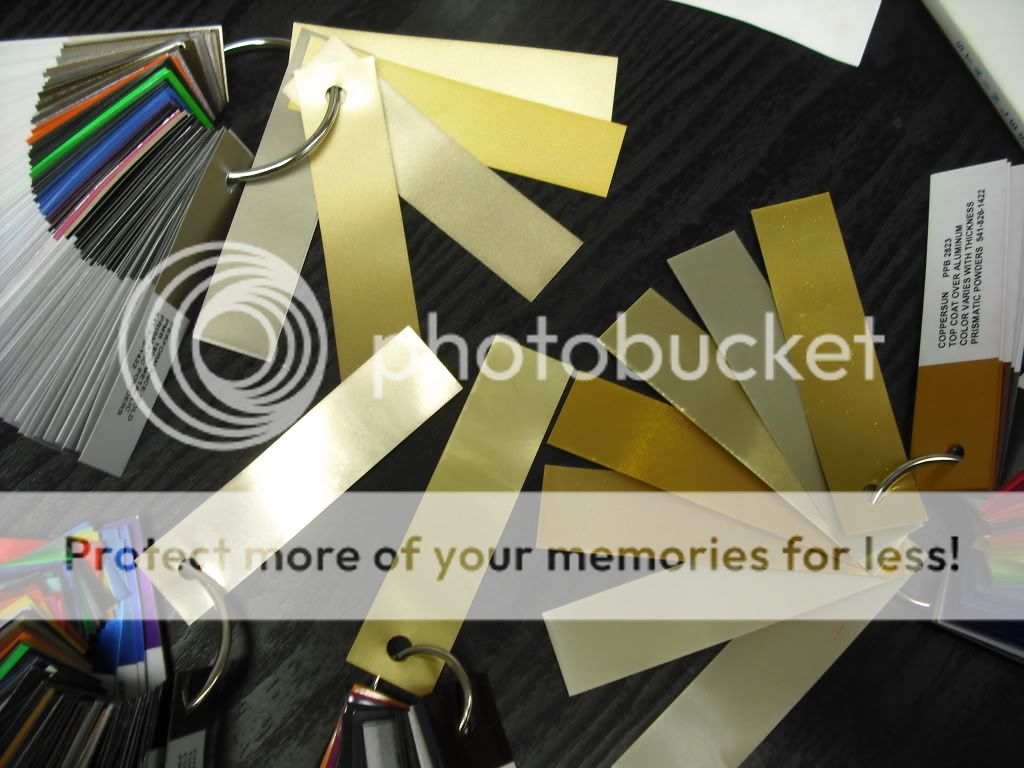
PM'd this to Gerry, but thought it worthwhile to post to the group. Many people still have the idea that powdercoating is limited to a few select colors. In the last 10 years though just about any color and finish has been perfected and produced. The photo below is a sampling of the available bright gold/brass powdercoating from just one manufacturer we use. There are even more dark, light, and textured finishes in this color range. This manufacturer has 4,000 colors ready to mix/ship and can match any other color. Not to mention that we can add different metallics and sparkles into the mix as well.

DSCF0593.jpg
 
Well its all tacked up. Another 4 hours this evening and its all in one piece. Total of 8 hours work to get the thing in one piece; but looking at it worth every minute.
I cant wait to get is ground, dressed and painted. Next is the perch its going to sit on.. Woweeee. Happy boy tonight. Could nt have done it without my build buddy Johns help.

Tackedup5.jpg
Tackedup4.jpg
Tackedup3.jpg
Tackedup2.jpg
Tackedup1.jpg


Got a couple of gaps to deal with but thats less than I expected. Like I said it needs a 60 year old with 40 years of metalwork under his belt to do this baby in one go.

All thats left is to see if its good enough for powder coating, but with 2mm thick steel I have a good chance.

Gerry
 
I know we where pushing using a MIG to finish weld your tank. After seeing it together, if it where in my shop, I'd be real tempted to TIG it. If it wouldn't make any difference with the powder coating, I would use stainless. It flows better for me and I can travel a little faster. JMO

Ron
 
Looking real good, Gerry. I predict those panels are going to start warping a little bit, especially on the flat one. Then, you have to worry about pen holes and leaks.
 
Gerry,
With all of the suggestion, have you considered finishing out with silicon bronze? Lower melting point,easy pin hole repair and handles vibration well. Just a thought. Maybe ask your weld man for his opinion........ruggs
 
I know we where pushing using a MIG to finish weld your tank. After seeing it together, if it where in my shop, I'd be real tempted to TIG it. If it wouldn't make any difference with the powder coating, I would use stainless. It flows better for me and I can travel a little faster. JMO

Ron

Hey Ron
I agree with you it needs TIG'ing. As I said in an earlier post I have had a play with some of this sheet and my eyes are not up to TIG'in. So I have a couple of friends (Old guys) who have been roundy roundy racing for the last 30+ years. They even made their own block. Very very successful in their field, but its not one that gets a lot of publicity.
Anyway they are going to TIG it all up for me. Plus they know the T and love it to death and they know this is a fuel tank., which they have made in the past for their race car. So its all looking good. I really wish my eyes were good enough to do the welding but I know when Im beat

gerry
 
How ya gonna get anyone in there to weld it on the inside? Just as an aside, when viewed from the rear, 3/4 shot, to me it really looks like Capt. Nemo's submarine, the Nautilus, from 20,000 Leagues Under the Sea. JMHO.
Way too much work for me. I'm sure it will be beautiful when finished.

John
 
John
Dont worry thats just the tacks that makes it look like the Nautilus. (not sure thats the correct spelling). When its welded and dressed it gonna look like the space shuttle but without those troublesome tiles
G
 
I was thinking that too One finger ... lol.

I would love to tackle a TIG job like that Gerry if for no other reason than just to be mentioned in the credits. I did a stainless hyro resouvor for a show truck. Little bitty welds. Only had one leak too.

Ron
 
Boy if I lived in the USA I have some things in my mind that would gives us all a challenge. I would be honored to have you weld it for me.

If I ever get the chance to do the credits thing.... ALL you forum guys will be top of the list. This is not just bull, but the last 12 months or so have helped me through the finishing of yella fella and that is the hardest part.

My hat off to YOU all.
Gerry
 
Yep, me too. I would also have loved to weld this tank. I would use a torch, very thin rod, and lay a clean, beautiful bead down with a little glow of cherry red, dampening it with a wet cloth to shrink it back in place. I've done a lot of chop topping and hammer welding this way. You can almost weld it with the two pieces of metal that are there.

 
Called the guy thats welding the tank for me and he has managed to complete on side. He is doing it in between other jobs so the price is very good.
He said that there has been no distortion or warpage and its looking very good.
So I hope that I can throw some pics up in the next few days of the completed welded tank before I attack it with some rotary burrs and the good old power file. Seems like it may be good enough for a brass colored powder coat.
Also just got a new set of 5 burrs (Bergen, a good make) from Ubay for the price of 1 snap on.
Happy tonite
Gerry
 

     Ron Pope Motorsports                Advertise with Us!     
Back
Top