Ron Pope Motorsports                California Custom Roadsters               

photo of my new project

You could also put a small Gasser tank up front, for looks. I have done that, made a cutout at the bottom to install a small trans. cooler and fan (12v. pancake w/ squirrelcage blower or a heater fan) inside. I have also made a small toolbox out of those small spun alum. gasser tanks ....
 
You could also put a small Gasser tank up front, for looks. I have done that, made a cutout at the bottom to install a small trans. cooler and fan (12v. pancake w/ squirrelcage blower or a heater fan) inside. I have also made a small toolbox out of those small spun alum. gasser tanks ....

Do you have pictures of how you did this?
 
You could also put a small Gasser tank up front, for looks. I have done that, made a cutout at the bottom to install a small trans. cooler and fan (12v. pancake w/ squirrelcage blower or a heater fan) inside. I have also made a small toolbox out of those small spun alum. gasser tanks ....
I was thinking of putting a gasser tank up front making the radiator over flow tank.
 
Do you have pictures of how you did this?
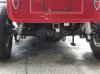
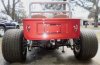
All you have to do is cut a rectangular hole in the bottom just big enough to install your cooler and fan.
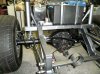
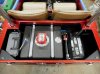
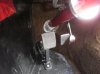
Get a 4" or 6" wide x 1/4"thick piece of alum. flatbar, with the tanks rect. cutout facing upwards, slide your cooler into the opening,
positioning the flatbar to mark the hose openings that will be needed to route the hoses thru that flatbar. I drill the hose holes just big enough to slide the hoses thru the plate connecting the cooler withhose clamps.
Drill 2 holes thru the alum plate, on each side of the rect. cutout, and tap the spun alum tank for 3/8's NF threaded flathead cap screws. That will fasten the tank down to the alum. plate.
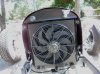
Now, that plate I drill about a dozen 1/2" thru holes of cooling. After I mount the alum. flatbar with the tank upon it, I fasten a small scoop onto the bottom to grab air when the car is moving. The scoop doesn't have to be big, because the fan will pull the air in thru the bottom, but at speed, it will be assisted by that scoop.The cooler is held in with a couple of larger pieces of hoses going over the hoses that feed the cooler. These are fastened down with crimp clamps, This allows the cooler to jiggle and move slightly over rough roads and bumps.
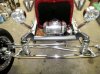
Drill 2 or 3 large holes in the ends of the tank. I fastened a alum plate over the holes, with the plate having 2" spacers holding the end plates off, but end plates dia. has to be bigger that the part with the holes, that way you won't see them, they'll be kinda hidden.

Now, going down the road, the small scoop on bottom will shove alot of air thru the tank, thru the cooler and out the cooling holes in the end of the tank.
Sorry, my camera is broken and my wacom pad is screwed, too. Someone dropped something heavy on it....
 
Last edited:
Well this is the long delayed update 5 years down the road . Delayed for paint but at a great price . Still needs windshield glass and some interior work , but it runs and drives very well. Engine and transmission work great . Has coil overs front and rear . Next is Registration process . Here are a lot of pictures to catch things up. It will take a few post for pics.0001.JPG 0002.JPG 0001.JPG 0002.JPG 0001.JPG
 
here is more
 

Attachments

  • 0003.JPG
    0003.JPG
    488.6 KB · Views: 144
  • 0003a.JPG
    0003a.JPG
    440.7 KB · Views: 143
  • 0004.JPG
    0004.JPG
    436.5 KB · Views: 143
  • 0005.JPG
    0005.JPG
    519 KB · Views: 143
  • 0006.JPG
    0006.JPG
    429 KB · Views: 143
  • 0006a.JPG
    0006a.JPG
    415.3 KB · Views: 144
  • 0008.JPG
    0008.JPG
    345.3 KB · Views: 143
  • 0009.JPG
    0009.JPG
    447.7 KB · Views: 142
  • 0010.JPG
    0010.JPG
    447.8 KB · Views: 142
  • 0011.JPG
    0011.JPG
    412.9 KB · Views: 144
more and this is it for now .
 

Attachments

  • 0012.JPG
    0012.JPG
    456.5 KB · Views: 143
  • 0140.JPG
    0140.JPG
    469.6 KB · Views: 142
  • 0014.jpg
    0014.jpg
    614.4 KB · Views: 140
  • 0015.jpg
    0015.jpg
    392.7 KB · Views: 143
  • Like
Reactions: Guy
Very nice. How long did it take you to build it? Did you paint it yourself?
I didn't paint it , my brother has a body shop and he wanted to do it in between other work. That's where the time comes in ,he is very busy. My work time was about 3 years but did everything else but the trans overhaul( lack of proper tools ) . But was fun , did some things different than most . Electrical under seats ,battery in the bed ,coil over up front .

Steve
 
-AiHKzAqE4_CLpERr-6Qi0tq4Yrl44G-uIYszeK4qwdXCrtN3Wa4fNenb3tVrtQo2JKa11hbAjiLbxFJIHrz5Q-T4uAC0jCeV-3Q_ydMlZai3sYkuIuAYa56XpCJ1-FlrmbOi_o7g5-qS_fbCQeGun2Jh6laV6mEJOhLLa74A_oDzBen98BYCdZ2gWStT2Hu5VJwsjijHCZ2EWlp9VZDACBbQMftXnLiuCYq3607zsf5JHrGIBBHdOt_06_xTDTMC0I2JCYI4GKdudNo6Y9kd-7eERIqw-Gf_NPCYcWSatMD_sTaM_PQ9m2KkovfPeCM4oaRtbKTNAtIK2cVQvg4QUN4QUmHxYwMpYTIsGTaGLz2m_v49NH4dOsL8tsKxLKxuStxiCepEpBmCC6P2oqdtEvSBpGYS_ly6xGohb8AVyod304L1b9-iwWrDH_30w8PDvFooIFeDazBcZb_8ikfm_RaHILsTd5u6M93hemukfmMsrzF3BdrV4K9APcQVULqHpRim2X0UMVPxbAc_6viIKQ0J6ORdzqQ1-BZJ14V02W9dQwnjziFPNsQhwNI00TzjdocGZIbifxXXID1rdOZNCAiw7A5WRFkUvAG6fswcMFMYgpzXCjBgBE5jG8lSIgOtvboWrWsnHSEps6v-x6i1wM9GqPHYcCl=w1187-h890-no

1975 i restored and painter
 
well finally Registered ----was a project but got the state safety inspection and all paper work done , the plates are on , drives great ,rides very good .


Steve
 

Attachments

  • 30147.jpg
    30147.jpg
    610.9 KB · Views: 89
  • 30148.jpg
    30148.jpg
    511.5 KB · Views: 87
  • 30149.jpg
    30149.jpg
    452.6 KB · Views: 86
That's great, Steve. Turned out well. Gasser tank looks cool, and the '39 Lincoln tail lights add a nice detail. Now, go hunt some Mustangs! :D
 

     Ron Pope Motorsports                Advertise with Us!     
Back
Top