

You are using an out of date browser. It may not display this or other websites correctly.
You should upgrade or use an alternative browser.
You should upgrade or use an alternative browser.
And now for an IRS horror story
- Thread starter PotvinGuy
- Start date
fluidfloyd
Active Member
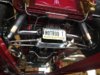
I have either a C2 or C3 Corvette IRS. When making a 3 point turn the other day, I heard a loud snap and this is what happened. I can't find anyone who made this wishbone design for this differential. I guess I will have to make a beefier one. It had 1/2" bolts. I will upgrade it to 5/8".
View attachment 10293 View attachment 10294
RodB,
Does that lower control arm have a radius or thrust tube at the outer carrier that ties into the frame? From the rear view I can't see one but it could just be out of sight. If you don't have one then that is why the unit failed in my opinion. You really need something to take that wheel thrust under acceleration as well as the reversed load when braking.Those control arm can get pretty lite weight and live if everything else is designed correctly. Not saying lite and flexy is good but they can survive. Post a picture of the opposite side for comparison. I know a lot of Jaguar IRS units are installed without those radius rods and seem to live but it''s not right as that tire and outer hub is constantly trying to shorten or lengthen that wheelbase under accelerating, braking and turning loads. It looks to me loke that cross shaft flexed until it failed right next to the weld. Just something to think about. Hope this helps.
George
RodB
Member
Here are some pictures. The original Vette rear end had one single lower control arm and the tracking was set by the front control arm with shims. Mine has ladders from the original Vette hubs to just under the steps shown in the second picture. The original lower control arm bracket, which bolts to the bottom of the differential is there, but someone welded ears to adapt the Wishbone design. The welds failed. The control arms measure 3/4" O.D. I need to remake them out of 7/8" tubing with 5/8" rod ends. The camber and tracking will be set by these arms.


old round fart
Well-Known Member
I think I would go with 1" tubing. You can get it from Ron Pope ( RPM) and he can thread it for you. Easiest and fastest way to go.
GAB
Member
A pic directly on from the side with the wheel and tire removed would help. I think that I can detect what appears to be a hairpin radius rod in the front view. If that is the case, I would suspect that conflicting arcs is the reason for the failure. The original builder changed the Corvette geometry by making the lower link into an a-arm and when viewed from the side the outer end of that arm moves in a plane that is basically vertical. If a radius rod is mounted to the frame in a conventional method, it will describe and arc at the end that is attached to the hub carrier or lower a-arm. The push and pull due to differences in geometry will eventually result in failure at some point.
How is the toe-in controlled?
The trailing arms for the Vette rear are quite a bit more substantial than hairpin radius rods. I've made quite a few sets over the years.

How is the toe-in controlled?
The trailing arms for the Vette rear are quite a bit more substantial than hairpin radius rods. I've made quite a few sets over the years.

fluidfloyd
Active Member
RodB,
Is that a hairpin style locating arm? If so, how is it attached to you outer wheel hub? It still looks to me that something is binding as the lower control arm swings up and down. I think that was causing stress and eventual failure at the weld joint. The C2/C3 OEM trialing arms had big rubber bushings at the chassis attachment brackets allowing for a lot of movement and misalignment without bending anything. As old round gas passer suggested, 1.0" OD tube would be a move in the right direction. Even so, you need to isolate the root cause of the failure as bigger tubing will only mask the issue and following Murphy's Law it will fail at the worst time possible. I think you have a rigid triangle that is wanting to change lengths as it travels though it's full range of travel. You might consider blocking the frame and removing the wheel and shock from the other side. Move it up and down by hand and see if you have any tight or hard spots. You might even pull the half shaft out for a completely isolated lower control arm. Whatever you decide to do, I would not just replicate the same design in bigger tubing until I was sure of what caused it to fail. Treat it like your life depended on it! Keep us posted and good hunting.
George
fluidfloyd
Active Member
Damn North George, I was typing over you but I see we're thinking a like. Must be a Yellow Brick Road thing.
The Other (South) George
The Other (South) George
RodB
Member
Here is the view from underneath with the differential removed. The differential had over 1/8" play in each side which results in the camber changing while driving, so I sent it out for a rebuild to V Tech Corvette. I will send a picture once I get the differential back and installed. I think I am going to leave the existing design and make the wishbone arms bigger. I will need to calculate the bottom pivot so that the tire stays level during the entire travel. The camber and tow are both set by the lower wishbone. The ladder arm is simply to keep the wheel in the proper front to back location. Thanks for all of our advice.

Wild Mango
Member
What Fluidfloyd said. The lower control arm ("LCA") rotates around the inboard attachments. Your trailing arms rotate around a centre a much longer way outboard, and they will move the outboard end of the axle forward and back around the arc radius centered at the forward attachment for the trailing arm. The two arcs, having separate radius points are "fighting" during travel, which has resulted in what looks suspiciously like a tensile failure of the forward inner rod end on the LCA.
Another good Fluidfloyd thought;
You might consider blocking the frame and removing the wheel and shock from the other side. Move it up and down by hand and see if you have any tight or hard spots.
Another good Fluidfloyd thought;
You might consider blocking the frame and removing the wheel and shock from the other side. Move it up and down by hand and see if you have any tight or hard spots.
![Rear View[1].jpg](/data/attachments/6/6380-ed201c2882b8e98f4c152f2d6b5a3782.jpg)

RodB
Member

Thanks for the update, good tech is always welcome. How much toe-out do you run? Do you have a good alignment shop? I drive 30 miles to get away from the places with computers that start by asking "uh, what year is it?" Whose coilovers are those? Nice pieces, I suspect custom.
I was in your neighborhood just a week ago, driving from Carmel to my old hometown Warsaw. We need a US map with all our locations shown. I nominate Mike to do that.")
I was in your neighborhood just a week ago, driving from Carmel to my old hometown Warsaw. We need a US map with all our locations shown. I nominate Mike to do that.
RodB
Member
Zero toe. I put 300 lbs in the cab and did the alignment myself. I have a Backyard Buddy lift. I shimmed the lift to be level, centered the car on the lift and then measured the front and rear tread to make sure the tires were parallel and pointing equal amounts to the front of the car. I used a level on the front and rear of the tires to keep from getting a false reading from the bulge at the bottom. The car drives and steers better than it ever has.
I would not trust an alignment shop to work on my T.
I would not trust an alignment shop to work on my T.
Similar threads
- Replies
- 6
- Views
- 1K
- Replies
- 16
- Views
- 1K
