Ron Pope Motorsports                California Custom Roadsters               

Front Axle suggestions

Muddi1

New Member
Hello Everyone,

:bawl: newbie here,

This is an introduction as well as a front axle question. I am new to the building of T-Buckets, HotRods, and Crusiers but I have fabricated various parts and accesories for Off Road 4 x 4 vehicles form buggies to 7000 pound full size Chevy K-5's.

I have taken a great interest in rewarding myself for my two years, four months, and thirteen days of sobriety. This reward comes in the form of building my own T-Bucket from the ground up by way of what I refer to as "traditional" methods. I will be resourcing parts from as many possible salvage/wrecking yards as I can and purchasing some parts such as axles, rear end, interior peices from various sources in the used form. Safety is of course at the top of the priority list for myself, my family, passangers, and those I will share the road with.

I DO NOT wish to nor have the means to drop upwards of a couple thousand dollars on a front end set up from a well known after market source. It would be nice to be able to, it simply is not the case. I do realize that alot is to be learned, it will be very time consuming, and that some items will have to be purchased new for the sake of safety.Other than those specific items related to safety I am looking to build this vehicle in the "traditional" scavange and search method. This is also an effort to spend quality time with my wife rediscovering this Great Country as we search out or parts for the build. Knowing that a vehicle can be built safely and very much road worthy through this method, it is the approach that I prefer.

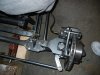
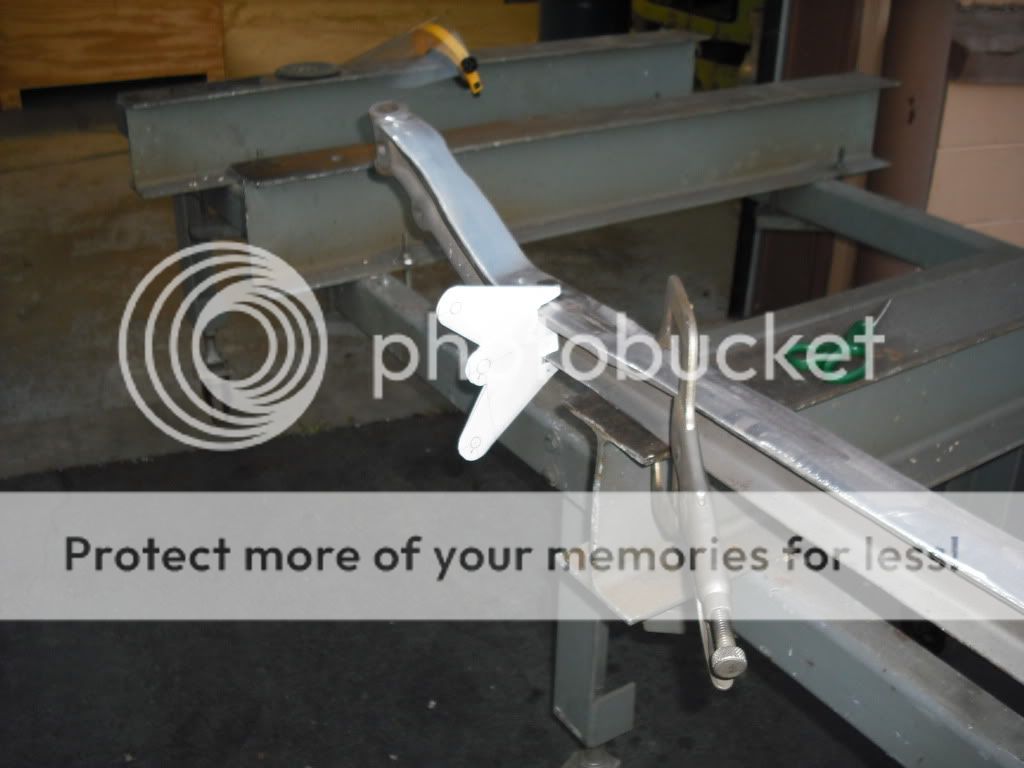
I will be building a basic classic T-Bucket frame from 3 x 2 .160 rectangular tubing, running a GM rear end most likely from an S10, an automatic transmission, (my clutch leg is much bigger than the other lol) and of all things a Four Cylinder GM 181 engine. I have acquired some of these parts such as the engine, trans, and the two front axles, one being a 47-55 GM 1/2 ton truck axle with springs, drums, and spindles, I also have a 1930 Model A bare axle.

My question is what are the pro's and con's of each axle set up? I would like either the traditional spring behind or a "suicide axle" set up. RPM makes a bolt on adapter for my GM axle to set it up for the radius arms and spring. I have seen different options for the Ford Axle such as bolt on spring perches that incorperate the classic "batwing" and I like this idea.

Is it acceptable and/or safe to weld batwings onto the Ford axle or not??? I have been told that "trimming the spring pads off of the GM axle will weaken it??? If this is indeed the case would welding batwings to the Ford axle result in the same scenerio???

Now the question I have seen several times but not really figured out the answer to though many have been given. Putting the GM spindles on the Ford axle.....I realize there is a bit of work to be doen here in respect to the king pin angle differences, machinging of the king pin bosses, and possible machining of the boss to obtain correct king pin installation. What are the benefits bedises the fact that I have the GM spindles to swapping them onto the Ford axle. I have read that mid to late 70's intermediate brakes from GM vehicles are an option.????

I am very open to suggestions, advice, comments, even those who will tell me to save my money and purchase an after market front end kit will be openly accepted!!!

Thank you all for allowing me the opportunity to be a part of this Forum and the opportunity to learn from those who have been where I am before me.

Muddi1 aka Mike
 
Buy Chester's Book on how to build a HotRod for $3000.00 or less. Best info anywhere but like you said, build it safe!!
 
Congrats on your going dry. One day at a time as they say. I had an 18 year dry spell because I had to have a driver's license to make a living.

I have a couple of suggestions regarding front ends.

Check with Ron at RPM (one of our sponsors) as he offers a tube axle front end that is well suited for T's. Personally, I think the Chevy truck axle is too heavy. Keep the unsprung weight down.

Also take a look at Chassis Engineering in Iowa. They offer forged axles and spindles. Not cast like Super Bell and others.
Their forged spindles are available for the fitment of Chevy brakes.
 
I do believe if I build another T Bucket I will be using a stock type late model GM axle like the one you have now, that way you have all the right parts in one package, with RPM's bolt on RR mounts, you will be home in no time and saving a ton of time and money compared to putting together all that is necessary to make that ford axle work correctly... The extra un-sprung weight is nothing to worry about, BTDT :)
 
I used the axle from a 65 Chevy G van. Sorry about the blocks and jacks in the picture but it is winter here in Ohio. The front end was assembled several years ago so the adapter brackets are a home made set-up, but look similiar to the RPM brackets. The disc brakes are a recent addition.
 

Attachments

  • DSCN0160.JPG
    DSCN0160.JPG
    134.6 KB · Views: 121
I used the axle from a 65 Chevy G van. Sorry about the blocks and jacks in the picture but it is winter here in Ohio. The front end was assembled several years ago so the adapter brackets are a home made set-up, but look similiar to the RPM brackets. The disc brakes are a recent addition.

That looks like this should work pretty good, I see that you really have enough room to fix the Ackerman, by making the steering arms go out wider, so that the points between the king pin and tie rod ends, intersect at the third member... Just a thought. :)
 
That looks like this should work pretty good, I see that you really have enough room to fix the Ackerman, by making the steering arms go out wider, so that the points between the king pin and tie rod ends, intersect at the third member... Just a thought. :)
 
According to the measurements the tie rod should be 1/2 longer than I have it. The current position is pretty close to the back of the rims when the tires are on. I don't think that the 1/2 inch would make that much differnce. I'll take a closer look at it in the spring when the tires go back on.
 
Thank you all for your input,

I have been poking around checking out different brackets and such. I would of course love to buy an axle set up but at this time am financially not able to. So what I have done is made a template that is size proportionate to my axle and roughed a bracket out. This was done with a horizontal band saw and grinder with various cutting/grinding wheels.

I have "wrapped" the rear and underside of the axle with the bat wing portion of the bracket so it appears to be a "normal" bat wing. I like the look but am wondering about rub prevention. I thought about putting an 1/8th inch gap between the bat wing and the axle, or the gap and some sort of isolator.? Any thoughts?

I have time on my hands, mechanical ability, and material in the garage so I thought I would give it a shot, if all else fails I will purchase a set from RPM.

Here is what I have roughed out thus far.... your input is appreciated.

Mocking it up yourself is the best and most fun way to do it in my opinion. As for the truck axle, we are building a T now with a F1 axle of the same vintage. We cut off the spring pads and smoothed the axle down and are welding in the batwings. I drew out what I thought the batwings brackets should be then made some cardboard patterns to test and tweak the design. To lessen the weight some and add the cool factor, we're going to drill the I beam with 1" holes. After smoothing and powder coating, it should look pretty good for a budget setup.
DSCF0089.jpg
 
I think it is one of the best parts also, I got a Royal tongue lashing for mentioning trimming the spring pads in another forum....it will remain anonamous....anyway I kind of like the idea of the bolts sticking out there. Normally we see everything all nice and smooth cleaned up, a great look of course, I like to see some thing different now and then...kinda like Baskin Robbins ice cream....there are 31 flavors for a reason!!!

I didnt realize the pictures would show up where they did lol..oopsy :dummy:


Mocking it up yourself is the best and most fun way to do it in my opinion. As for the truck axle, we are building a T now with a F1 axle of the same vintage. We cut off the spring pads and smoothed the axle down and are welding in the batwings. I drew out what I thought the batwings brackets should be then made some cardboard patterns to test and tweak the design. To lessen the weight some and add the cool factor, we're going to drill the I beam with 1" holes. After smoothing and powder coating, it should look pretty good for a budget setup.
DSCF0089.jpg
 
Mocking it up yourself is the best and most fun way to do it in my opinion. As for the truck axle, we are building a T now with a F1 axle of the same vintage. We cut off the spring pads and smoothed the axle down and are welding in the batwings. I drew out what I thought the batwings brackets should be then made some cardboard patterns to test and tweak the design. To lessen the weight some and add the cool factor, we're going to drill the I beam with 1" holes. After smoothing and powder coating, it should look pretty good for a budget setup.

Thank you Flap, it is a great feeling :hooray:

Ben, I have seen a build link that shows how a guy drilled his axle, it turned out looking excellent and he saved the cost of having it done. I will try to search out the link and post it.

After taking another looksy at my brackets I am liking the way they look so far, I am going to be refining the one and start cutting the second during commercial breaks of the Jets/Colts game lol...

Alrighty, here is the link to how this fella drilled his front axle, looks pretty straight forward and I'm sure with patience it could turn out nice....

http://66.154.44.164/forum/showthread.php?t=416208
 
I myself, like to make the radius rod brackets be themselves with no spring tab on them... I then make a separate tab for mounting the spring hangers, out wider, so now you can run a much longer spring, tons and tons of a better ride. :)
 
Alrighty, here is the link to how this fella drilled his front axle, looks pretty straight forward and I'm sure with patience it could turn out nice....

http://66.154.44.164...ad.php?t=416208

Yep--this is pretty much how I figured on doing the drilling on our axle. It should give it a pretty sweet old-school look. This budget T project we're doing is going for the early 60's style.
 
So this would be two brackets located on the one that bolts to the original GM axle ?

I myself, like to make the radius rod brackets be themselves with no spring tab on them... I then make a separate tab for mounting the spring hangers, out wider, so now you can run a much longer spring, tons and tons of a better ride. :)
 
So this would be two brackets located on the one that bolts to the original GM axle ?
NO... Another bracket that you can either weld or bolt to the axle out maybe 6 to 10 inches wider, keeping the spring centered between the radius rods for best working clearance and desired height along with the front frame cross member spring perch height... :) This is the same way I have mine mounted.
 
NO... Another bracket that you can either weld or bolt to the axle out maybe 6 to 10 inches wider, keeping the spring centered between the radius rods for best working clearance and desired height along with the front frame cross member spring perch height... :) This is the same way I have mine mounted.

I checked out your myspace pictures of the spring and now see what you mean, a picture is worth a thousand words hehehehe,

So I have to ask, this is a newbie question :pacifier: , I see radious rod and spring perches welded to mainly Ford axles, I know it is possible, given the axle is not cast.

Can the perches be to the GM axle? Does this comprimise the axle in any way as I have been lead to believe by trimming my perches and welding perches on like Ben has planned and is doing?

This would make life way easier, almost too easy as I have a longer spring, a 37" already and have a shorter 27" spring.

The engine I will be using is an inline 4 that wieghs about as much as a small block lol, the longer spring is a heavier rating with a lower sprung wight rating. I know from my employment as an Over Head Garage door Installer for 12 years that different spring rates can be achieved by either cutting a spring, using a longer one, the number of leaves, and also the gauge of the spring steel used. I believe that the longer spring 37" is rated at 1250pnds and the shorter 27" is rated at 1750pnds.

Thank you for any thoughts.

Muddi1
 

     Ron Pope Motorsports                Advertise with Us!     
Back
Top