

You are using an out of date browser. It may not display this or other websites correctly.
You should upgrade or use an alternative browser.
You should upgrade or use an alternative browser.
My ProjecTee
- Thread starter DonnyRay
- Start date
DonnyRay
Well-Known Member


 Here's the photos I promised. The twin hood scoops actually were made for a Nissan 370z's side windows. They resemble spider jaws. I scrapped the rear spoiler buck. I have a better idea for a rear spoiler. Alisha suggested naming my t ,"creepy crawlers". I like that !
choppedtop
Well-Known Member
Never have used core mat, but sure wanting to see your results. Give it a shot. I wanna see.
fletcherson
Well-Known Member
For flat stuff only, or is it playable enough for contours as well? I haven’t used it yet, I do have numerous ply and weight cloth for different areas and that has been helpful to me. I ordered a array of material to have on hand so the project wouldn’t stall waiting on it... too bad life keeps getting in the way. I need to get back to it.Added 6 pieces of core mat to my dashboard. The core mat is easy to cut & the cuts are clean ( no fibers sticking out ). I may stop using fiberglass mat & use only core mat. What do you guys think ?
DonnyRay
Well-Known Member


 Look how clean & sharp the cuts are. They stay clean & sharp even after the resin has been applied. In the last photo there are 5 areas that are covered with core mat. The top of the dashboard is covered in the first photo. The core mat feels like foam rubber ( sorta ). Very impressive stuff.
DonnyRay
Well-Known Member
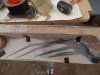
I think it is pliable enough to be use on contours. Here's some photos from today's exciting adventures.

 I don't know how I ended up with duplicate photos. Anyway ; I drew a sketch on the dashboard. I reworked it until I liked it. I purchased some window film from home depot. Placed it on top of the sketch ( taped it in place ) & drew my lines on the window film. I sprayed some adhesive on some strange white poster board ( from tap plastics ). Placed the window film on top of the adhesive & used a piece of 2 " black abs pipe as a rolling pin. Voila ! No air bubbles. The poster board will be cut by following the design on the window film. I'll then have templates. I will use core mat to form my spider's legs. The numbers on the design designate how many pieces are to be cut for each color.
I don't know how I ended up with duplicate photos. Anyway ; I drew a sketch on the dashboard. I reworked it until I liked it. I purchased some window film from home depot. Placed it on top of the sketch ( taped it in place ) & drew my lines on the window film. I sprayed some adhesive on some strange white poster board ( from tap plastics ). Placed the window film on top of the adhesive & used a piece of 2 " black abs pipe as a rolling pin. Voila ! No air bubbles. The poster board will be cut by following the design on the window film. I'll then have templates. I will use core mat to form my spider's legs. The numbers on the design designate how many pieces are to be cut for each color.Attachments
DonnyRay
Well-Known Member


 In the top photo you'll see the pattern drawn on to a piece of window film. The film is then glued to the white plastic card board. I cut the pattern pieces out ( this gave me templates ). Then I placed my templates on top of the core mat & drew a line around the templates . The #'s 4,3,2 &1 are the amount of layers of core mat that will be piled on top of each other. This will give me some dimension.
Gerry
Well-Known Member
Some of my photos are being duplicated. I don't know what is causing this to happen.
I thinks it may be due to double clicking on the insert full image button. Kinda remember it only needs a single click...
Gerry
Well-Known Member
I just checked when I uploaded a pic of my tank for I Girl. I am used to double clicking for most file tyres from explorer so do it as a matter of course.
Yep double clicked on insert full image and 2 of the same pic appeared in the post right after each other with no gap between them.
Just another tip. if you can place your cursor at the bottom right of the last pic you post and hit return, it should start your text below the last picture instead of at the bottom right hand corner of the last pic. I kinda have to find the start of your sentences when you post pics.
Hope you see this as help not criticism.....
G
Similar threads
