

You are using an out of date browser. It may not display this or other websites correctly.
You should upgrade or use an alternative browser.
You should upgrade or use an alternative browser.
Restoring A T bucket that sat 10 + years
- Thread starter Guy
- Start date


fletcherson
Well-Known Member
I used used ones. I think they were 30 amp. I always strip them out of cars or trucks whenever I scrap them, or anytime I go to the bone yard I grab a pocket full of fuses, relays, etc... saves a trip to the store, lol. I just use female spade connectors to wire them. The closer to the headlights, the better. The wire is a resistor and causes a voltage drop. I installed new hid bulbs in my dump truck and they weren’t very bright, plus they would overheat the headlight switch and go out randomly. After re wiring them with relays and a shorter, heavier battery lead, problem solved and very bright.
Neshkoro
Well-Known Member
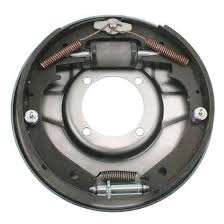
As far as your brakes go, I think the star wheel on the adjuster should be below the coil of the spring. That's what keeps the adjuster from backing off. Kind of locks it in place. That's the way I've been doing it for many years. Maybe someone else can chime in on that.
Bill
Bill
Island Girl
Well-Known Member
"To switching means " , goes to your ignition switch ( power when ON position ).
No,
That means the hi-Lo switch that sends a +12V "signal" to the relay, that pulls in the coil which transfers the connection between the +12V from the batter that by default goes to one of the lamp connections to the other lamp connection.
When there's no "control signal", the +12V from the headlight's switch goes to the low beam lamp wire thru the normally closed relay contacts.
When the relay is energized, the +12V is then connected to the Hi beam lamps' wire.
Using a single relay to switch between hi and lo beams still requires a main switch for the headlight.
If you used 2 relays. one to turn on hi and one for lo, you could eliminate the main headlight switch, but you'd need a three position toggle switch to control the 2 relays . . . Hi---OFF---LO
Guy
Member
Breaks are all set finally, what a pain and it's so hot out to be testing had to be something on both sets of shoes now both drums are cleaned up and both wheels on the front have new shoes working very nice . Going to order that relay set up from Delcity should work out ok I hope , oh this morning when I was going to talk my car out one break light didn't work took it apart doesn't have a spring under the socket had a rubber garment, so back to the parts store to but a pig tail and spring now that works again, I have come to realize theses cars are never DONE it's an ongoing thing LOL
Guy
Member
This is the way it was when I took it apart the first time I replaced it according to the Chevy bookAs far as your brakes go, I think the star wheel on the adjuster should be below the coil of the spring. That's what keeps the adjuster from backing off. Kind of locks it in place. That's the way I've been doing it for many years. Maybe someone else can chime in on that.
Bill
Guy
Member
It's not wired that way they have the center prong as the groundThis is the back side of your headlight. Wire colors don't matter here. Just look how the terminals are marked.
View attachment 16589
choppedtop
Well-Known Member
Maybe "they" have done it wrong?
Neshkoro
Well-Known Member
I took a look on google and the brake adjuster and spring placement are shown both ways; with the coil of the spring over the star wheel and with the coil of the spring away from the star wheel. Maybe either way is correct. I've always put the coil of the spring over the star wheel. It seems to help keep the adjuster from backing off.
fletcherson
Well-Known Member
Depending on when it was made, (drum brakes in general) it may be designed to have a adjuster in the mix that acts as a ratchet and tightens as you back up... those typically had a spring with a shank that avoided the star wheel. The brakes will back off without something to resist star wheel rotation.
Guy
Member
thats not the spring i have mine has a long thin partI took a look on google and the brake adjuster and spring placement are shown both ways; with the coil of the spring over the star wheel and with the coil of the spring away from the star wheel. Maybe either way is correct. I've always put the coil of the spring over the star wheel. It seems to help keep the adjuster from backing off.
Guy
Member
the problem with the lights was i wired it the same way who ever did it before and the ground was wrong , now lets see if i can get though one day without fixing more things that they had done . I went out for a short ride and got rained on but not too badView attachment 16640 This connects to their relay. There's a column on the left side of their webpage. Left click on relays. You'll see this when the page opens. Left click on it. HTH .
Guy
Member
correctMaybe "they" have done it wrong?
Guy
Member
yes
Similar threads
- Replies
- 22
- Views
- 4K
