


If you're building a traditional T bucket, there is nothing more correct than a Model A rear spring. They were often used to give clearance for a quick change equiped rear end. With or without the quick change they will give you the look of a "40's or '50's hot rod.
There were two versions of the A rear spring. One had 8 leaves to it and the other had 10 leaves. Most Model A's had the 10 leaf version. That's the one we will deal with here. One word of caution, when you are shopping for your spring, check the eyes for the shackles. They should be round. If they are oval in shape, check to see that the shackle didn't wear into the leaf. If it did, look for another spring.
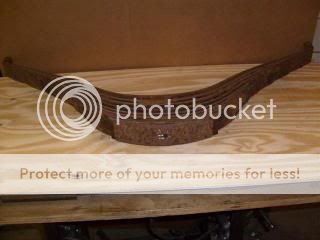
Stock Model A rear spring.
The modifications are simple and can be done with basic hand tools. In a couple of hours, you can have one ready to bolt into your frame.
First the spring needs to be disassembled. Be very careful here. There is a lot of tension here that will be releasted when you remove the center bolt in the spring. Clamp the leaves with two large C-clamp before attempting to remove the bolt. Please don't skip this step. Replace the center bolt with a piece of 1/4" running thread about 12" long. Now release the clamp slowly. Sometimes the leaves need a little tap with a hammer to free them from each other. Once the tension is off the leaves, you can remove the running thread.
If you are using an open perch, like your front one, you will only need to use the main leaf and the four on top of it. If you are using an original A crossmember, you will need to modify all ten leaves, starting with the main leaf and working your way to the top leaf.
The follwing measurements are from the center bolt holes out toward each end of the leaf;
Main leaf...full length
2nd leaf...24"
3rd leaf...19-1/2"
4th leaf...13"
5th leaf...7"
6th leaf...6-1/2"
7th leaf...6"
8th leaf...5-1/2"
9th leaf...5"
10th leaf...4-1/2"
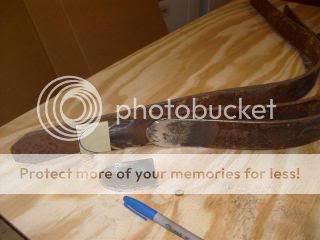
In this next step, we will be working with the 2nd, 3rd and 4th leaves. Use one of the ends you cut off to make a template to round off the sides of each leaf. See picture below. These leaves need to slide on the leaf under them. Grind a radius on the bottom edge at the end of each leaf.
The top 5 leaves can be ground to clean up any sharp edges. They will not be flexing and only serve as spacers in the crossmember.
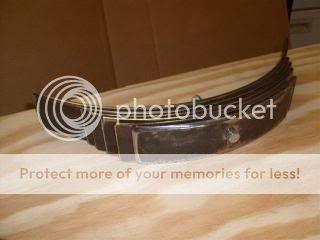
There is a sleeve in the eyes of the main leaf. This will not be needed with your new shackles so it can be removed. You can clean up the leaves with a wire brush or by sand blasting. To assemble the spring simply reverse the disassembly process. Replace the center bolt with a new one.

There is no way to make this set up ride like a Cadilac, but there will be a big difference over a stock spring.
There were two versions of the A rear spring. One had 8 leaves to it and the other had 10 leaves. Most Model A's had the 10 leaf version. That's the one we will deal with here. One word of caution, when you are shopping for your spring, check the eyes for the shackles. They should be round. If they are oval in shape, check to see that the shackle didn't wear into the leaf. If it did, look for another spring.
Stock Model A rear spring.
The modifications are simple and can be done with basic hand tools. In a couple of hours, you can have one ready to bolt into your frame.
First the spring needs to be disassembled. Be very careful here. There is a lot of tension here that will be releasted when you remove the center bolt in the spring. Clamp the leaves with two large C-clamp before attempting to remove the bolt. Please don't skip this step. Replace the center bolt with a piece of 1/4" running thread about 12" long. Now release the clamp slowly. Sometimes the leaves need a little tap with a hammer to free them from each other. Once the tension is off the leaves, you can remove the running thread.
If you are using an open perch, like your front one, you will only need to use the main leaf and the four on top of it. If you are using an original A crossmember, you will need to modify all ten leaves, starting with the main leaf and working your way to the top leaf.
The follwing measurements are from the center bolt holes out toward each end of the leaf;
Main leaf...full length
2nd leaf...24"
3rd leaf...19-1/2"
4th leaf...13"
5th leaf...7"
6th leaf...6-1/2"
7th leaf...6"
8th leaf...5-1/2"
9th leaf...5"
10th leaf...4-1/2"
In this next step, we will be working with the 2nd, 3rd and 4th leaves. Use one of the ends you cut off to make a template to round off the sides of each leaf. See picture below. These leaves need to slide on the leaf under them. Grind a radius on the bottom edge at the end of each leaf.
The top 5 leaves can be ground to clean up any sharp edges. They will not be flexing and only serve as spacers in the crossmember.
There is a sleeve in the eyes of the main leaf. This will not be needed with your new shackles so it can be removed. You can clean up the leaves with a wire brush or by sand blasting. To assemble the spring simply reverse the disassembly process. Replace the center bolt with a new one.
There is no way to make this set up ride like a Cadilac, but there will be a big difference over a stock spring.
") (661) 203-0165 or
(661) 203-0165 or 