

YblockT
Member
And, according to New York theater and music critic Jon Sobel (who is also a working musician), "The internet is a double-edged sword - while it stimulates thought, it also makes it easy to magnetize large groups of samesayers." And that's just how the oldest, most often repeated criticism of Chester Greenhalgh's "How to Build a T-Bucket Roadster for Under $3000" came about.
It first appeared in an Amazon.com customer review in 1999 that said, "I have to take issue with the use of used tie-rod ends 'welded' to watter(sic) pipe as steering components? come on! This kind of unsafe foolishness is what gave T-buckets a bad name in the 60's." So, to shed some light on the unsubstantiated safety accusation: T-buckets were just becoming popular in the 60's and had NO bad name at the time. If they did have a bad name, then it's unlikely the T-bucket phenomenon would ever have accelerated to be as HUGE as it was in the 70's. The fact that the reviewer could not spell offers some further insight. Again, though, he gave the book 3 out of 5 stars.
I'll let Chester respond: "I've caught a lot of flak on the radius rods. I originally made them as a temporary alternative to Heim joints and cold rolled steel. The brackets and batwings are designed to accept either, depending on your budget. My idea was to get you rolling for under $3000 and then let you replace the 'alternatives' or expedients when you could afford to do so."
"How many people have facilities in their home garage, or say, in the outback of Australia, to thread cold roll steel with an impossible to find tap? They would have to be farmed out to a machine shop where six radius rods and a drag link with 15 heim ends would set you back over $1000. I was fighting to produce a roadster for under $3000: an unheard of, unbelievable price even in 1986. My radius rods could all be built for under $20. Compared to a grand, how's that for getting on the road quick and cheap when you're on a tight budget?"
"We've gotten spoiled here in America where all things are easily available. My book was written for people all around the world who wanted to build a car with what they had on hand. In the outback of Australia, or down here in Mexico,or Siberia, cold roll steel and heim joints are about as available as a used rocket engine from NASA. But wherever you find a junk car or indoor plumbing you'll find tie rod ends and water pipe. President Theodore Roosevelt once said, ' The credit doesn't go to the critic who says 'it would have been better if this had been done like this... it goes to the man who is actually in the arena'."
"The real problem with these radius rods was that they worked so good few people ever changed them. To my knowledge none of them ever failed. Like my dad used to tell me,'If it works, don't 'fix' it!' As far as the taper goes, I had a tool special made in a machine shop that I used to taper the holes on the rods I built. In the book I mentioned you could use a rat tail file to taper yours."
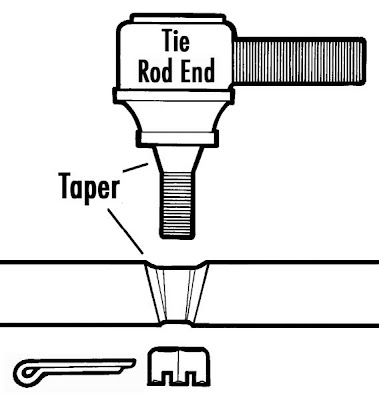
"I made further refinements on the radius rods after the book was printed. I welded 9/16" nuts on the back side of the brackets to give the tie rod ends a more substantial anchor, so that in time they could not wallow out the hole and wobble. And, as noted, I had a special tool for the taper. I also started cutting off 6" of the tie rod and welding this to the water pipe so that the end could be adjusted. This also allowed me to slide in an 8" length of cement rebar into the tie rod section, weld it, and then slide it into the water pipe for a stronger union when it was all welded. I use the rebar because it is easy to grind off the ridges until it will slide in easily for a snug fit. This also allowed you to grind the weld flush without weakening the unit so it didn't look like a snake swallowing a rat. The thing I didn't like about these radius rods was the top bar on the front was so visible, and it was ugly! Most of my customers replaced the tie rod ends on this bar with heim ends for appearance sake. They were a simple screw in swap. I guess 4 Heim ends were better than 16 though."
Also, HAMBer "Old Crow" offered the following great tip: "As far as the taper goes, the true 'lo buck' trick is:
It first appeared in an Amazon.com customer review in 1999 that said, "I have to take issue with the use of used tie-rod ends 'welded' to watter(sic) pipe as steering components? come on! This kind of unsafe foolishness is what gave T-buckets a bad name in the 60's." So, to shed some light on the unsubstantiated safety accusation: T-buckets were just becoming popular in the 60's and had NO bad name at the time. If they did have a bad name, then it's unlikely the T-bucket phenomenon would ever have accelerated to be as HUGE as it was in the 70's. The fact that the reviewer could not spell offers some further insight. Again, though, he gave the book 3 out of 5 stars.
I'll let Chester respond: "I've caught a lot of flak on the radius rods. I originally made them as a temporary alternative to Heim joints and cold rolled steel. The brackets and batwings are designed to accept either, depending on your budget. My idea was to get you rolling for under $3000 and then let you replace the 'alternatives' or expedients when you could afford to do so."
"How many people have facilities in their home garage, or say, in the outback of Australia, to thread cold roll steel with an impossible to find tap? They would have to be farmed out to a machine shop where six radius rods and a drag link with 15 heim ends would set you back over $1000. I was fighting to produce a roadster for under $3000: an unheard of, unbelievable price even in 1986. My radius rods could all be built for under $20. Compared to a grand, how's that for getting on the road quick and cheap when you're on a tight budget?"
"We've gotten spoiled here in America where all things are easily available. My book was written for people all around the world who wanted to build a car with what they had on hand. In the outback of Australia, or down here in Mexico,or Siberia, cold roll steel and heim joints are about as available as a used rocket engine from NASA. But wherever you find a junk car or indoor plumbing you'll find tie rod ends and water pipe. President Theodore Roosevelt once said, ' The credit doesn't go to the critic who says 'it would have been better if this had been done like this... it goes to the man who is actually in the arena'."
"The real problem with these radius rods was that they worked so good few people ever changed them. To my knowledge none of them ever failed. Like my dad used to tell me,'If it works, don't 'fix' it!' As far as the taper goes, I had a tool special made in a machine shop that I used to taper the holes on the rods I built. In the book I mentioned you could use a rat tail file to taper yours."
"I made further refinements on the radius rods after the book was printed. I welded 9/16" nuts on the back side of the brackets to give the tie rod ends a more substantial anchor, so that in time they could not wallow out the hole and wobble. And, as noted, I had a special tool for the taper. I also started cutting off 6" of the tie rod and welding this to the water pipe so that the end could be adjusted. This also allowed me to slide in an 8" length of cement rebar into the tie rod section, weld it, and then slide it into the water pipe for a stronger union when it was all welded. I use the rebar because it is easy to grind off the ridges until it will slide in easily for a snug fit. This also allowed you to grind the weld flush without weakening the unit so it didn't look like a snake swallowing a rat. The thing I didn't like about these radius rods was the top bar on the front was so visible, and it was ugly! Most of my customers replaced the tie rod ends on this bar with heim ends for appearance sake. They were a simple screw in swap. I guess 4 Heim ends were better than 16 though."
Also, HAMBer "Old Crow" offered the following great tip: "As far as the taper goes, the true 'lo buck' trick is:
- Before welding the tabs on the frame, heat the area around the hole red hot with an oxy torch.
- Set the piece over an anvil hole.
- I keep an old tie rod end, still connected to a tie rod (makes a great handle) to stick in the hole and give it a couple heafty whacks with a hammer. This forms the correct taper in the tab (without the expense of a special tool or tapered reamer)."
")
