


You are using an out of date browser. It may not display this or other websites correctly.
You should upgrade or use an alternative browser.
You should upgrade or use an alternative browser.
Mykk's BMW V8 T-bucket, version 1.5:
- Thread starter Mykk
- Start date


Mykk
Active Member
Shifting gears for a different project today.
With the awkward shape of the tank under the cowl I knew I wouldn't be able to fit mechanical gauges in the dash. So I made myself digital gauges on a touch screen.
Using a Raspberry Pi 5, full version of the tuning software and a 7" DSI screen. The software autoruns at startup, then conditionally it will auto run the self tuning side of the software making perpetual adjustments to the running VE table in a constant learning mode similar to like Holley EFI. Finally the boot SD card and the OS are Write Protected for a Read Only mode as to not currupt the boot data when power get's disconnected.
The dash and gauges are my own making and I can change them up as desired.


Once the body get's painted in semi-gloss black the screen should blend in and just about disappear when turned off.

Don't mind the zero oil pressure on the digital gauge. The sensor isn't hooked into the EFI controller on Bucket V1 but will be on V1.5
With the awkward shape of the tank under the cowl I knew I wouldn't be able to fit mechanical gauges in the dash. So I made myself digital gauges on a touch screen.
Using a Raspberry Pi 5, full version of the tuning software and a 7" DSI screen. The software autoruns at startup, then conditionally it will auto run the self tuning side of the software making perpetual adjustments to the running VE table in a constant learning mode similar to like Holley EFI. Finally the boot SD card and the OS are Write Protected for a Read Only mode as to not currupt the boot data when power get's disconnected.
The dash and gauges are my own making and I can change them up as desired.
Once the body get's painted in semi-gloss black the screen should blend in and just about disappear when turned off.
Don't mind the zero oil pressure on the digital gauge. The sensor isn't hooked into the EFI controller on Bucket V1 but will be on V1.5
Last edited:


Mykk
Active Member
My spare time is getting more and more limited but I am determined to get at least one thing a day started or mounted on the build.
Getting the main transmission mount crossmember in place and tacked in place:


I've given myself holes in the bottom of the frame to rosette weld. I've even got enough DOM tubing left to make two 11" legs of the K member.
Getting the main transmission mount crossmember in place and tacked in place:
I've given myself holes in the bottom of the frame to rosette weld. I've even got enough DOM tubing left to make two 11" legs of the K member.


Mykk
Active Member
Not on the mock up/fab steps but absolutely I will come time of final assemblyHey Mykk, do you use some sort of isolation bushings/washers when mounting your fuel, pump? Mine is kinda noisy mounted directly to the frame.


Mykk
Active Member
Finding a mounting location, and welding on the mount tabs for the fuse block. Making a switch panel for the Ignition, headlights and the toggle to use for turn signals.
Mounting the switches backwards under the center of the seat was an idea I wanted to test out. In mock up it seems like it'll work pretty good.


Mounting the switches backwards under the center of the seat was an idea I wanted to test out. In mock up it seems like it'll work pretty good.
Mykk
Active Member
Today's Project: This was one of the weird idea's I wanted to try even before I started the build. Along with hanging the differential off a rear perch, a transverse leaf spring on a jaguar IRS.
Made the leaf spring shackles, drilled out the 1/4" leaf spring mount plate bolted to the control arm brackets. I have a loose plan how to support the bottom leaf spring mount plate from the upper differential perch and take the load off of the control arm bracket bolts in the differential.


We'll see how it goes on this idea.
Made the leaf spring shackles, drilled out the 1/4" leaf spring mount plate bolted to the control arm brackets. I have a loose plan how to support the bottom leaf spring mount plate from the upper differential perch and take the load off of the control arm bracket bolts in the differential.
We'll see how it goes on this idea.
Last edited:
You have never changed the odyssey battery in 20 years? I have one in my t roadster 8 years and was wondering the life span? Thanks RonsonWe have a Odyssey battery in the 32 in the trunk. It is small as a lawn mower battery. So far it has never failed to start the car in almost 20 years.
Amazon Odyssey
choppedtop
Well-Known Member
I use a 925 Odyssey in my red car. Seems if they ever completely go down, as in switch left on, they may or may not recover.
Mykk
Active Member
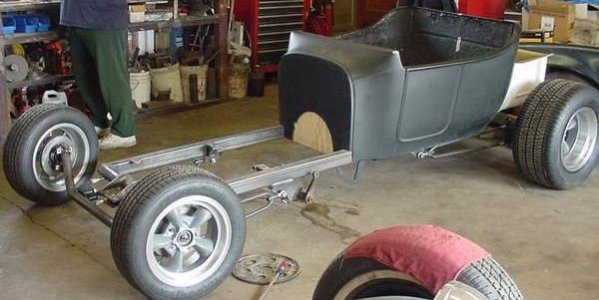
I picked up a cheapy chinesium metal '32 grill shell will full intention of choping it up. When it arrived it had some funky weirdness in the stamping of the piece that was just too ugly to use. I've got another one coming to try, fingers crossed it's closer to the '32 grill shells I've used in the past with nice and smooth lines.
But I figured it could make for some nice practice to cut it up and weld it back together and mock up exactly how much of a sectioned & shortened grill would work for this build.


Removing 9.5" from the middle, it's a bit stubby. I do like where the chin of the grill lines up behind the frame.

I'm thinking on the real grill shell sectioning 8" might look better. Although that stubby grill is growing on me and it would look better with a grill insert. With the radiator and grill moved back on the frame to it's proportionate location and distance away from the cowl I see I can remove more from the frame then I anticipated. 11" removed will put the front frame crossmemeber about 1/2" ahead of the grill shell.


With the frame shortened 11" it will have roughly a 106" wheelbase, 2" shorter then Bucket #1
But I figured it could make for some nice practice to cut it up and weld it back together and mock up exactly how much of a sectioned & shortened grill would work for this build.
Removing 9.5" from the middle, it's a bit stubby. I do like where the chin of the grill lines up behind the frame.
I'm thinking on the real grill shell sectioning 8" might look better. Although that stubby grill is growing on me and it would look better with a grill insert. With the radiator and grill moved back on the frame to it's proportionate location and distance away from the cowl I see I can remove more from the frame then I anticipated. 11" removed will put the front frame crossmemeber about 1/2" ahead of the grill shell.
With the frame shortened 11" it will have roughly a 106" wheelbase, 2" shorter then Bucket #1
Mykk
Active Member
Added a mount provision to the steering gear and it's corresponding mount tab to the DOM tubing. Three mounting locations at different angles will hopefully keep that steering gear in place.
I welded a tab that was cut off from the steering gear to a different location on the gear after grinding a deep bevel, with my MIG the cast melted away into the weld easier then I thought it would so hopefully it's got the penetration to stay there permanently.


The next step is to shorten the frame. I'm thinking of permanently burning in all of my tack welded pieces before cutting it apart and bending it in unnatural ways to get the taper of the frame to line up again.
I welded a tab that was cut off from the steering gear to a different location on the gear after grinding a deep bevel, with my MIG the cast melted away into the weld easier then I thought it would so hopefully it's got the penetration to stay there permanently.
The next step is to shorten the frame. I'm thinking of permanently burning in all of my tack welded pieces before cutting it apart and bending it in unnatural ways to get the taper of the frame to line up again.
Similar threads
- Replies
- 12
- Views
- 2K
