Welcome to Our Community

Wanting to join the T-Bucket Forums discussions? Then sign up for a free forum account, today!

Sign Up

Ron Pope Motorsports                California Custom Roadsters               


Dismiss Notice
Thank you for visiting the T-Bucket Forums! This site was created in 2006, to provide enthusiasts with a place to discuss T-Buckets. Over the years, there have been many imitators, but this is the T-Bucket resource you have been looking to find. We encourage you to register a FREE account and join in on the discussions.

Track Bucket build

Discussion in 'Project Plans & Updates' started by thebearded1, Oct 15, 2022.

  1. thebearded1

    thebearded1
    Expand Collapse
    Member

    Joined:
    May 1, 2019
    Messages:
    103
    Likes Received:
    94
    Gender:
    Male
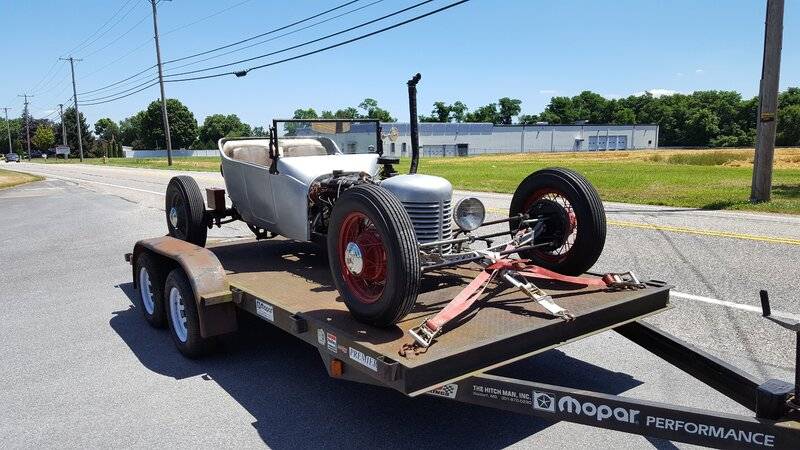
    I've been on this site for a while reading past threads and have gotten a lot of helpful information of it so I figured I would start a build thread. When I purchased the car the previous owner was going in more of a rat rod tractor themed car but i was able to see past that and luckily got it for a low price. My plan has been to make it similar to dirt track roadsters from the 40s and 50s.
    [​IMG]
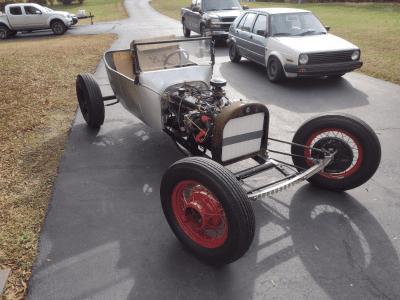
    Yup thats the exhaust with a rain flap that conveniently was about face height haha. The suspension needed to be redone as he had quarter ellipticals up front and a cateliver style in rear but he mounted all the springs arched up like a smile to get the car lower which resulted in the weight of the car working with the springs rather than against. The car now has quarter elliptical springs front and rear and the mounts have a bolt to adjust ride height slightly but only plan to raise the front when running on dirt tracks. I also re wired the car completely as i didn't trust what was there and the P.O. used switches that weren't not meant for automotive use.

    Another issue was the P.O. used a mishimoto radiator that was meant for a honda civic in order to fit it into the Case tractor grill and it was not enough to cool the slant six. After looking up many threads on here and slantsix dot org on how to clean and flush the block I did several flushes, soaks, scrapping and vacuuming from the freeze plugs and got the block running clean but will still be running a piece of screen. Then I had a friend and I modified an aluminum radiator intended for a 65 mustang to fit into a 1917 Dodge Brothers grill shell I picked up at Hershey.
    [​IMG]
    [​IMG]
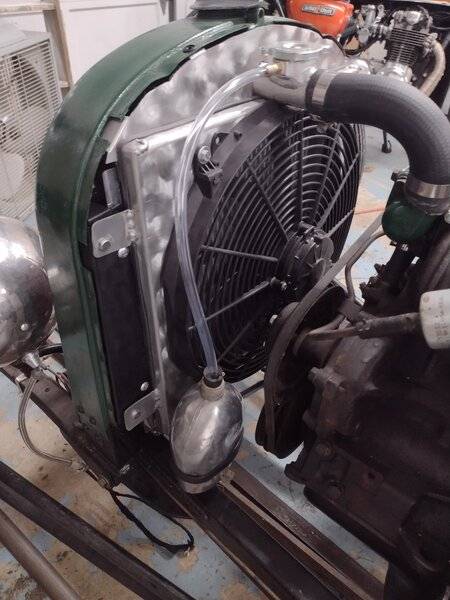
    It turned out really well and made the car look a lot better and seems to be cooling it a lot better as well.
     
    James Louis and Spanky like this.
  2. thebearded1

    thebearded1
    Expand Collapse
    Member

    Joined:
    May 1, 2019
    Messages:
    103
    Likes Received:
    94
    Gender:
    Male
    I built the seat frame out of some wood then upholstered it in waterproof canvas. I used 4" foam and cut holes in the seat base with added webbing to help make it better for longer drives. Still trying to figure out how I will do the seat back and side panels. I thought about aluminum for the sides but was worried it may get too hot since there is no roof but it probably wouldn't be too bad since I would plan to leave it raw. My other option I may go with is to use some waterproof canvas that matches the tan in the seat.
    [​IMG]
    The seat hinges forward for storage and electrical access. Still need to make a hinging cover for the master cylinder to replace the temporary brown wood scrap. I built the battery box out of a street sign and pop riveted the sides together this hangs the battery under the car to help save space. I didn't have a hinge on hand so I made one out of more street sign material and used the old VA license plate for the lid. Under the black cover to the right is a large continuous relay that powers a separate fuse panel so i didn't have to run all the power through the key switch. The key switch supplies a small amount of power to turn the relay on which sends power to most everything else. If I have room I'm going to mount a small fire extinguisher on the front panel under the drivers seat.

    The dash is just a sheet of plywood with a metal lip I added to the top. Pretty basic but it does have a GPS speedo and the trim around it is fuel cap trim from a Hudson I found in the woods. Going to make a panel to cover the fuse panel access.
     
    James Louis and Spanky like this.
  3. thebearded1

    thebearded1
    Expand Collapse
    Member

    Joined:
    May 1, 2019
    Messages:
    103
    Likes Received:
    94
    Gender:
    Male
    [​IMG]
    The floor is a thin piece of plywood with the pallet wood screwed to it from underneath. It is easily removable in case i need to access around the trans. Still need to make a cover for the trans tunnel and a boot for the genie shifter. I have an old Hurst handle that i'm going to use for the shifter. I may make a shifter knob out of a billard ball since the #6 is hunter green and the car is a six cylinder. I also have a wood knob i made on my wood lathe.
    [​IMG]
     
    rbsWELDER, James Louis and Spanky like this.
  4. thebearded1

    thebearded1
    Expand Collapse
    Member

    Joined:
    May 1, 2019
    Messages:
    103
    Likes Received:
    94
    Gender:
    Male
    [​IMG]
    Engine wise it's a 1971 225 completely stock. Currently running the Holley 1920 but i do have a Holley 2280 to rebuild and a 2 barrel intake. Other than that I will likely keep the motor stock. I do have a spare head that i may do some minor gasket match porting and maybe take it to get milled slightly to up the CR. I'm not wild on where the PO mounted the steering box so I'd like to move it closer to the firewall to make more room for the exhaust. I have a few ideas for the exhaust that my friend is willing to help me weld up. A 6 into 1 header similar to this Maserati 250F and then run a single 2.5/3" pipe straight back to the rear of the car. The Maserati 250F is probably one of my favorite sounding straight sixes too. There are some good videos on youtube that I play many times through the speakers in the garage while working on the car.
    [​IMG]
    [​IMG]

    or end it shorter like this one below
    [​IMG]
    This is one of my favorite vintage photos has been a big inspiration for the direction of this build.

    The other option would be to do 2 3 into 1 headers or a set of dutra duals (cast 3 into 1 headers) if i could find a used set and then run 2 smaller 2" pipes either down the side of the car like I discussed above or run the exhaust lower like on this Talbot Lago T26C
    [​IMG]
     
    James Louis, Spanky and Indycars like this.
  5. thebearded1

    thebearded1
    Expand Collapse
    Member

    Joined:
    May 1, 2019
    Messages:
    103
    Likes Received:
    94
    Gender:
    Male
    [​IMG]
    I wanted to run the wire wheels in the back but the rear is a Dana 35 with 5 on 4.5 bolt pattern. The previous owner used adapters and wire wheel supports to run them but the wheels stuck out too far for me. I purchased a set of Willys 18" wire wheels which are 5 on 4.5 but the back plate on the hubs wouldn't clear the brake drums, about an inch shy. I'm looking out for a pair of early Thunderbird wire wheels as they are 5 on 4.5, unfortunately most of them are chrome so i'd either attempt to paint them or have them powder coated black. If i can't find a pair i will see if i can find someone weld new centers into the pair of wheels that came on the back of the car. I may also look into drilling the axles I have for the 5 on 5.5 bolt pattern if there is enough metal there. I

    I would like to find another Model A 19" wheel to go with another one i have to use as narrow front runners. Soon I will paint the front wire wheels black so they match the back steelies somewhat. I did find a set of 16x4 Ford steel wheels for the front. I will probably outfit one set of wheels with some dirt tires for racing events.
    [​IMG]

    The back half of the car is pretty simple like most lakester modifieds. I may add a small bumper and hidden hitch for a small hot rod trailer my friend gave to me so I can haul some camping gear for some fun trips. I did find some soft motorcycle paniers to strap onto the tank for some extra storage.
    [​IMG]
     
  6. thebearded1

    thebearded1
    Expand Collapse
    Member

    Joined:
    May 1, 2019
    Messages:
    103
    Likes Received:
    94
    Gender:
    Male
    I didn't like the silver paint job and needed to paint the grill shell I purchased too so I had to decide on a new color. I wanted to paint the car myself and wanted to roll/brush it so i didn't paint the entire garage and to go with the old race car theme. I went with Hunter Green rustoleum and thinned the paint a little with mineral spirits. I did about 4 coats and it turned out better than i expected. I was planning on wet sanding with 3000 grit and then giving it a polish to take out the orange peel but I'm pretty happy with the results and don't want to risk over sanding and having to repaint right now. It's going to be getting dirty at the track anyway.
    [​IMG]
    I'd like to add a number to the car and maybe some small logos of my favorite things as "sponsors" on the lower cowl.

    Grill and radiator I lugged several miles back to the car. It was pretty heavy but was only $200. I've seen just the emblem on ebay for $80-250! The brass radiator itself was not usable and was going to cost $900 to have re-cored so I went with the option of modifying the aluminum mustang radiator. I ended up selling the radiator to a guy in TN that was restoring an original Dodge Brothers car and recouped a good chunk of what I paid for the combo.
    [​IMG]
     
    rbsWELDER, James Louis and Spanky like this.
  7. thebearded1

    thebearded1
    Expand Collapse
    Member

    Joined:
    May 1, 2019
    Messages:
    103
    Likes Received:
    94
    Gender:
    Male
    Overall it's been a great learning experience and am proud to have done all the work myself except for the welding which my buddy Drew has done graciously for whiskey and a welding shop gift certificate. I'd like to get a welder soon and learn though. It may not be perfect but hell I love it! I plan to take it to some vintage racing events in southern PA next year. The events include circle dirt track, paved drag racing, gravel drag racing at Allentown Fairgrounds, street style gran prix at Coatsville and what ever else I find out about.

    The current to do list get it on the road is as follows:
    *Add headlights. They will bolt on here and will be wired with weather pack connectors so I can remove them when racing. When on the dirt tracks I will make a frame that bolts into the headlight locations for a screen to protect the radiator. Right now I covered the radiator with a Nomex honeycomb radiator guard which is used on a lot of dirt cars.
    [​IMG]

    *add Ford hydraulic lever shocks to the rear. Don't worry the yellow clamps are just temporary, I will paint them black before I'm done.
    [​IMG]
    *add lap belts. I'm going to sandwich the lower rear plywood in the body with 2 33" long x 2"wide pieces of 1/4 steel to make anchor points for the belts.

    *finish the shifter handle


    Future plans include
    adding a small rollbar
    add five point seat belt that attaches to rollbar
    making a tonneau cover for the passenger side of the cockpit
    rear bumper and hidden hitch
    hook up the parking brake if i can find room in the cockpit
    maybe make a soft top if the windshield to rollbar line clears my head.
     
    rbsWELDER and James Louis like this.
  8. thebearded1

    thebearded1
    Expand Collapse
    Member

    Joined:
    May 1, 2019
    Messages:
    103
    Likes Received:
    94
    Gender:
    Male
    Doing boring stuff like wiring the headlights today and trying to check over little things but figured I would share my "gas gauge" I made. The fuel tank does not have a hole for a sender so that wasn't an option besides welding a place for it. That would also mean more wires and it would take away from the old race car look I'm going for. I had an old tractor gas cap I found in a barn so I drilled it out to fit a brass compression fitting. I had to machine (files and vice haha) the compression fitting a little to get.it to fit perfectly. I also smoothed out the inside of the compression fitting. Then I used a piece of aluminum tubing and attached a fuel sender to the end with holes and copper wire. This way the aluminum tube will slide up and down to show me roughly how full or empty the tank is. I topped off the aluminum tube with a piece of heat shrink to keep any junk from going into the hole. I had to put the float at the funny angle so I could fit everything into the gas filler neck. I got the idea from a plunger style cap used on a tractor. The cork float was on a lever at the bottom. That unit cost $125 before covid so I wasn't going that route haha. I will probably add some marks to it once I fill the tank and get to 3/4 1/2 and 1/4. It binds a little bit if the float and aluminum rod aren't perfectly straight up and down but this car will be bumpy enough to realign it as needed haha. Sorry I can't find the photos I took when I was making it.
    [​IMG]
    [​IMG]
     
    rbsWELDER and James Louis like this.
  9. thebearded1

    thebearded1
    Expand Collapse
    Member

    Joined:
    May 1, 2019
    Messages:
    103
    Likes Received:
    94
    Gender:
    Male
    I'm currently making a set of friction shocks for the front end now.
    [​IMG]
    I will weld a tab onto the leaf spring shackle and will use a male and female threaded heim joints to make shock links. I messaged Exjunk about his setup using the heim joints but i see he hasn't been on this site in a while.
     
    rbsWELDER, James Louis and Spanky like this.
  10. LongJohn

    LongJohn
    Expand Collapse
    Member

    Joined:
    May 10, 2022
    Messages:
    64
    Likes Received:
    40
    Gender:
    Male
  11. thebearded1

    thebearded1
    Expand Collapse
    Member

    Joined:
    May 1, 2019
    Messages:
    103
    Likes Received:
    94
    Gender:
    Male
    Thanks it's been a slow project since I don't have a welder at my garage and life getting in the way. That's a lot of money for a dress up piece! Depending how these axles hold up I may have to change the whole rear end. I plan on taking the car to vintage drag race and circle track events as well as driving on the street
     
  12. thebearded1

    thebearded1
    Expand Collapse
    Member

    Joined:
    May 1, 2019
    Messages:
    103
    Likes Received:
    94
    Gender:
    Male
    And since my rear is so it in the open it would be pretty obvious it's a cover haha
     
  13. thebearded1

    thebearded1
    Expand Collapse
    Member

    Joined:
    May 1, 2019
    Messages:
    103
    Likes Received:
    94
    Gender:
    Male
    21702 Corvair Steering Box Bracket, Standard Body
    I'm thinking about using one of these brackets to remount the steering box but not sure if it will allow the steering box to clear my starter. I've been wanting to redo the way the steering box is mounted and I will probably order a new reversed corvair box from Ron Pope Motorsports since mine has a lot of slop in it and it's already been adjusted as much as it can.
     
  14. Bill Pedersen

    Bill Pedersen
    Expand Collapse
    Member

    Joined:
    Nov 13, 2007
    Messages:
    167
    Likes Received:
    36
    Gender:
    Male
    Welcome to the site.
    I had a chance to meet ExJunk a couple of times and had a chance to go for a ride with him a number of years ago. His car was exceptionally nice and well thought out. The friction shocks worked great and his car rode better than any T-bucket I’ve ridden in. Here are a couple of pictures of his friction shocks. He also had a build thread on another site where he went by KOALA T. Media added by KOALA T
    ExJunk--86.jpg ExJunk--87.jpg
     
    rbsWELDER, James Louis and Spanky like this.
  15. thebearded1

    thebearded1
    Expand Collapse
    Member

    Joined:
    May 1, 2019
    Messages:
    103
    Likes Received:
    94
    Gender:
    Male
    Thanks for the photos. I hadn't seen the one from the side of the car and can now see he does have some space next to the heim joints to allow them to pivot more. Once I get my shocks built and hooked up I will jack up one wheel to make sure the heim isn't binding
     
    lincolnuT and Spanky like this.
  16. thebearded1

    thebearded1
    Expand Collapse
    Member

    Joined:
    May 1, 2019
    Messages:
    103
    Likes Received:
    94
    Gender:
    Male
    I can't get the photos to load from my phone so I will add them later when I have access to my computer.

    I made some progress on the friction shocks today. The part that attaches to the frame is made of 2x3 unequal angle iron. It will be bolted to the frame with the headlights. I still need to trim down this mount that is sticking beyond the frame. The material in-between the shock arms are discs that I cut out of a sheet of UHMW plastic. This material had less static friction so it will result in a smoother operation. The slant six valve spring keeps pressure on the discs even if they start to wear down. This will still require regular checks with a torque wrench. Thanks to @Charrlie_S from another site for sending me the valve spring retainers. They work perfect as a washer for the nut to rest on and keep the spring centered. My buddy will weld a tab onto the leaf spring shackle and the heim joint shock links will attach there. I will probably add some speed holes to the shock arms later on.
     
  17. thebearded1

    thebearded1
    Expand Collapse
    Member

    Joined:
    May 1, 2019
    Messages:
    103
    Likes Received:
    94
    Gender:
    Male
  18. thebearded1

    thebearded1
    Expand Collapse
    Member

    Joined:
    May 1, 2019
    Messages:
    103
    Likes Received:
    94
    Gender:
    Male
    Discovered some cracks in the body of my Holley 1920 1 barrel carb and they were seeping fuel
    [​IMG]

    With the carb being perched over the exhaust manifold I decided to rebuild a Holley 2280 2 barrel I had. Now i just need to paint the intake so I can try it out on the car

    [​IMG]
    [​IMG]
     
    choppedtop and Spanky like this.
  19. Indycars

    Indycars
    Expand Collapse
    Well-Known Member

    Joined:
    Mar 11, 2010
    Messages:
    2,534
    Likes Received:
    1,139
    Gender:
    Male
    Occupation:
    Information Technology (IT) 15yrs, Then Retired
    Love the nice clear photos !
     
    thebearded1 likes this.
  20. thebearded1

    thebearded1
    Expand Collapse
    Member

    Joined:
    May 1, 2019
    Messages:
    103
    Likes Received:
    94
    Gender:
    Male
    Not sure why the photos from my last 2 posts disappeared? They are showing up as a photo icon with a red x for me. I pasted them from my computer into the thread.
     

Share This Page


Advertise with Us! Advertise with Us! Advertise with Us!

SSL Certificate