

You are using an out of date browser. It may not display this or other websites correctly.
You should upgrade or use an alternative browser.
You should upgrade or use an alternative browser.
AmericanGraffiti's Project Diary
- Thread starter AmericanGraffiti
- Start date
No, in my case the lower half of the back of the body has been cut out, and frame kick-up will be inside the body. Here is a pic of my body on the previous owners' frame...
View attachment 10816
I'm taking it even farther back, so that the rear edge of the body will be directly over the axle...
View attachment 10817
Wow Bill, you have an awesome flathead! It'd be a shame to cover that engine with a hood
") Anyway you have a great looking build. Have you started your own build thread? I am sure we would all enjoy watching your progress (HINT HINT!)
Anyway you have a great looking build. Have you started your own build thread? I am sure we would all enjoy watching your progress (HINT HINT!)Wow Bill, you have an awesome flathead! It'd be a shame to cover that engine with a hood
Unfortunately that's not my flathead. That pic is from the original owner of the body I have now. My engine is on the opposite end of the cool spectrum from flathead. It will be a de-electronicsed GM 60 degree V6, made to look kind of old school...high rise manifold, dual point distributor, and either lake style or zoomie headers. The small engine is why I'm trying to build this thing as compact and light as practical. The engine and transmission came from 1989 Camaro RS that weighed over 3000 lbs. If I can bring this thing in at around 1500 lbs, it should be a fun little cruiser.
You know it's winter when you are glad it's 40 degrees outside, which means it's 50 degrees in the shop and T Bucket time! I had a good day today, working on the interior wood for the firewall and floor:


I learned on this forum that Bondo makes a great wood glue, and this is exactly right! I glued new 5/8" plywood on top of the old worn out 1/2" plywood floor and it is now rock solid. While waiting for the Bondo and fiberglass to dry, I took some old aluminum I had from building my dirt track modified body and bent up a driveshaft and transmission tunnel. I'll fiberglass this in also and fill the gaps:

When it was all dry, I had an eager passenger ready to cruise!

I learned on this forum that Bondo makes a great wood glue, and this is exactly right! I glued new 5/8" plywood on top of the old worn out 1/2" plywood floor and it is now rock solid. While waiting for the Bondo and fiberglass to dry, I took some old aluminum I had from building my dirt track modified body and bent up a driveshaft and transmission tunnel. I'll fiberglass this in also and fill the gaps:
When it was all dry, I had an eager passenger ready to cruise!
RatchetRob
Banned
Looks like you did make some good progress! I miss my dirt track racing days but all the experience racing has helped me with my project. Looks like your little buddy is rarin to go for a ride!
EX JUNK
Moderator
"American Graffiti", have you considered making that trans cover rounded rather than so squared off? By rounding it you'll give yourself more foot room for the throttle. If you want I can post pictures on how to do it and you can even make it removable if you wish to service the shifter and parking brake for example if you are using a Lokar type unit.
Jim
Jim
"American Graffiti", have you considered making that trans cover rounded rather than so squared off? By rounding it you'll give yourself more foot room for the throttle. If you want I can post pictures on how to do it and you can even make it removable if you wish to service the shifter and parking brake for example if you are using a Lokar type unit.
Jim
Hi Jim! Always open to suggestions and advice, especially from someone who has built such a beautiful car as yours. Yes please share what you know. I do need all the foot room I can get so I am absolutely open to your ideas!! THANKS!
EX JUNK
Moderator
Hi Jim! Always open to suggestions and advice, especially from someone who has built such a beautiful car as yours. Yes please share what you know. I do need all the foot room I can get so I am absolutely open to your ideas!! THANKS!
Here are some shots that might help you. The first thing that I did was to make a skeletal framework out of "plumbers strap". I left a minimal clearance between the strapping and the transmission and shaped it to allow the most foot room.

I then covered the skeletal framework with Gaff Tape or you could also use Duct Tape.

After masking all the surrounding area we proceeded to lay up the fiberglass.

After the glass had cure we unmasked everything and the "rough" cover was exposed.

Here you can see the flush fit trans cover.

Here is the finished product in primer/sealer.

By simply removing some screws along the perimeter the cover lifts off to service the shifter and parking brake. I have a shot of it while I was doing some work on the parking brake but am unable to find it at this time.
I might also add that the bottom of the floor is finished as smoothly as the top side.

I had to do this because my engine and trans sit higher in the frame than the usual buckets because I wanted the car to be low. So, I hope that this will help you.
Jim
P.S. I must add that the skeletal framework does not stay with the fiberglass piece.
Last edited:
fletcherson
Well-Known Member
Good progress! I am not sure how well fiberglass will bond to aluminum though, from past failed experience. Looks good, I need your motivation... I have a shop with central air and heat (don't hate me) and still can't muster any progress. It sucks getting old! Lol. Your co pilot is likely planning his t bucket so you can keep busy when yours is done!You know it's winter when you are glad it's 40 degrees outside, which means it's 50 degrees in the shop and T Bucket time! I had a good day today, working on the interior wood for the firewall and floor:
View attachment 10827
View attachment 10828
I learned on this forum that Bondo makes a great wood glue, and this is exactly right! I glued new 5/8" plywood on top of the old worn out 1/2" plywood floor and it is now rock solid. While waiting for the Bondo and fiberglass to dry, I took some old aluminum I had from building my dirt track modified body and bent up a driveshaft and transmission tunnel. I'll fiberglass this in also and fill the gaps:
View attachment 10829
When it was all dry, I had an eager passenger ready to cruise!
View attachment 10830
baddawgcustoms
Active Member
Jim after taping it all up, is that just aluminum foil you used to cover it before laying on the glass?Here are some shots that might help you. The first thing that I did was to make a skeletal framework out of "plumbers strap". I left a minimal clearance between the strapping and the transmission and shaped it to allow the most foot room.
I then covered the skeletal framework with Gaff Tape or you could also use Duct Tape.
After masking all the surrounding area we proceeded to lay up the fiberglass.
After the glass had cure we unmasked everything and the "rough" cover was exposed.
Here you can see the flush fit trans cover.
Here is the finished product in primer/sealer.
By simply removing some screws along the perimeter the cover lifts off to service the shifter and parking brake. I have a shot of it while I was doing some work on the parking brake but am unable to find it at this time.
I might also add that the bottom of the floor is finished as smoothly as the top side.
I had to do this because my engine and trans sit higher in the frame than the usual buckets because I wanted the car to be low. So, I hope that this will help you.
Jim
P.S. I must add that the skeletal framework does not stay with the fiberglass piece.
EX JUNK
Moderator
Jim after taping it all up, is that just aluminum foil you used to cover it before laying on the glass?
No, the glass was laid directly on top of the tape because the glass does not adhere to the tape.
Jim
Wow Jim, That is a really cool idea! I went out and measured last night and determined that I can gain about three inches of right foot space by replicating your ideas. Thanks so much for sharing them with me and I am sure that others enjoyed it also. What a cool forum!
Good progress! I am not sure how well fiberglass will bond to aluminum though, from past failed experience. Looks good, I need your motivation... I have a shop with central air and heat (don't hate me) and still can't muster any progress. It sucks getting old! Lol. Your co pilot is likely planning his t bucket so you can keep busy when yours is done!
Thanks Fletch! I am also wondering about the bond. The aluminum is painted...so not sure. I might have to try a test piece out first. I really like Jim's idea and that could work for the driveshaft tunnel also. I might have to scrap the aluminum pieces altogether.
About motivation, truth is I work many long days as a quality manager in my job...it is a high stress environment where I make the call about whether or not we ship product, and also manage rework plans etc. As such, I find my shop time to be very relaxing, especially when my youngest son comes out to check on my progress. I'll make a buckethead out of that boy yet, I tell you!!
I've left my tranny exposed for now:
Gives lots of foot room. Grind off the bumps and such and who needs a hump? And I mounted the battery in the passenger footwell, so everyone can see my billet holder. And the odd passenger (and my passengers are very odd) can drape their legs over it or hang a gam over the side.
Gives lots of foot room. Grind off the bumps and such and who needs a hump? And I mounted the battery in the passenger footwell, so everyone can see my billet holder. And the odd passenger (and my passengers are very odd
) can drape their legs over it or hang a gam over the side.Very creative Potvin! Totally cool!
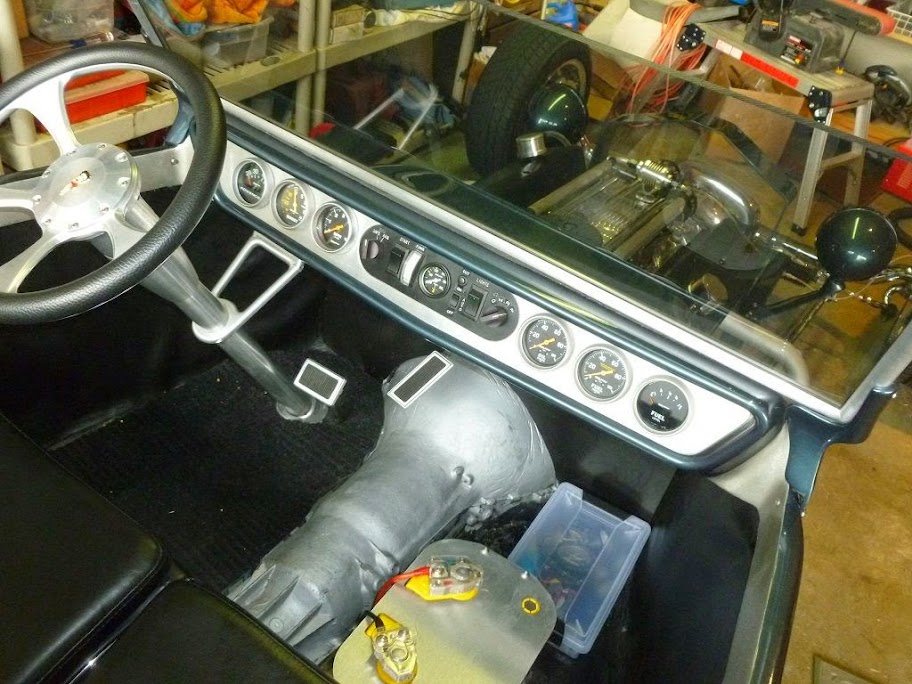
I took Jim's advice and recreated my trans tunnel gaining several inches of right throttle foot room in the process. I did it my own way using some of the old body panel aluminum I had left over from the old dirt track modified we've raced the past few years. While I admit it is ugly for now, it will be covered with carpet so I was going for form rather than appearances:


I also started the pick up bed cover after mounting it to the body:

Finally, I worked on my seat mounts:

I also started the pick up bed cover after mounting it to the body:
Finally, I worked on my seat mounts:
Last edited:
Finally, I worked on my seat mounts:
View attachment 10846
Did you use the original attachment points on the seat frame, or did you have to do something special to be able to fasten those mounts?
Similar threads
- Replies
- 19
- Views
- 556
