Besides loving the ride height of this one, I really like the idea of the chassis able to run and drive with or without the body. I see (sorta) how the body's firewall attaches to the "fixed" firewall on the chassis, but I don't see any pics of how the sides and back of the tub will attach to the frame. I'm really interested in what design, what type of attaching hardware, and what method of sealing you have in mind.


You are using an out of date browser. It may not display this or other websites correctly.
You should upgrade or use an alternative browser.
You should upgrade or use an alternative browser.
Hot Rod Bucket
- Thread starter Jim B
- Start date
Jim B
Active Member
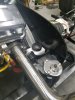
I see (sorta) how the body's firewall attaches to the "fixed" firewall on the chassis,
The steel firewall has holes drilled every few inches all the way around and you can see them in this pic if you look closely. The plan is to drill corresponding holes in the body firewall that match these and secure them all with brass #10 machine bolts. It is probably about 30 of them and will be a pain but it will look cool I think. The bottom of the body will require some fiberglass work. A flange or lip around the bottom of the body that matches the aluminum floor on the chassis will have to be created. Then drill matching holes through the alum floor and the body. The body is pretty thin so it will need reinforcement to make this work. I also have a supporting structure behind the dash that I could use to tie into the windshield posts from inside the body which would probably help stiffen up the front part pretty well. Still working out details, but so far nothing insurmountable.
Attachments
Jim B
Active Member
Speaking of softballs, in my neck of the woods a softball is 16” in circumference or about 5” in diameter as compared to the 3.8” diameter. Whatever that’s worth.
Uh oh, Sally says she can't go no higher. She wants to change softball leagues.

Jim B
Active Member
Finished my drive shaft cover today. This is the only way I know how to cut sheet aluminum. Plasma!
Made a template from poster board and transferred it to 10g alum sheet.


Then I cut it out with the Plasma cutter. I used a clamped down level as a guide for the cutter.

Cut it out. Touched it up lightly with a grinder and installed the two sides.

 Drilled and tapped the button head screw holes. I know you are all as sad as I am that my beautiful gold driveshaft is covered.
 ")
Made a template from poster board and transferred it to 10g alum sheet.
Then I cut it out with the Plasma cutter. I used a clamped down level as a guide for the cutter.
Cut it out. Touched it up lightly with a grinder and installed the two sides.
Drilled and tapped the button head screw holes. I know you are all as sad as I am that my beautiful gold driveshaft is covered. JetMech727
Active Member
I second Indys' comment Jim.
Mike J
Member
Must have been Bob Dean!This town is very limited for hot rod type parts and services. There are no "junk yards" where you can pick over stuff. The parts places require a make and model and if you don't have that, they cannot type it into the computer and get it for you. Welding places here will sell you their scraps for a dollar a pound. No metal sales place here. There are better pickings an hour away but even then it is a crap shoot sometimes. Since I had to drive up there for the windshield anyway, I dropped into the metal place and asked them to cut one 20 foot piece of angle iron in half so I could haul it home. Two bucks for the cut, no problem. Then they tell me they have a cut schedule and it will be two days before they can put in under the chop saw. One cut. Finally they did cut it for me but you could tell it was a HUGE inconvenience.
Jim B
Active Member
Must have been Bob Dean!
WOW, Correct, Bob Dean Metal. Right on the money.
I've been following threads with Z'd frames. I'm planning a build with similar ride height. How did you know that the amount you raised the front rails and kicked up the rear would yield the ground clearance you were looking for? I've searched the suspension forum for conversation about how much spring compression to expect with the weight of the drivetrain, body, etc., without much luck. I wouldn't want to end up having to add stiffer riding springs because I went too low with the frame.
When you get down to 3-5" inches off the ground, the margin for error is small.
When you get down to 3-5" inches off the ground, the margin for error is small.
Jim B
Active Member
How did you know that the amount you raised the front rails and kicked up the rear would yield the ground clearance you were looking for?
I don't think there is an exact science to this. The rear was pretty easy since the only weight it carries is the gas and two passengers. It pretty much stays close enough to where you put it. For the front, we assumed the motor weight would drop the front an additional 1.5 inches. We were pretty close. It probably worked out to be about 1.75 inches. We were prepared to change the perch if we had to though, so we did have "plan B."
Jim B
Active Member

Thanks to the Buckethead that who gave me this method on this forum. Worked great and straightened brake line like a champ. I have the rear brakes done to the MC with proportioning valve in place in case I need it. I have one side front brake plumbed as well. I have to reroute the transmission lines just a bit before running the right side front brake line.
Indycars
Well-Known Member
Have you considered where a trans cooler might go IF you need one? I went back skimmedI have to reroute the transmission lines just a bit before running the right side front brake line.
thru your thread and didn't see anything about the transmission converter stall speed. The
question, do you need a trans cooler will invoke all kinds of different comments. I have a
temp sensor in both the pan and the outlet line going to the cooler.
Just trying to think ahead in case, since you are rerouting the trans lines.

Similar threads
- Replies
- 2
- Views
- 1K
