Ron Pope Motorsports                California Custom Roadsters               

How I scratch built a Modern T

In the 2.3 dual plug ignition system the engine starts on the primary set of plugs then after it is running the PCM fires up the secondary set of plugs, this is supposed to reduce emissions. The primary plugs are on the exhaust side of the engine so this set of plugs are the ones I will use to run the engine. The other set will not be used for now, I will try to devise a way of firing them at a later time after the engine is running.

I welded a bracket to the intake manifold to hold the ignition coil and another one to hold the HEI ignition module.

D62b.JPG
 
I installed the rear fenders, running boards and splash pans. The original T had no tail lights, brake and tail lights are kinda required to drive down the highway safely today so I bolted a set of Model A tail lights to the fenders. They look good there, almost like they were made for it.

I welded a rear bumper up from the Speedway nerf bar kit. I had already welded a length of square tube in the frame. I welded a piece of square steel to the bumper to fit inside the square tube, it fits and bolts together the same way as a Reese trailer hitch. This way I can remove the bumper and replace it with a spare tire mount or even a ball for a trailer hitch. I like lots of versatility.

D63.JPG D64.JPG
I sent the windshield frame to a local glass shop to have the safety glass installed.
 
That rear end looks great and no I am not trying to get fresh...….LOL......I really like the fenders & tail lights....Make it as versatile as possible......

Mike
 
Wiring, the job many builders love to hate is next.

I purchased the 22 circuit wiring kit from Speedway. Nice kit, fuse block, all the wires color coded and labeled every six inches and a complete set of instructions. I also ordered all the switches and lights I thought I would need. The instruments are the five gauge set from Omega Custom. They have a nice antique look to them that I liked. The tach I had to order separately.

Some builders make up the wiring harness on the bench in one piece, install it in the car then hook it to the various lights, instruments etc. If I was a perfect person and never made any mistakes I would do it that way but I am not, so I won’t and I didn’t.

I mounted the fuse panel to the firewall under the dash then ran all the wires through the firewall to the various components and back to the dash gauges and switches.

Some builders like to use the frame for the electrical ground but I do not like to do that, most electrical problems are due to a poor ground connection so I ran a separate ground wire from each unit to a common ground connection at the battery. With the body being fiberglass I was going to have to do this for some of the units anyway.

I ran the wires to each unit, tested it to make sure it worked OK then went on to the next one. It took a lot of time to do this but everything worked as it should when I was done. I then bundled each wire run together and wrapped it with some wire loom. For me at least, wiring and painting are the two hardest jobs when building the T.
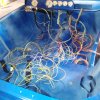
D65.jpg D66.JPG
 
I bolted the roof in place, I am a bit disappointed that the finish coating came out rougher than I would have liked. I will probably do it over again at some point.

The Ranger seats were in good shape so I left them as is, I will probably get them reupholstered at a later date. I did manage to find a set of seat covers that matched the car colors rather closely so I will use them for now.

D69.JPG D70.JPG
 
The carbs with the air cleaner on top ended up being a bit higher than I liked so I was forced to either cut an opening in the hood or building some sort of an offset air cleaner. As much as I hated the idea of cutting a hole in the hood that I went to so much trouble to make, it was the easier of the two choices. It ended up looking nicer than I expected.

D71.JPG
 
Ready to drive.

D72.JPG D73.jpg

The only thing left to do is the floor mats and the body upholstery. I got a good price on getting both done at a local upholstery shop but this virus thing has it shut down. As soon as they get going again I will take it over to them and get it done. Meanwhile I will just have to drive it the way it is.
 
Super nice!
 
Your first post was in October last year. This has got to be record time for build. Not only the Fact that you have skills you are fast.
 
Good job looks very neat i like . Its a different way of looking at the hot rod model T. I love the big hairy V8 and a blower big tire on the back and skinny wires on the front. I have a 4 pot in my T. Well done .
 

     Ron Pope Motorsports                Advertise with Us!     
Back
Top