Keeper, I keep looking at the pics and your ride is looking badass. :thumb:
You are using an out of date browser. It may not display this or other websites correctly.
You should upgrade or use an alternative browser.
You should upgrade or use an alternative browser.
Keepers build
- Thread starter Keeper
- Start date
Keeper
Active Member
Hot Damn I have brakes 
Okay only the rears are plumbed, but they bleed out fine and when I push on the pedal the tires stop
I know I should have done the whole system before adding fluid, but I got a wild hair after I finished the lines, I had to check for leaks you know.
:kiltdance:
Sorry no pics tonight, I will get some tomorrow.
tfeverfred
Well-Known Member
Being excited is allowed, dude. Can't wait for pics.
Keeper
Active Member
Okay the brakes are finished! I had to wait for some king pin shims before I could put the front end back together. So here we go:
I did the rears a couple days ago: (Not the best of pics)

MC: Now I have read that since the fluid bays are the same size it does not matter which you plumb to the front or rear, so I just went with the closest to the rear and front, if it turns out to be incorrect, well I will just rerun the lines

Front "T":

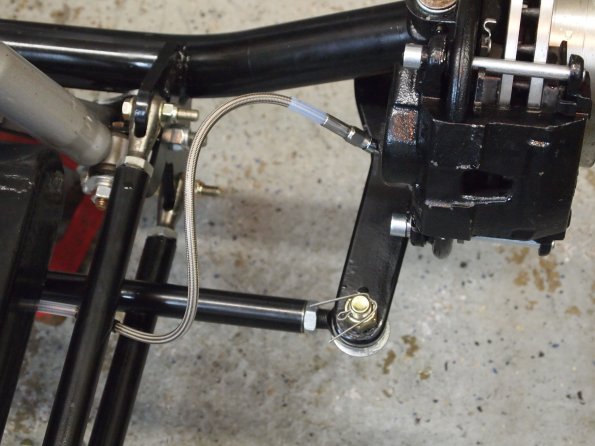
Once the lines were run I started reinstalling the front end, Grade 9 hardware for the brakes:

Brakes lines on the passenger side installed: I used 5/8's grade 8 fine thrread all around on the steering components with nylocks, once I installed them I counted the threads then drilled a hole for a cotter pin, it won't keep the nut from loosening, but it will keep the nut from falling off.


So the front end is all together and lubed up. Brakes are bleed and working, though I think the MC might have an issue. I will post about that in another thread.
I did the rears a couple days ago: (Not the best of pics)

MC: Now I have read that since the fluid bays are the same size it does not matter which you plumb to the front or rear, so I just went with the closest to the rear and front, if it turns out to be incorrect, well I will just rerun the lines

Front "T":

Once the lines were run I started reinstalling the front end, Grade 9 hardware for the brakes:

Brakes lines on the passenger side installed: I used 5/8's grade 8 fine thrread all around on the steering components with nylocks, once I installed them I counted the threads then drilled a hole for a cotter pin, it won't keep the nut from loosening, but it will keep the nut from falling off.


So the front end is all together and lubed up. Brakes are bleed and working, though I think the MC might have an issue. I will post about that in another thread.
tfeverfred
Well-Known Member
Woo yahhh! :kiltdance:
Keeper
Active Member
Finally finished the fuel lines. I do not know how or why I make things so damn complicated!
What should have taken a couple hours tops took me almost 2 days. Between my tubing bender kinking lines and just plain bad luck I must have wasted 6 hours doing and redoing lines.

My patent pending line straightening tool (Vise with rubber jaws)

One side done. I didn't take any pics tonight. I will get some tomorrow.

Next up, wiring
What should have taken a couple hours tops took me almost 2 days. Between my tubing bender kinking lines and just plain bad luck I must have wasted 6 hours doing and redoing lines.

My patent pending line straightening tool

One side done. I didn't take any pics tonight. I will get some tomorrow.

Next up, wiring
Keeper
Active Member
And so it begins:


You can see my rough in for the dash. I needed to figure out where my gauges were going before I started cutting up the harness. I plan on leaving about a foot of extra wire for the gauges in case I change my mind.
The fuse panel is mounted under the dash above the steering column, the outside wires will exit behind the brake pedal, I ordered some weather pack connectors so I can disconnect the body with only a few connections.
Tomorrow should be a fun day of fighting, bitching and cursing the wire gods.
tfeverfred
Well-Known Member
WIRES! Electricity is...........THE DEVIL!
tfeverfred
Well-Known Member
But you conquered that "devil", Fred!
Jim
Yea, I did. But it's still the DEVIL! Ya gotta treat him with respect.
Has anyone mounted their fuse box on the underside of the cowl? In my head it seems like it could work. Of course my head thinks strange things sometimes.
Keeper
Active Member
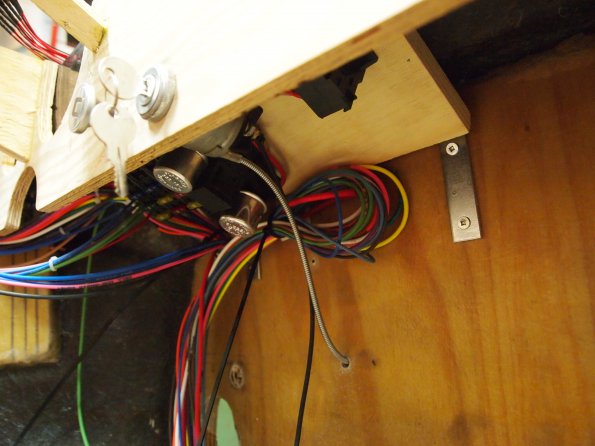
Here are some pics of how it is mounted. I left 1 foot of "slack" in the harness in case I need to move it.


The blank space there on the panel is where I will be mounting a ground bar. I cannot seem to find any around here.....thought they would be a common item. Guess not.

With the column mounted I still have room to get to it.
The dash you see there will be re-created in steel. I needed to see where things were going so I could wire things up.
Its coming along, The hardest part is dealing with the weatherpack connectors. Slowly coming along.


The blank space there on the panel is where I will be mounting a ground bar. I cannot seem to find any around here.....thought they would be a common item. Guess not.

With the column mounted I still have room to get to it.
The dash you see there will be re-created in steel. I needed to see where things were going so I could wire things up.
Its coming along, The hardest part is dealing with the weatherpack connectors. Slowly coming along.
tfeverfred
Well-Known Member
Wow, Keeper. That's where I was talking about. Looks good.
Keeper, I go to Home Depot or Lowes and buy a ground bar for a house electrical panel in the length that I want. Take out the end screws and screw to panel or firewall. Very cheap and easy to use. #10 wire from battery to bar,#10 wire to starter or frame along with ground from battery, all grounds from everything else go to bar. Very easy to trace bad connections, and also put more than one wire in each terminal, as wire is smaller than house wiring. Bruce/T-Test
Keeper
Active Member
IT'S ALIVE!!!!!!!!!!!!!!!!!!!!!!!!!!!!!!!!!!!!!!!!!!!!!!!!!!!!!!!!!!!!!!!! 3.5 years and countless hours later 
So after 4 days of fighting with wiring and cursing Murphy, I got it going with a couple small hiccups.
First start took a bit with the mechanical fuel pump to prime the system. I had the timing close enough that it started once it got fuel.
Then the secondary system started puking fuel through the vent, seems the float was missing the small clip that holds it in place, well it slipped off the set post and well gas was every where. That was a quick fix once I pulled the bowl off.
So it was running for about 5 minutes, spit out some fuel through the primary vent tube and died. So thinking that something similar went wrong with the float I started troubleshooting. Which brings me to the lesson of the day "Before troubleshooting a "bad" carb........check the gas tank", yup I ran it out of gas.....dumb ass move and 15 minutes of tinkering before it dawned on me to check the tank.
My biggest concern was the transmission, since I rebuilt it myself I was sort of expecting the worst, but it shifted into all the gears, and moved 5 feet forward and in reverse. The break in headers did not allow the wheels to turn very far. Well that and I still have to make the gas pedal
So now the engine and cam is broke in, the carb is adjusted and once I make a gas pedal I will take it for a spin.
Only outstanding items are:
Tail lights.
Front turn signals.
Windshield.
I cannot stop grinning
Similar threads
- Replies
- 26
- Views
- 9K


