Welcome to Our Community

Wanting to join the T-Bucket Forums discussions? Then sign up for a free forum account, today!

Sign Up

Ron Pope Motorsports                California Custom Roadsters               


Dismiss Notice
Thank you for visiting the T-Bucket Forums! This site was created in 2006, to provide enthusiasts with a place to discuss T-Buckets. Over the years, there have been many imitators, but this is the T-Bucket resource you have been looking to find. We encourage you to register a FREE account and join in on the discussions.

Help - Caliper Doesn't Fit

Discussion in 'Brakes' started by TriodeLuvr, Apr 27, 2014.

  1. TriodeLuvr

    TriodeLuvr
    Expand Collapse
    Member

    Joined:
    Aug 8, 2013
    Messages:
    414
    Likes Received:
    57
    Gender:
    Male
    Occupation:
    Engineer
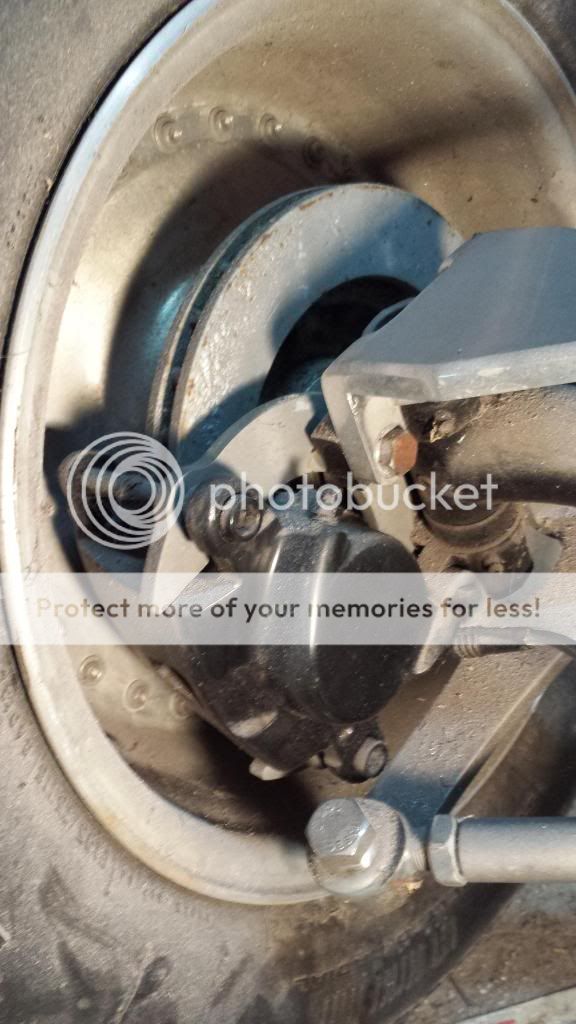
    One of the new (rebuilt) calipers on my bucket doesn't fit. I really need some help from anyone who might be familiar with the standard "Mustang II brakes on '49-'54 Chevy spindles" conversion that Speedway sells.

    I started a thread about the replacement work at a different site, and rather than repeat everything here, it would be a lot easier to post a link to that thread. Mike, if this is a problem regarding site policies, just let me know. Don't want to cause problems.

    This link goes to my last post in that thread:

    http://bucketbuilder.bb3host.com/viewtopic.php?f=5&t=791&p=6299#p6299

    My car is down right now because of this, and I don't know what my choices are for a solution. Any and all help will be appreciated.

    Jack
     
  2. bobs66440

    bobs66440
    Expand Collapse
    Supporting Member
    Supporting Member

    Joined:
    Mar 9, 2013
    Messages:
    1,065
    Likes Received:
    212
    Gender:
    Male
    Occupation:
    Graphic Designer
    Hmmm, That's a tough one. It seems to be an inherent flaw in the design/matching of parts. Maybe use an allen bolt (smaller diameter head) for the steering arm. That may give you the teeny extra you need. Other than that, the only thing I can think of is to space out the caliper, but you say the pad is already off the rotor a bit. Or maybe try to find thinner crush washers. Maybe a combination of all of the above may be necessary. A small tweak here and there may do it.
     
    #2 bobs66440, Apr 28, 2014
    Last edited: Apr 28, 2014
  3. Keeper

    Keeper
    Expand Collapse
    Active Member

    Joined:
    May 4, 2008
    Messages:
    2,190
    Likes Received:
    116
    Gender:
    Male
    Are those calipers on the right side? It looks like the bleeder points down in your pics.

    You can buy thinner crush gaskets as well. I had to go the other way with mine and find thicker ones.
     
  4. Keeper

    Keeper
    Expand Collapse
    Active Member

    Joined:
    May 4, 2008
    Messages:
    2,190
    Likes Received:
    116
    Gender:
    Male
    Also, when you put the pads in the caliper and push it back onto the rotor, how much space does it give you?

    It seems in the pics that the caliper is pushed all the way forward, leaving and inch for the front pad, thats huge.

    Here is the bolt that will help:

    http://www.fastenal.com/web/product...pcode=&filterByStore=&filterByVendingMachine=


    Adding more to this post:

    There are a couple things you can do, though I am not sure how far you want to go.

    The mounting pad for the line, you can grind a bit of that down to gain clearance, I would check to see whats at the end of that hole first to see about bottoming out.

    You can find thinner crush gaskets.

    Do you have any better photos? Like a side shot of the whole setup, something just doesn't seem right.
     
    #4 Keeper, Apr 28, 2014
    Last edited: Apr 28, 2014
  5. Hackerbilt

    Hackerbilt
    Expand Collapse
    Active Member

    Joined:
    Dec 21, 2011
    Messages:
    355
    Likes Received:
    142
    Gender:
    Male
    Occupation:
    Collision Tech
    You really should have started a thread here just to save us all going back and forth...but regardless, my opinion is you're basicly screwed and should get a kit designed for draglink style steering (traditional).
    It looks like whoever put this together already used a washer to space the upper bolt mount area away from the steering arm/bolt.
    (which is likely why your pads are not quite on the rotor as far as they should be)

    p5975808.jpg

    Also...that steering arm looks like its been ground around the hole for additional clearance, far beyond a safe limit. My opinion is it should be replaced...especially considering how inexpensive they are.

    p377624117.jpg

    I truly believe you need either a new brake setup or a new style of steering.
    In fact...Speedway even says in the description for this brake setup that it WON'T work with the traditional style flat steering arm.
    NOT what you want to hear I'm sure...but thats what it looks like to me! :(
     
  6. railroad

    railroad
    Expand Collapse
    Supporting Member
    Supporting Member

    Joined:
    Apr 8, 2009
    Messages:
    1,027
    Likes Received:
    109
    Gender:
    Male
    Occupation:
    retired
    Grind the steering arm down to clear the bolt. There is plenty of meat there for strength. Touch up the paint and enjoy.
     
  7. Hackerbilt

    Hackerbilt
    Expand Collapse
    Active Member

    Joined:
    Dec 21, 2011
    Messages:
    355
    Likes Received:
    142
    Gender:
    Male
    Occupation:
    Collision Tech
    Seriously!?!? Did you even look at the picture of his steering arm!?!?
    This is what it SHOULD look like.
    91632019_L_170732ec.jpg Oh yeah...he has LOADS of metal left to grind on! :rolleyes:
     
  8. bobs66440

    bobs66440
    Expand Collapse
    Supporting Member
    Supporting Member

    Joined:
    Mar 9, 2013
    Messages:
    1,065
    Likes Received:
    212
    Gender:
    Male
    Occupation:
    Graphic Designer
    Oh crap! I missed that. Yes, I agree. Too much has been taken off already. Time for a redesign...
     
  9. railroad

    railroad
    Expand Collapse
    Supporting Member
    Supporting Member

    Joined:
    Apr 8, 2009
    Messages:
    1,027
    Likes Received:
    109
    Gender:
    Male
    Occupation:
    retired
    He has already ground enough at the center of banjo bolt, just take it a little higher up and in addition mill down both sides of the banjo fitting. Might need to crush the copper washer on the bottom side, but it just looks like hot rodding to me.
     
  10. TriodeLuvr

    TriodeLuvr
    Expand Collapse
    Member

    Joined:
    Aug 8, 2013
    Messages:
    414
    Likes Received:
    57
    Gender:
    Male
    Occupation:
    Engineer
    Thanks to everyone for the comments and suggestions. In searching for the best solution to this, I'm trying to first understand how it should have been done. One thing that's confusing me is the discrepancy in bolt hole sizes. What I mean is that the Speedway Chevy steering arm (like the one Hackerbilt posted above) is specified as having 0.475" mounting holes. However, the parts diagram of their Mustang II brake conversion shows 7/16" bolts at the holes in the Chevy kingpin flanges. A 7/16" bolt is only 0.438", and the difference - almost .040 - would be a pretty sloppy fit. Is this typical?

    Jack
     
  11. railroad

    railroad
    Expand Collapse
    Supporting Member
    Supporting Member

    Joined:
    Apr 8, 2009
    Messages:
    1,027
    Likes Received:
    109
    Gender:
    Male
    Occupation:
    retired
    Did someone suggest the solid round bar steering arm? It should be nearly a bolt on and you can get in chrome, so no paint needed.
     
  12. Hackerbilt

    Hackerbilt
    Expand Collapse
    Active Member

    Joined:
    Dec 21, 2011
    Messages:
    355
    Likes Received:
    142
    Gender:
    Male
    Occupation:
    Collision Tech
    Thats a pretty good suggestion.
    No idea if one is available for a Chevy spindle but you have to keep in mind that the round bar has to be larger in that area to provide a shoulder to the spindle so it doesn't just pull thru. Still might not give enough room right out of the box.
    However, it MIGHT be possible to do some minor grinding just past that shoulder to allow for banjo bolt clearance...especially if the banjo bolt and even the hose end itself are modified slightly as well.
    The only way to know for sure is to do a mockup using some scrap that replicates the thickness of the required round bar steering arm.
    Now...if the steering arm is actually hollow tube or deeply drilled to take a bolt into the steering arm itself, you have to take the wall thickness into account as well. Can't grind beyond a safe point on that either!
     
  13. TriodeLuvr

    TriodeLuvr
    Expand Collapse
    Member

    Joined:
    Aug 8, 2013
    Messages:
    414
    Likes Received:
    57
    Gender:
    Male
    Occupation:
    Engineer
    The real question is whether I should replace it. I've been giving that a lot of thought. The two bolts in the steering arm are different sizes. The one that's interfering is 1/2" x 20. The other is smaller, probably 7/16" (I'll measure it when I get home today). The smaller bolt goes through the kingpin flange and is secured with a nyloc nut on the back side. The larger 1/2" bolt is threaded directly into the kingpin flange.

    Last night I was thinking that I should replace the steering arm, then work out the problem from there. However, it's possible that this larger bolt wasn't a builder error, that it might have been necessary due to an access problem. Maybe there's no way to install a nut on the back side of that bolt after the rotor is installed (again, I'll check after I get home today). If that's true, it won't help to buy a new arm with a smaller hole unless I also install a 7/16" Helicoil in the kingpin flange. The problem is, the smaller head on a 7/16" bolt won't completely resolve the interference issue. So, for all that work, the banjo will still hit the bolt.

    At this point, there are actually two distinctly different issues in this area of the car. First, the head of the 1/2" hex bolt is so large that the inner curvature of the steering arm at the right angle bend above the bolt doesn't allow me to fully seat a socket on the bolt head. I can remedy that by replacing the bolt with a socket head cap screw. Unfortunately, the head of a 1/2" cap screw is the same diameter as the flats of the hex bolt, so this won't do anything to resolve the interference with the banjo.

    I've installed an extra washer between the mount and the caliper, and that has levered the caliper out just enough to be able to tighten it down. This isn't a permanent fix - the banjo bolt still hits - but now the car is driveable. I plan to visit a few motorcycle shops later this week to see if I can find a thinner banjo fitting. If that fails, I'll see about having one or two machined. That, and maybe thinner crush washers, will probably be the only viable solution.

    Many thanks for everyone's comments and suggestions! :thumbsup:

    Jack
     
    #13 TriodeLuvr, Apr 29, 2014
    Last edited: Apr 29, 2014
  14. RPM

    RPM
    Expand Collapse
    Administrator
    Staff Member Forum Sponsor

    Joined:
    Oct 16, 2007
    Messages:
    5,074
    Likes Received:
    662
    A counter sunk Allen head would fix that. You would have to have the bolt hole counter sunk, but then it would clear.
     
  15. 2old2fast

    2old2fast
    Expand Collapse
    Active Member

    Joined:
    Mar 25, 2010
    Messages:
    2,325
    Likes Received:
    486
    Gender:
    Male
    Occupation:
    sorta retired
    There is no room for a bolt head or nut on the wheel side of that bolt. I used a 7/16" flat socket head bolt [requires countersunk hole in spindle flange] then a standard 11/16" nut on the steering arm side, along w/machining the caliper banjo mounting surface[spot facing] "thinning" the banjo fitting & the banjo bolt head , I have a solid 1/16" clearance. You shouldn't complain about having to modify something that is not being used "as designed"....
    dave
     
  16. TriodeLuvr

    TriodeLuvr
    Expand Collapse
    Member

    Joined:
    Aug 8, 2013
    Messages:
    414
    Likes Received:
    57
    Gender:
    Male
    Occupation:
    Engineer
    That's an excellent idea, I'll keep it in mind. The situation would be a lot easier to deal with if it wasn't already drilled and tapped for a 1/2" bolt. There's not enough meat left on the existing arm to cut a CS that large.

    Dave, I only have two issues with modifications. First, I consider modification of maintenance items like calipers to be a last resort. It's the sort of thing I curse previous owners for when I have to deal with it later. The second issue is downtime. Sometimes it's necessary, but my first choice - all else being equal - is always the method that gets the car back on the road as quickly as possible. FWIW, I'm hoping to get the 1/16" clearance you mentioned by simply changing out the banjo. Some of the motorcycle parts look to be 1/4" thick or less. Maybe it won't work, but I'm gonna try.

    Jack
     
  17. 2old2fast

    2old2fast
    Expand Collapse
    Active Member

    Joined:
    Mar 25, 2010
    Messages:
    2,325
    Likes Received:
    486
    Gender:
    Male
    Occupation:
    sorta retired
    Be aware that IIRC the banjo bolt is 7/16-24 thread , not the more common 7/16-20. Another one of ford's "better ideas" AFA " maintenance items" , I think the calipers on my DD pickup are 13 years old & have 210K miles on them w/ 1 pad change , I guess that's maintenance , just not very often !!!
    dave
     
  18. Track-T

    Track-T
    Expand Collapse
    Active Member

    Joined:
    Sep 8, 2007
    Messages:
    1,145
    Likes Received:
    35
    Gender:
    Male
    Just my 2 cents worth. Speedways kit does not come with mustang calipers. they come with GM metrics
    Also the bleeder should be on top to remove the air.
    I have the speedway kit and yours looks like the past owner rigged a system.
    do you have a pic of the mounting plate the caliber mounts to?
    where the steering arm bolts on should be the same, mine are the same dia. but one is longer
     
  19. Track-T

    Track-T
    Expand Collapse
    Active Member

    Joined:
    Sep 8, 2007
    Messages:
    1,145
    Likes Received:
    35
    Gender:
    Male
    [​IMG] Heres a pic of mine from speedway.... tube axle,54 chevy spindles, mustang rotors, GM metric cal.
    Bleeder on top brake line on bottom
     
  20. 2old2fast

    2old2fast
    Expand Collapse
    Active Member

    Joined:
    Mar 25, 2010
    Messages:
    2,325
    Likes Received:
    486
    Gender:
    Male
    Occupation:
    sorta retired
    Speedway does {or did} offer kits w/ either must II or gm metric calipers , jack & I have the mustang II
    dave
     

Share This Page


Advertise with Us! Advertise with Us! Advertise with Us!

SSL Certificate