Garage Merch                Ron Pope Motorsports                California Custom Roadsters               

Keepers build

I have been using 'T nuts" for a long time and have yet to have a failure. I have even used them as nut plates for things like tail light mount thread inserts in frame rails.

Another idea for a foot reat for your left peg is to make up acopy of your brake pedal, weld it to a plate and bolt it to the floor. It looks like a clutch set up then.

Ron

Thanks for the info on the t-nuts.

Thats a great idea for the foot rest, sure would throw some folks for a loop!
 
After all the talk about interiors I decided that my bench needed a cover, well that and I need to keep the grinding dust and stuff out of the foam.

I only got some patterns done tonight, but these will be the base for the covers. I expect I will make these covers at least twice so I went ahead and made a full set of patterns. Here is how I did it.

Supplies: (Well what I used anyway)

Carpenter square.
Long straight edge.
Poster board.
pencil, marker
razor
scissors
acetate (clear vinyl for patterns)
And of course the seat.

2%20june%202011%20003.JPG_595.jpg


I started with the poster board, I made a few mistakes then realized, I only had to make one side, then copy it for the other....

2%20june%202011%20002.JPG_595.jpg


Complete set:
2%20june%202011%20004.JPG_595.jpg


I then transferred the patterns to the clear vinyl adding the 1/2 seam allowance.

2%20june%202011%20005.JPG_595.jpg


You cannot really see them in the pic...now I can move on to the vinyl.
 
OKay so today I took a stab at making the cover bench cover. This is my first attempt of doing anything like this so it took most of the day to do the bottom. Hopefully the top will go a little quicker. Not that it matters much!

So here we go:

Transferred the patterns to vinyl:
4%20Jun%202011%20001.JPG_595.jpg


Cut it all out and transferred the reference marks.
4%20Jun%202011%20003.JPG_595.jpg


Glued it to foam and cut it out, marked out the pattern and sewed them up (forgot to take a pic) I went with 1 1/8 between pleats.
4%20Jun%202011%20004.JPG_595.jpg


Then I jumped in and started sewing. This was the easy part. I did not go with any decorative seams as I am not confident enough in my skills to do so. Maybe on the next set.
4%20Jun%202011%20007.JPG_595.jpg


Next the centers: Starting to look like something now.
4%20Jun%202011%20008.JPG_595.jpg


Then came the skirt. Next time around I won't center the seam!
4%20Jun%202011%20009.JPG_595.jpg


4%20Jun%202011%20010.JPG_595.jpg


SO CLOSE!!! Even with all the reference marks, I some how missed the point......It did not really show up until i started stretching and stapling.
4%20Jun%202011%20015.JPG_595.jpg


Lots of stapling:
4%20Jun%202011%20014.JPG_595.jpg


And the finished seat bottom:
4%20Jun%202011%20018.JPG_595.jpg


4%20Jun%202011%20019.JPG_595.jpg


All in all I am happy with it. I will do a couple things differently on the next version.

Those that are wondering, the final version of this seat/interior will be a much lighter grey.

Now I just need to do the back.
 
Looks great you have a lot of nice pics posted do you clock in and out every time you work on it just so you know how many hours in it?LOL probably enjoy it but don't want to know the hours.
 
Looks great you have a lot of nice pics posted do you clock in and out every time you work on it just so you know how many hours in it?LOL probably enjoy it but don't want to know the hours.

HAHAHA, not a chance. If I totaled up the hours I have spent on this, well it would be a 6 figure car! and I am cheap...lol

There is a 2nd photo album with more pics. I cannot change my signature to include it. I have close to 300 pics I think so far.
 
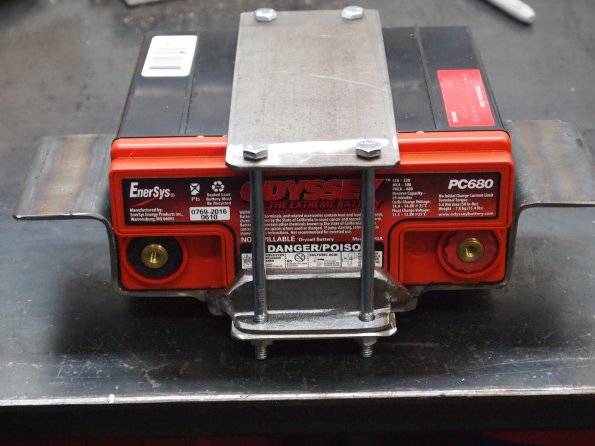
Only had a short time in the garage today, so I finished up my battery box. Just need to drill the mounting holes and I will be all set.

5%20Jun%202011%20004.JPG_595.jpg


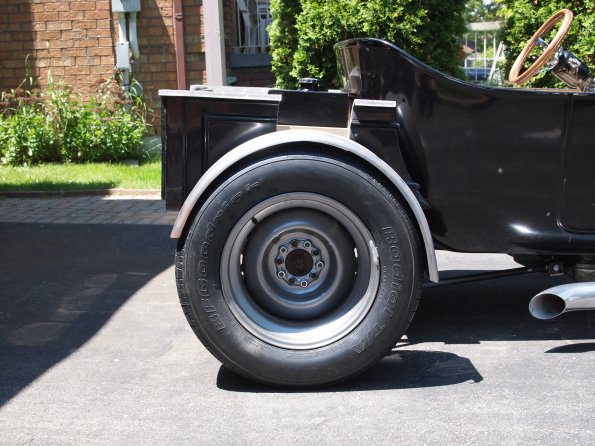
The way its set up its pretty much invisible from the side of the car:

5%20Jun%202011%20003.JPG_595.jpg


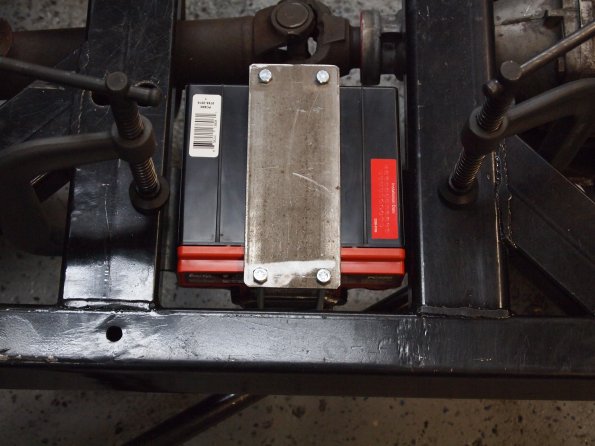
Fits nicely between the cross members:

5%20Jun%202011%20001.JPG_595.jpg


I originally thought to fully shield the battery from the bottom, but everyone said not to be to concerned about it.
 
I continued on with the interior tonight. Screwed it up once, got lucky and repaired it without it showing up in the final product. Here we go:

Laid out the pleats:
9%20Jun%202011%20001.JPG_595.jpg


Skipped a couple photos!! Here is the main panels sewn together:

9%20Jun%202011%20004.JPG_595.jpg


After I had these sewn together I put it up next to the base and stared at my mistake, somehow I added the seam allowance in the middle panel twice, so it was an inch to wide, resulting in none of the panels/pleats matching up. I am still scratching my head trying to figure out how I screwed that up!

So I ripped it apart and hoped for the best:
9%20Jun%202011%20005.JPG_595.jpg


Trimmed the extra off (then went and fixed my template!!):
9%20Jun%202011%20006.JPG_595.jpg


Then sewed it back up, I moved the pleated panel in 1/8 an inch to cover up the holes from my mistake, I got real lucky this time, all part of the learning curve I guess.

Here is the cover loose over the seat, I need to pick up some listing wire before I can do the final install.

9%20Jun%202011%20007.JPG_595.jpg


Once I tighten up the cover, the pleats will match right up:
9%20Jun%202011%20008.JPG_595.jpg


Now to make some door panels, rear panel, and a dash.
 
You must have a "No Fear" t-shirt! What I like about your build is the fact that no matter what your faced with, you go for it. Thanks for posting your build thread here. It has to be inspirational to many.

Ron
 
Bit of an update. Today was a great day to be outside, sunny 75 with a light breeze :) So seeing that it was a nice day, I installed everything I have and brought her out into the daylight.

The original plan today was to determine how much I am going to stretch the bed. So here was the process.

This is a 9 inch stretch, this puts the bed end "u" channel even with the end of the tire. Looked okay but not what I wanted.

19%20Jun%202011%20001.JPG_595.jpg


Since I plan on making/installing fenders I thought I would put them on while lining
things up: (its a little crooked here)
19%20Jun%202011%20002.JPG_595.jpg


Next up was a 12 inch stretch, this gave me plenty of room in the bed and looked the best to me:
19%20Jun%202011%20011.JPG_595.jpg


3/4 shot:
19%20Jun%202011%20012.JPG_595.jpg


Here is me playing around trying to determine how I am going to build the bed subframe:
19%20Jun%202011%20017.JPG_595.jpg


3/4 front shot: Notice the new steering wheel :) The front fenders will be worked a bit to round them off more.
19%20Jun%202011%20004.JPG_595.jpg


Finalized the shock mount placement:
19%20Jun%202011%20009.JPG_595.jpg


Now that know how much I am going to stretch things I can start on the glass work. Not really looking forward to that!!!
 
I agree with the final stretch. It looks great! One other thing that I admire on your build is that the grill shell does not stick up higher than the cowl. Some guys do not take the time to do it that way and they look out of wack. Keep up the great work and you'll have a ride that you'll really be proud of.

Jim
 
really nice progress. I like the box stretch good plan for the wifes suitcase.
 
Worked on the bed framing today. The fiberglass shell will be bolted to this frame allowing me to unbolt the bed from the body and the frame and pull the whole unit out as one piece. Should make working on the jag rear easier if it needs to happen.

With the bed attached to the body, on its rubber spacers, the bottom of the bed is exactly 2 inches lower then the frame, which made it perfect for me to use the 2x2 tube I had on hand.

Here is the mock up as I am taking measurements:
27%20June%202011%20002.JPG_595.jpg


All the pieces cut out:
27%20June%202011%20003.JPG_595.jpg


All welded up:
27%20June%202011%20005.JPG_595.jpg


All mocked up:
27%20June%202011%20006.JPG_595.jpg


All I need to do know is make up a couple of brackets to attach it to the frame and I am all set.

The fiberglass shell will be bolted to this frame allowing me to unbolt the bed from the body and the frame and pull the whole unit out as one piece. Should make working on the jag rear easier if it needs to happen.

Over this I will have a piece of sheet metal bent to fit the bed floor, over that I have some spalted maple that might look pretty nice, have to wait and see if I have enough on hand to complete the bed, if not some white oak will do.
 
So it was finally time for fiberglass work, I have been dreading this task for months. So I went to my local fiberglass shop and picked up:

2 gallons of poly resin
6 yds of 1.5 oz fiber mat
and all the tools, buckets, brushes etc etc.

I have not played with fiberglass in about 17 years (and that was a surf board repair!), so I started small with the tailgate:

I marked, cut out and taped the tailgate to the bed. Then I laid in 3 layers of glass to attach it:

2%20Jul%202011%20005.JPG_595.jpg


2%20Jul%202011%20006.JPG_595.jpg


2%20Jul%202011%20007.JPG_595.jpg


I started re-framing my trans tunnel with some chicken wire, the old setup I had was about 2 inches wider on each side then this setup.

The tunnel is made up of 4 layers of mat, I did seem to get a bunch of air pockets in the glass, mostly around the chicken wire, its not big concern and it will be covered up with paint and carpet :)

On the inside I laid a full floor piece, the firewall, and both sides, by then I had run out of resin......

There are not during pics as most of the time I was covered in resin and little fiberglass strands!!

2%20Jul%202011%20002.JPG_595.jpg


2%20Jul%202011%20004.JPG_595.jpg


So I still need to finish the back, add another 2 layers to the sides and finish the bed stretch.

Did I mention I hate fiberglass work?
 
Best thing I bought was a box of disposable gloves and a good mask.Especially for the sanding.
This is the style I like best those little dust masks you can burn for all I care.These let you breathe better and are less than 20 bucks.They have an exhale valve under the 3M
41Tn%2BcaHw9L._SS500_.jpg
 

     Ron Pope Motorsports                Advertise with Us!     
Back
Top