Garage Merch                Ron Pope Motorsports                California Custom Roadsters               

Keepers build

i agree with ORF ... lol In a perfect world you would want the drag link and the control bar (hairpin) to travel in the same arc. In our world we have to make allowances for other suspension componantes and as such things don't always work out as the "book" says. You have a real nice build going here, well thoughtout and exicuted. My hats off to you.

Ron
 
Like was said, the two do not ark the same anyway, it looks fine, (way better than two different angles) where you have it now, just make sure the rod end, does not get into any bind at all during full turns... The axle will rock more with shorter radius rods than longer ones...
 
I'm not trying to be a wet blanket here,but..... isn't it worth the effort totry and eliminate as much bump steer as possible ? there was a commercial of few years back that asked; "if good enough is good enough,when is it good enough? or something to that effect.


dave
 
I thought about unbolting the front leaf spring and seeing how things act the way it is. I have nothing but time as the driving season is over up here and these little things give me more excuses to get out in the garage.

I do agree that the way it sits now, it just looks right with the bars all running along the same lines. Does not look distracting. Maybe I will leave well enough alone and move on to figuring out the brake mounts.

Thanks for all the advice.

Anyone have some plans for a brake mount? :)
 
Thanks great to hear, mine are almost dead on parallel then:
11%20oct%202010%20011.jpg_595.jpg

I like this, the drag link, radius arms and the headers all parallel. It looks like it was done on purpose. :thumb:
 
I'm not trying to be a wet blanket here,but..... isn't it worth the effort totry and eliminate as much bump steer as possible ? there was a commercial of few years back that asked; "if good enough is good enough,when is it good enough? or something to that effect.


dave

It is worth the effort. However as little suspension movement as there is. bump steer is not a problem. So, why not do more for the looks also?
 
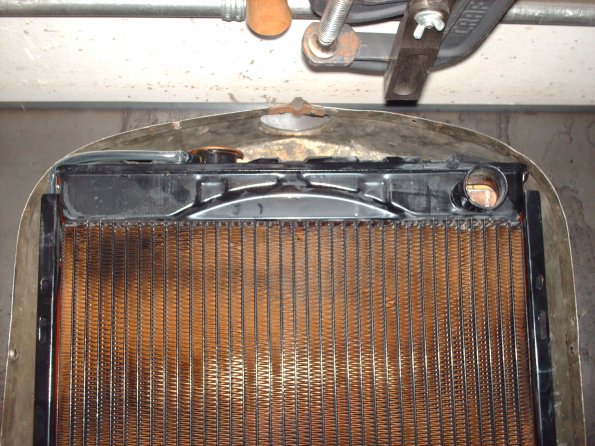
Today I spent some time trying to find the right look for my rad shell and my headlights. First thing I did was head to the local rad shop with my rad shell in tow. I had called him on Thursday asking about a 66 mustang rad. He had one in stock! So I asked him to hold it for me so I could make sure it was going to fit my shell. Long story short, it fit like it was made for it. He is even offered to relocate the filler tube for me all for around $240. Not bad for a 3 row copper rad :) Then he went on to show me his 39 coupe, 38 2 door sedan, Lotus Esprire twin turbo v8 and other toys he had in the shop, I had to run away before I offered to buy the 38 2 door.

Anyway, with the general size in mind I got out the rad shell, some painters tape and some patience.

Here was the start, the shell is about 1/2 to high in this picture, it did not seem right to me:

23%20Oct%202010%20019.JPG_595.jpg


So I moved it down and readjusted the tape: This one just seemed right to me so I left it, all the lines kind of flowed.

23%20Oct%202010%20017.JPG_595.jpg


23%20Oct%202010%20016.JPG_595.jpg


Once I got the rad shell in the right spot I started playing with head light location. I am using stock 7 inch Model A (I think) headlamps, they will be retrofitted with some halogens. These lights along with the rad shell are OEM parts, they are not perfect have some dings and scratches, but I figure they are 80 years old, they are allowed to have some character.

First attempt they were to low and to far apart.

23%20Oct%202010%20021.JPG_595.jpg


To aid me in locating the headlights, I once again got out the tape to help me get the angles to flow, I wanted the headlights to be inline from the top of the tires, to the top of the rad shell. After an hour or so of tweaking I think I finally got the look I was after:

23%20Oct%202010%20023.JPG_595.jpg


Once I got them in the right spot, I took some measurements, I will attempt to make the headlight stands myself so I can put them just where I want them.

Afterward the welder and I spent some time together, I did a lot of welding, a lot of destructive testing and finally found the sweet spots my machine likes.

All in all it was a pretty good day, while I did not do a lot of "work" I got a lot done.
 
Headlite placement is such an individual thing. I would like to see them a little lower and closer in to the radiator. The hood will be nice. How will you position it on the cowl. Make a lip of some sort? Lines look good. What type of rad shell is that? Will the hood be a "shorty" or will you try for a full hood? I like the "shortys" myself. Throw on some louvres and leave it bare aluminum. Leather belts to hold it down. Paint the car British Racing Green. I don't know why, that rad shell reminds me of MGTC or TD. Worked A LOT on them in my youth. If you're not familiar with the little cars, Google MGTC or MGTD and have a look.

Must be in an "English" mood today. Might as well reshape the cowl to include the semi circle instrument cluster and the little, folding wind screens. It would be neat.

Enough day dreaming for today. Have a good weekend, John
 
She looks great :hoist: but, I personally like the top of the headlights even with the top of the tire. Still a great build though. :thumb:
 
Keeper,

Nice build!! I like it. I didn't notice what state you live in, but some states have headlight height laws that need to be looked at also. Oregon says 22", but they almost always look the other way in the case of the T buckets. something to concider however.

Russ
 
Keeper,

Nice build!! I like it. I didn't notice what state you live in, but some states have headlight height laws that need to be looked at also. Oregon says 22", but they almost always look the other way in the case of the T buckets. something to concider however.

Russ

Ahhh thanks, I did not even consider that. I will go see what I can find.

Oh and I am in Ontario.
 
Today I spent the day in the garage making mounts for the radiator. I spent some time trying to sort out how I wanted things to fit inside the shell.

I got it to fit as high as possible in the shell while leaving about 1/4 inch for clearance in the corners:

1%20nov%202010%20009.JPG_595.jpg


First thing I had to do was drill out the rivets that held the steel support in the bottom of the shell. I plan on reusing this piece later in the process, it will need to be shortened as in stock form it flares the bottom of the shell out about an inch. These were solid brass rivets. I will try and find some to replace 2 of the 4 I drilled out in each side.

6%20nov%202010%20012.JPG_595.jpg


Next I started looking at ways to mount it in the shell. I got lucky with the factory mounting points as one lined right up with holes that were already in the shell. I just made some simple "L" brackets and bolted the rad in.

6%20nov%202010%20015.JPG_595.jpg


6%20nov%202010%20016.JPG_595.jpg


Once it was bolted in I started looking for ways to mount the bottom. I came up with a plan to use the stock bottom mounting location.

TBC
 
Okay so I will use the stock bottom mounting location:

1%20nov%202010%20006.JPG_595.jpg


I started by making straps to fit the channels.

6%20nov%202010%20004.JPG_595.jpg


They were to tight as the bottom flares a bit so I used my custom spreader:

6%20nov%202010%20008.JPG_595.jpg


Worked like a charm so I repeated the process:

6%20nov%202010%20009.JPG_595.jpg


Next I needed a strap to connect the two. I added a drop so I could use a bolt to mount it to the bottom.

6%20nov%202010%20010.JPG_595.jpg


I recently picked up a 20 ton press, made bending this simple. Trimmed to fit:
6%20nov%202010%20011.JPG_595.jpg


Welded up:
6%20nov%202010%20018.JPG_595.jpg


I plan on giving this mount and the l-brackets a dip in "plastidip" this will keep the metal on metal contact from squeaking.

Next up was the bottom mount. I needed to trim about 1/2 inch out of the center to make everything fit the radiator.

6%20nov%202010%20006.JPG_595.jpg


Cut and working on the amount that needs to be chopped out:

6%20nov%202010%20014.JPG_595.jpg


Once that was determined it was chopped and ready to weld:

6%20nov%202010%20017.JPG_595.jpg


TBC
 
After the bottom was welded up and smoothed I made the jump and drilled some holes in my shell and bolted the bottom back on:

6%20nov%202010%20019.JPG_595.jpg


I plan on tracking down some brass rivets and use them in the top two holes. The bottom two will be below the top of the frame and used to hold the lower mount that will connect to the frame.

Once I got the bottom mounted back in I bolted in the lower mount. This setup will allow me to remove the radiator by simply unbolting the top two l-brackets and tipping the radiator out of the shell.

6%20nov%202010%20020.JPG_595.jpg


So this is where I currently sit, I could not bring myself to trim the bottom of the shell just yet. I don't want to screw it up! Next up I will be making some mounts that will fit inside the frame so I can bolt the radiator down.
 
Try and think of it as a muffler at least, mounted in rubber, kills vibration and lets things move a bit as needed, the water hoses do a wonderful job of holding the top of the shell in place, a nice fitting molded hose... Looking very nice so far... :)
 
Finally got around to mounting the shell and rad to the frame. Made up a couple of simple mounts, then spent 2 hours getting it to line up!

I have a touch over 1 inch fan clearance to the rad, thats close enough for me!

11%20dec%202010%20031.JPG_595.jpg


Simple mounts:
11%20dec%202010%20028.JPG_595.jpg


Front shot:
11%20dec%202010%20030.JPG_595.jpg


Lots of space in front:
11%20dec%202010%20038.JPG_595.jpg


Drivers shot:
11%20dec%202010%20033.JPG_595.jpg


Now I need to figure out some sort of grill, I am thinking of a 3/8 ss screen or something close to it.
 

     Ron Pope Motorsports                Advertise with Us!     
Back
Top