


You are using an out of date browser. It may not display this or other websites correctly.
You should upgrade or use an alternative browser.
You should upgrade or use an alternative browser.
My ProjecTee
- Thread starter DonnyRay
- Start date
Kevinrevin
Member
Thanks, Donny Ray.


Kevinrevin
Member
Nice axe!
DonnyRay
Well-Known Member
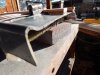
I finished covering my 4'x4' sunshade with 1 1/2 oz. fiberglass mat. I made a frame for it out of 1 1/2" x 1/8" perforated angle steel. I need to primer the angle steel frame then i can bolt the fiberglass covered Luan to the frame. I still need to weld 2 pairs of angle steel ( each will form a T ). The T's will be my vertical posts that will support my angle steel & Luan top ( for the shade ).I will C clamp the T shaped posts to Leroy's table top.


DonnyRay
Well-Known Member


 I did more to my driver's door conversion. The angles on the left & right side of the door well have been swapped over. Now the angles are correct for a driver's door. Remember i started with a passenger's door kit i had to switch contours from a passenger's side to a driver's side.
Last edited:
DonnyRay
Well-Known Member
Here's the photos i promised : 


 I placed 1/8" spacers between the door edge & the door well opening. I mated the outer surface of the door to the outer surface of the door well. I ran a screw through the door well , the spacer & the door to hold everything in place. Then i made the 2 braces with the duplicated contours. I screwed everything together . Then i glassed in my pre positioned door well contours ( after i flipped them around ).
I placed 1/8" spacers between the door edge & the door well opening. I mated the outer surface of the door to the outer surface of the door well. I ran a screw through the door well , the spacer & the door to hold everything in place. Then i made the 2 braces with the duplicated contours. I screwed everything together . Then i glassed in my pre positioned door well contours ( after i flipped them around ).Attachments
Last edited:


choppedtop
Well-Known Member

Similar threads
- Replies
- 3
- Views
- 364
