


You are using an out of date browser. It may not display this or other websites correctly.
You should upgrade or use an alternative browser.
You should upgrade or use an alternative browser.
"Black Dahlia"
- Thread starter tfeverfred
- Start date
tfeverfred
Well-Known Member
Saturday, I wasted no time setting the front suspension for fit.

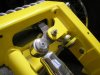
Now, one thing I have always disliked were clevis pins. So, after a chat with Ron (whose experience I totally trust) I elected to use rod ends on the rear radius rods. This allowed me to weld the brackets straight and my thinking is that the ball of the rod end will give me the angle they need to attach to the frame.

Now, one thing I have always disliked were clevis pins. So, after a chat with Ron (whose experience I totally trust) I elected to use rod ends on the rear radius rods. This allowed me to weld the brackets straight and my thinking is that the ball of the rod end will give me the angle they need to attach to the frame.
tfeverfred
Well-Known Member
tfeverfred
Well-Known Member
Good to have you back Fred. You should be rested and ready to get at it!
I'm perkier than a ruttin' buck.

tfeverfred
Well-Known Member
I was pleased to discover that I'd be able to use the factory brake line clamps.

choppedtop
Well-Known Member
I like the adjustable rear lower coil over mount, and wish that I had done that. Also the return stop on the brake pedal is good idea.
old round fart
Well-Known Member
Look close at the rod ends for clearance at the ends. You may need a cone spacer. Speedway has them.
one finger john
Active Member
WELCOME BACK !!! So what was your "welfare" like when you got back ?
John
John
one finger john
Active Member
I don't understand putting the heim balls at such an extreme angle. Wouldn't putting the rear end brackets at an angle be a better way to go ? Perhaps other members could clue me in.
John
John
tfeverfred
Well-Known Member
Look close at the rod ends for clearance at the ends. You may need a cone spacer. Speedway has them.
I did and I think I'll be okay. But I've had a bag of those spacers for a couple months, when I first thought of this idea. Thanks.
tfeverfred
Well-Known Member
I don't understand putting the heim balls at such an extreme angle. Wouldn't putting the rear end brackets at an angle be a better way to go ? Perhaps other members could clue me in.
John
It's why that ball is in there. Angle shouldn't make a difference. It's no worse than the angle on the front radius rod mounts. Also, that angle isn't as extreme as it may look. I'm just trying a different approach. In my opinion the clevis pins and the angled brackets always looked too stiff and rigid. If this doesn't work, I'll change it. But I think it'll work and I've been searching this application for a while. I think using clevis pins and an angled bracket are being done because that's the way it's been done for decades. People just got accustomed to the set up and stayed with it.
I'm by no means an innovator in any of this stuff. Do a Google search and you'll find several different ways of doing this set up. I was just pleased when I discovered this version. Thanks for the input.
Gerry
Well-Known Member
Respect for leaving the laptop behind you for a couple of weeks.
One thing about stick welds is they dont mind being ground out and another bead being put on top. Learned that 40 odd years ago from a guy that could weld spaghetti to wood.
Only one comment on the hemis. Some sort of safety washer (which I know you know about). I had these made to do it all in one.
 (2015_11_13 11_07_31 UTC).JPG")

There is more pics but I'm up against the 10 minute warning, sorry
One thing about stick welds is they dont mind being ground out and another bead being put on top. Learned that 40 odd years ago from a guy that could weld spaghetti to wood.
Only one comment on the hemis. Some sort of safety washer (which I know you know about). I had these made to do it all in one.

There is more pics but I'm up against the 10 minute warning, sorry
Last edited:
tfeverfred
Well-Known Member
Respect for leaving the laptop behind you for a couple of weeks.
One thing about stick welds is they dont mind being ground out and another bead being out on top. Learned that 40 odd years ago from a guy that could weld spaghetti to wood.
Only one comment on the hemis. Some sort of safety washer (which I know you know about). I had these made to do it all in one.
View attachment 12396
About leaving the laptop behind, there's no sound worse than a woman's high squealed, "ARE YOU KIDDING AND LEAVE ME WATCHING TV..... ALONE?" Takes the fight out of a man.
The kinda ugly welds are actually where they won't show, so I may just leave them alone. The welding on the rear brackets is a few beads and I'm considering grinding them down just a tad. I'd hate to have someone make bad comments about my rear.
My concern was penetration, so once everything is painted black and covered by the body and other assemblies the "not so perfect beads" won't bother me at all.Excellent thought and work on those Heim washers. Those look sweet!
Last edited:
choppinczech
Well-Known Member
I had these made to do it all in one.
Damn Gerry, those are nice! I've been looking for something just like that.
Gerry
Well-Known Member
Damn Gerry, those are nice! I've been looking for something just like that.
Mmm. I had these made for me. Had to pay for a spark eroding tool for the "torx" type drive socket, as the company Torx would not give us the dimensions becuase they are a trade secret??. We did out own version of a 6 star drive. Then the bottom side was designed to mimic the top with the same 6 star drive. No need for washers as the heads cover the Hemi balls, should they pop out.
They were CNC'd and then spark eroded (old style threads to boot. 1/2" UNC). Problem is they worked out a 50 bucks a piece and I have 16 on the T. I know its a lot of money and most people will not see them but I have to say I smile every time I look at them. The tapered heads reflect the tapers that are everywhere on the T.
Dont see anything wrong with the welds; just a plus for stick welding that makes me use it when I can.
Ah found the pic.

G
Attachments
Last edited:
tfeverfred
Well-Known Member
In this side view, if my calculations are correct, this is the front ride height.


tfeverfred
Well-Known Member
Mmm. I had these made for me. Had to pay for a spark eroding tool for the "torx" type drive socket, as the company Torx would not give us the dimensions becuase they are a trade secret??. We did out own version of a 6 star drive. Then the bottom side was designed to mimic the top with the same 6 star drive. No need for washers as the heads cover the Hemi balls, should they pop out.
They were CNC'd and then spark eroded (old style threads to boot. 1/2" UNC). Problem is they worked out a 50 bucks a piece and I have 16 on the T. I know its a lot of money and most people will not see them but I have to say I smile every time I look at them. The tapered heads reflect the tapers that are everywhere on the T.
Dont see anything wrong with the welds; just a plus for stick welding that makes me use it when I can.
Ah found the pic.
View attachment 12398
G
Gerry, do you have more pics of your front end? I like what you've got going on there.
tfeverfred
Well-Known Member
Yep, loads of pics but I don't want to hijack your thread.
Are they in your build thread? I must have missed them.
tfeverfred
Well-Known Member
Okay, had a smooth day at work, came home and took the front end pieces off my frame in preparation for some more welding. Tomorrow I'll touch up a few of the welds that keep buggin the hell out of me. On a side note, a good friend is getting ready to send me a 9" Ford pumpkin. When I first planned out this build my intention was to run a 9" rear, but cost and application needs led me to the S10 rear. So, I'll take the 9" pumpkin and build a rear end for the future.
Oh, take a look at the Model A frame in the back ground of this pic. The madness never ends and I have plans for that frame. Next build? Pinched rails and a roadster pick up? Say it ain't so!
Oh, take a look at the Model A frame in the back ground of this pic. The madness never ends and I have plans for that frame. Next build? Pinched rails and a roadster pick up? Say it ain't so!
Similar threads
